Carving a pot
+3
Klaudia & Martin
Khaimraj Seepersad
Stone Monkey
7 posters
Page 1 of 1
 Carving a pot
I started experimenting with clay a couple of years ago and tried various methods of construction but was never really happy with the outcome as far as overall finish I wanted to achieve. An additional problem was trying to make really small pots with my big clumsy fingers, that was when I started carving.
Since then I havent stopped and over that time a few people have asked about my methods so finally I have done a little photo series to share. A solid block is roughly trimmed to size, as I want a rounded corner they have been cut & roughly hollow out the core.
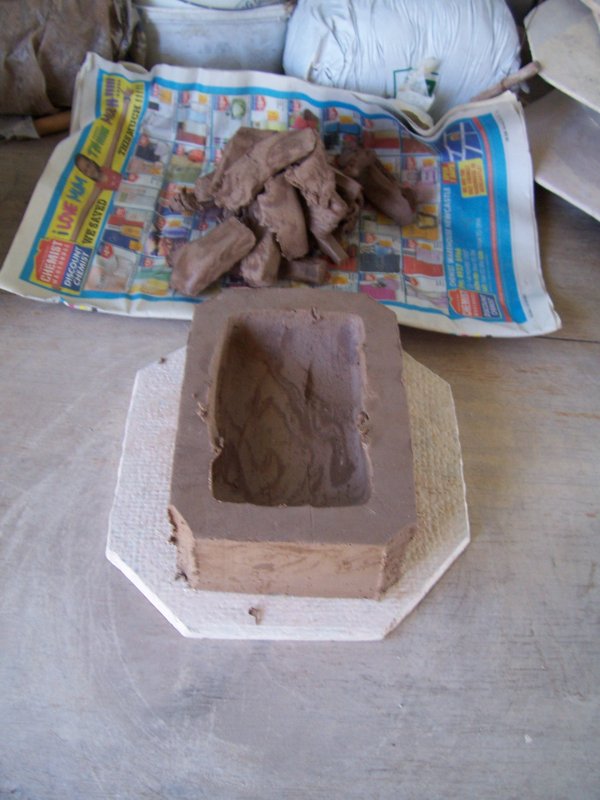
Now to give the first corner its shape, this will be refined in later stages but I try to get the line right first time.
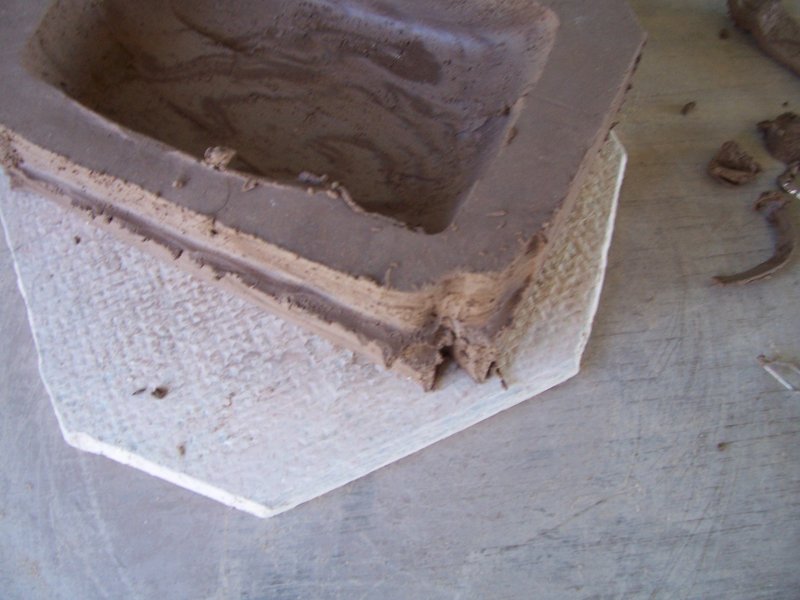
Clean the line across the front & round the next corner then follow the same line with a deeper cut into the clay to form a rim.
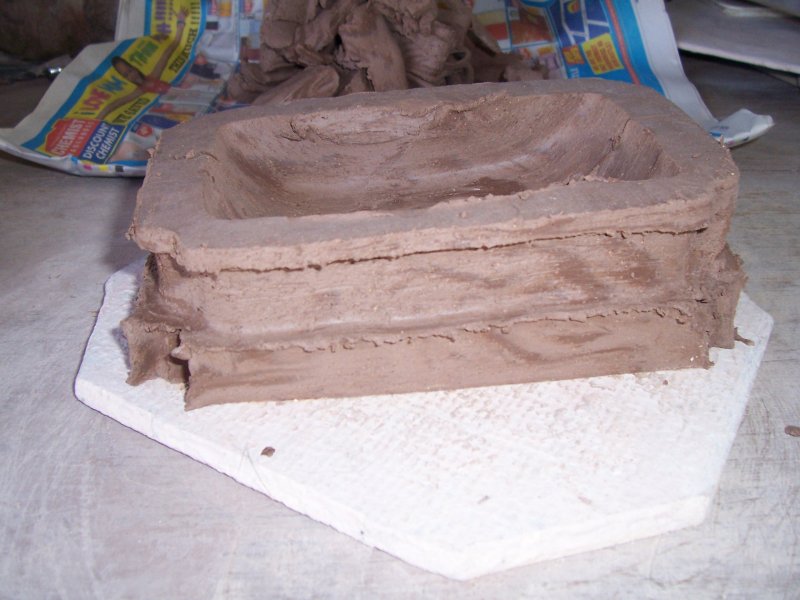
Work right round till all four sides are done.
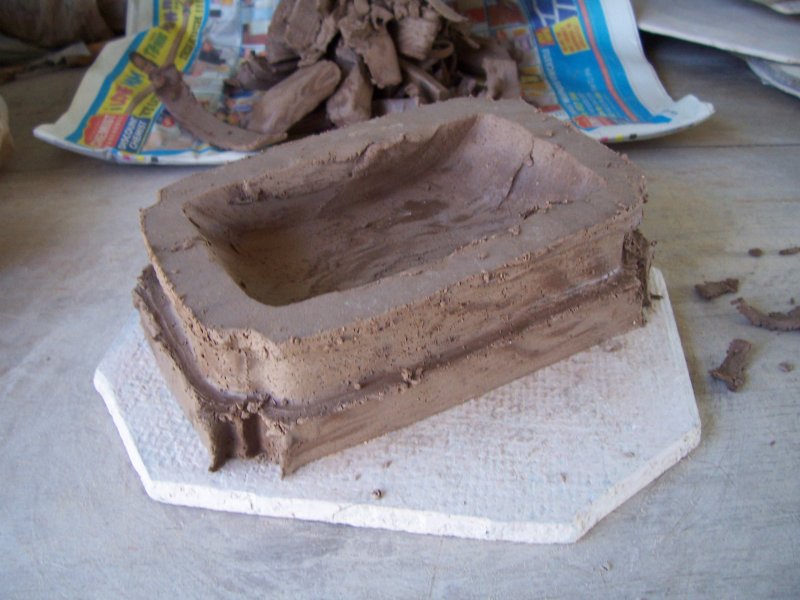
Next is to trim the lower half of the block, a little out from the last cut to give a bottom rim. Then start cleaning out the core following the now established outer line.
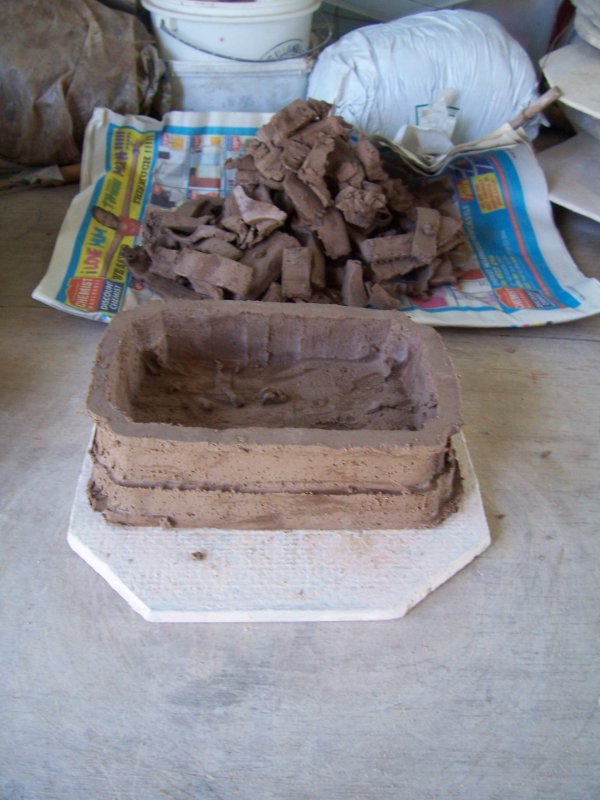
Flip the block over & cut the line of the feet a little deeper than the main face of the pot.
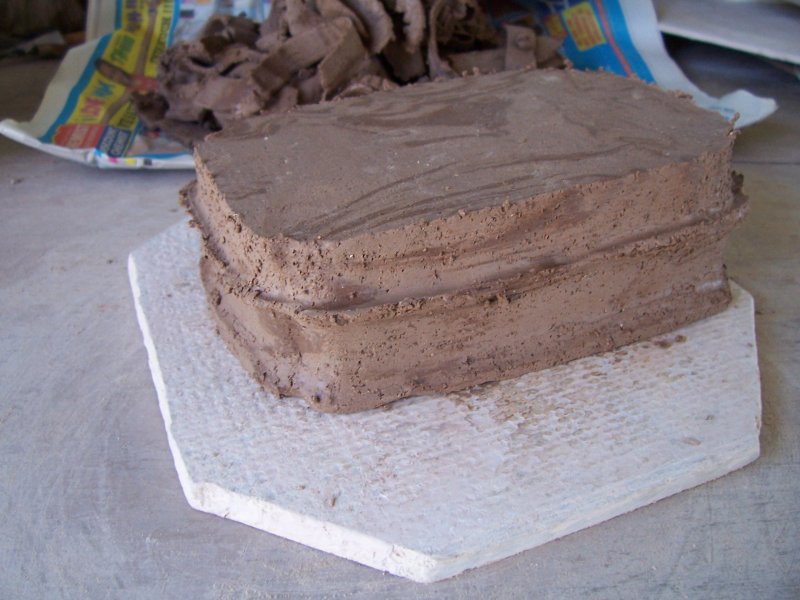
I flip it back over & give the inside its final trim, leveling the bottom & cutting the main drainage hole.
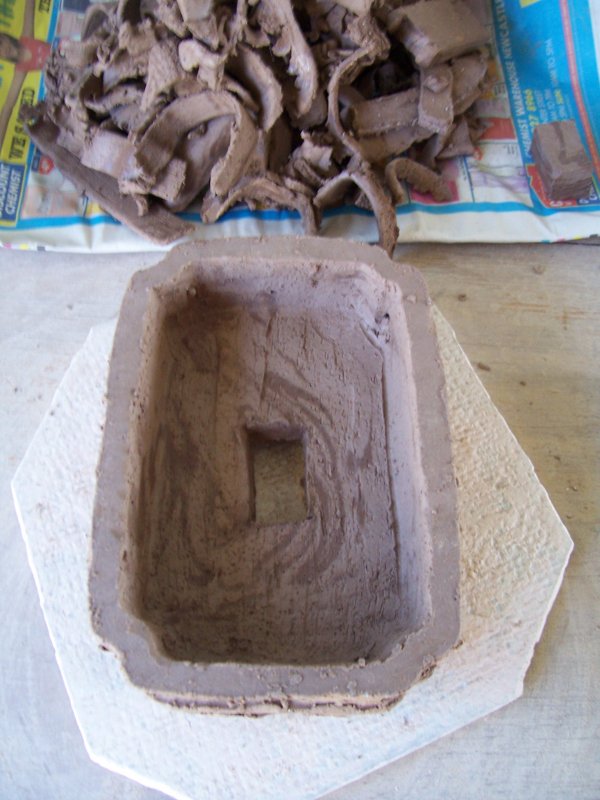
Back over onto its rim & start working on the underside & feet. Be careful at this stage to not stretch the clay that will form the floor.
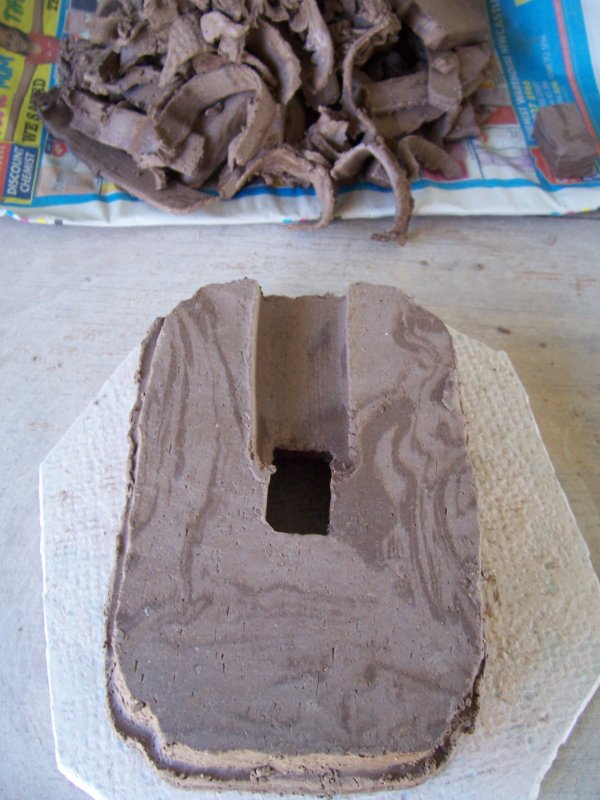
Now the main lots cleared out the feet can be trimmed down to the right height.

First round of work completed its off to the drying cupboard, it looks pretty messy at this stage but the basic form is there.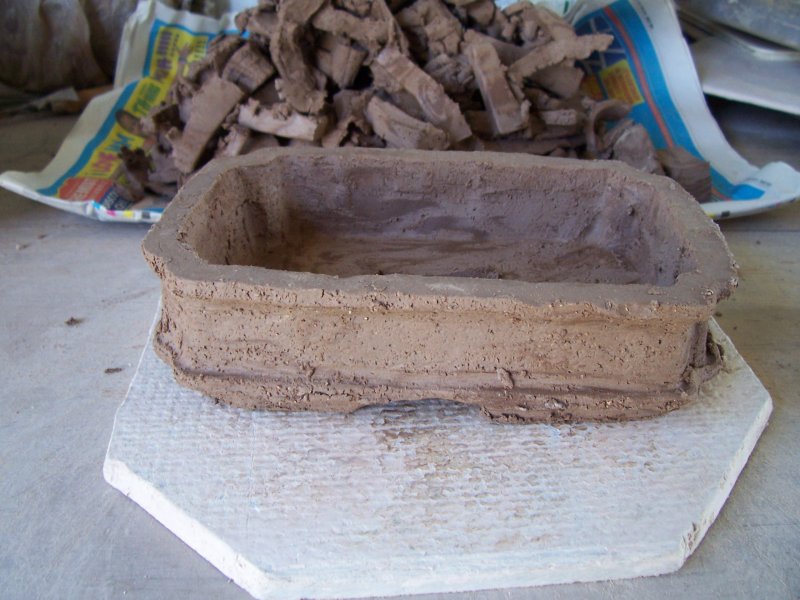
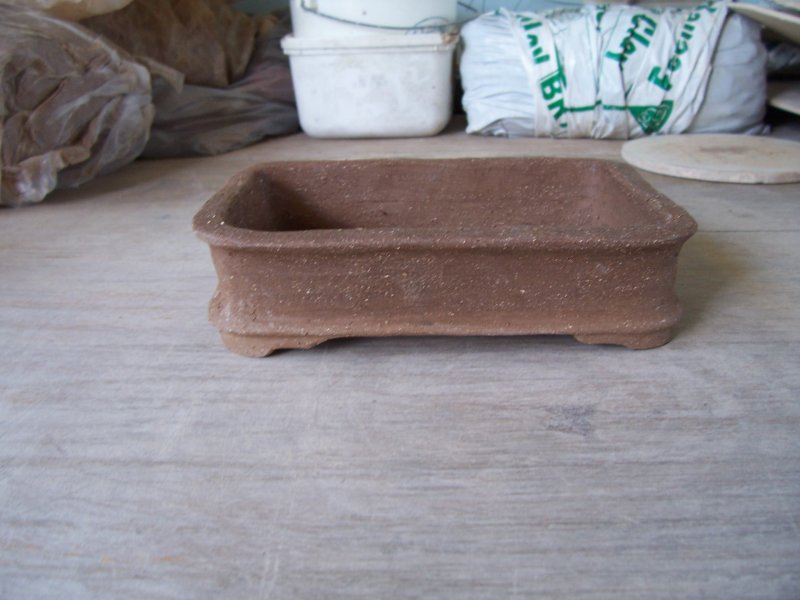
After a day or two the clay has dried enough for me to give the pot its final trim, removing all the dags & bobs. The pot is then returned to the drying cupboard again until it is completely dry. This is a similar pot that is finished & waiting to be fired.
I hope this has shown how easy it can be & encourage others to maybe try their hand.
Matt
Since then I havent stopped and over that time a few people have asked about my methods so finally I have done a little photo series to share. A solid block is roughly trimmed to size, as I want a rounded corner they have been cut & roughly hollow out the core.

Now to give the first corner its shape, this will be refined in later stages but I try to get the line right first time.

Clean the line across the front & round the next corner then follow the same line with a deeper cut into the clay to form a rim.

Work right round till all four sides are done.

Next is to trim the lower half of the block, a little out from the last cut to give a bottom rim. Then start cleaning out the core following the now established outer line.

Flip the block over & cut the line of the feet a little deeper than the main face of the pot.

I flip it back over & give the inside its final trim, leveling the bottom & cutting the main drainage hole.

Back over onto its rim & start working on the underside & feet. Be careful at this stage to not stretch the clay that will form the floor.

Now the main lots cleared out the feet can be trimmed down to the right height.

First round of work completed its off to the drying cupboard, it looks pretty messy at this stage but the basic form is there.

After a day or two the clay has dried enough for me to give the pot its final trim, removing all the dags & bobs. The pot is then returned to the drying cupboard again until it is completely dry. This is a similar pot that is finished & waiting to be fired.

I hope this has shown how easy it can be & encourage others to maybe try their hand.
Matt
Guest- Guest
 Re: Carving a pot
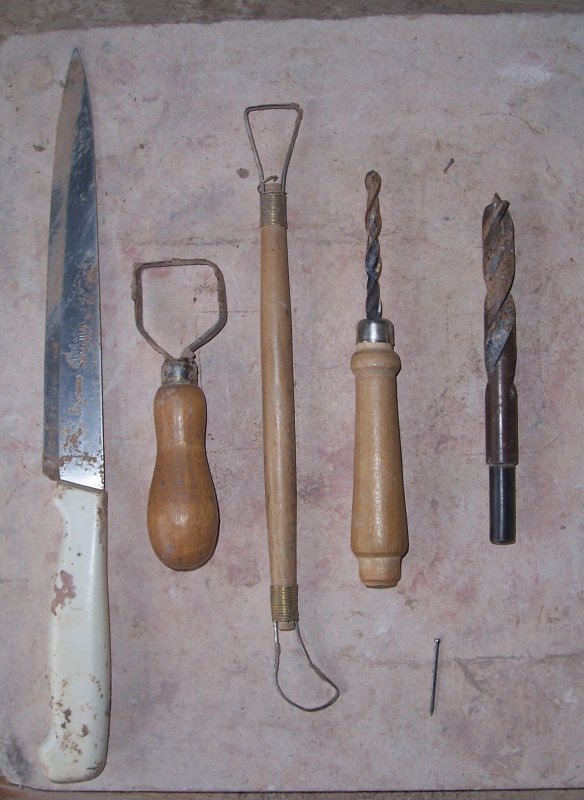
I was asked on another thread so heres a pic of my tools, knife for trimming the blocks and making main drainage holes, large & small drill bit (for wire/drainage) & small nail (for adding my chop). I have a few other shaped carving tools but tend to stick with the large one shown for bulk removal & the smaller for most other detail.
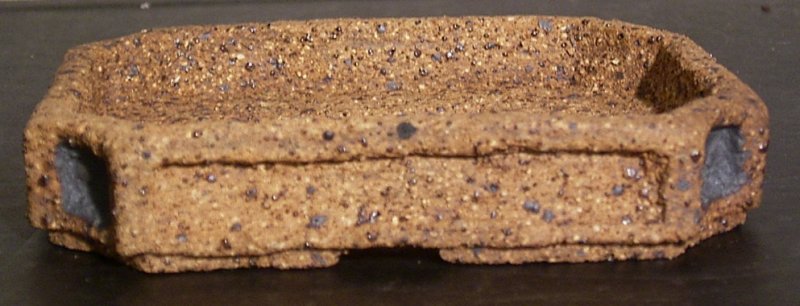
With high spring temps (mid 30'sC) the first pot had dried faster than expected but no matter it is just as easy to give it the final trim.
To make recessed panels like on this pot I use a small flathead screwdriver.

With high spring temps (mid 30'sC) the first pot had dried faster than expected but no matter it is just as easy to give it the final trim.

To make recessed panels like on this pot I use a small flathead screwdriver.

Guest- Guest
 Re: Carving a pot
H i MattA
This is really a interesting story, to follow your pot in the making...very nice job
Kind regards Yvonne
This is really a interesting story, to follow your pot in the making...very nice job
Kind regards Yvonne
Guest- Guest
 Re: Carving a pot
Well done for making a pot with this very long process
Regards
Andy
Regards
Andy

Stone Monkey- Member
 Re: Carving a pot
Beautiful job, Matt!
On-line if you do a little search, is a Japanese how to, that you may find useful. Same technique, but the guy uses guide shapes to get the angles. If I can find it, I will leave the address here for you.
Thanks for posting.
Khaimraj
Here you are -
About 3/4 of the page down ,
http://japanesebonsaipots.net/page/4/
Kamiya Ryuen pots and process
Posted on June 11, 2012

Khaimraj Seepersad- Member
 Re: Carving a pot
Thanks for the kind words everyone.
Andy, it does take a while, these pots took about 1.5hrs each but I enjoy the process and make all my pots this way.
Khaimraj, thanks heaps for the link, when I first started carving my pots I couldnt find anything on the net so just had to wing it. I have always wondered how they could produce pieces by this method that are so exact from one to the next, it makes sense now

Guest- Guest
 Re: Carving a pot
Ah but Matt,
when you tell folks you took only 1.5 hrs, and at a minimum wage of say $8.00, and handmade pots may not fall into the skilled bracket, how much will you charge for your work ?
Clay,
Glaze,
Fire,
Personal Time
Especially if when you work at a skill, you get more efficient and that means even less time to be paid for


Keep up the good work and show when you are ready to sell, thank you.
Later.
Khaimraj
when you tell folks you took only 1.5 hrs, and at a minimum wage of say $8.00, and handmade pots may not fall into the skilled bracket, how much will you charge for your work ?
Clay,
Glaze,
Fire,
Personal Time
Especially if when you work at a skill, you get more efficient and that means even less time to be paid for
Keep up the good work and show when you are ready to sell, thank you.
Later.
Khaimraj

Khaimraj Seepersad- Member
 Re: Carving a pot
Hello Matt
Thanks for showing your work!
I like to show you a link to an austrian potter who has shown his work in a german forum.
kind regards
Martin
Miniatures at the Bonsai-Fachforum
Thanks for showing your work!
I like to show you a link to an austrian potter who has shown his work in a german forum.
kind regards
Martin
Miniatures at the Bonsai-Fachforum

Klaudia & Martin- Member
 Re: Carving a pot
But Khaimraj, when does any artist earn what they are worth?
What does improve is the success rate, ie not having to scrap every second or third pot, maybe only every fifth or sixth. Like any artist, as your skills increase so does the quality of your work (hopefully) thus the amount of time taken doesnt change much after a point. Size and style also make no difference in how long a pot can take, the simpler the line the more room for error.
I still have a while before I need to figure out pricing but have always been surprised that most western potters are not able to command the same prices for there work as the japanese (despite the quality) so the real question is what are people prepared to pay. Would you be prepared to pay $30-40 (giving me a little income)? Or only $20 (barely cover costs)?
I will be setting up a website once I have pots for sale & will let you know then
Matt
Guest- Guest
 Re: Carving a pot
Martin,
Thanks for the link, his work is beautiful, maybe with a few more years practice I can achieve such quality of line & form.
Matt
Thanks for the link, his work is beautiful, maybe with a few more years practice I can achieve such quality of line & form.
Matt
Guest- Guest
 Re: Carving a pot
Matt,
I am sharing a bit here and I apologize if you already knew it and I am insulting your intelligence.
This as far as I know / understand it is Art Pottery -
http://syracusethenandnow.org/Nghbrhds/Strathmore/AARobineau.htm
The scarab vase by Mrs. Robineau is the for me the best example of Pottery into Sculpture.
What you guys do in Bonsai is create a container specifically for a masterpiece tree. Very much along the lines of when we take an oil painting to a master framer, to have him create the optimum shape to best display the image, when it is hung on a wall [ hopefully a museum wall, with historical time.]
The frame must enhance the image, but not be seen. So too the pot must enhance the tree, but not be seen.
This is where handbuilding is most most important, and the surface of the pot is absolutely important, be it burnished smooth, rough or satin glazed etc.
Unless the work reaches the level of Mrs.Robineau's work, and she is an Artist, the word Artisan is normally used for potters.
Have you tried genuine Yixing clay ?
Until.
Khaimraj

Khaimraj Seepersad- Member
 Re: Carving a pot
Matt,
How do you prepare your lump of clay before you start carving on it?
Libby
How do you prepare your lump of clay before you start carving on it?
Libby
bumblebee- Member
 Re: Carving a pot
Libby,
I start off by kneading the clay then wedging it into a basic block. For small pots (under4-5") I store the blocks between newspaper in tupperware containers until the clay has hardened enough to reduce flex but still moist enough to carve without too much difficulty (a little wetter than leather hard). For midsize pots (4-10") I usually follow the procedure shown in the photo series above (Ie the clay is wet), larger pots 8-18" have half of the bulk removed while wet & then allowed to stiffen and half again removed, back to the cupboard until its leather hard & then the final work can be done, the rim and feet need to be left till now to avoid uneven cracking during drying.
Matt
Guest- Guest
 Re: Carving a pot
Khaimraj,
Apologies for the slow reply, you gave me a bit to think about & I do that best with a spade in my hand. A cool change is coming thru tonight
Talk again soon
Matt
Apologies for the slow reply, you gave me a bit to think about & I do that best with a spade in my hand. A cool change is coming thru tonight
Talk again soon
Matt
Guest- Guest
 Re: Carving a pot
Khaimraj,
Apologies for the lengthy delay, life got a bit busy. I had typed out a long rambling reply but basically it came down to my own personal strugle over the words artist (which I have only recently accepted as a title) and artisan (which I initially thought was a put down to the many great potters on the forum).
I really enjoyed the article on Mrs Robineau and the Scarab vase but had trouble working out what made it art... In the end this definition makes it easy to split the line
After lots of reading & processing of it I liek the idea of being an artisan but dont have the skills yet, can I be an artisans apprentice? I dont want to be an artist, never did really & even less now I know
I havent tried genuine Yixing clay, I wish I could get some. I have found a couple of really nice commercial clays available locally & will experiment with doctoring them in due time
Matt
Apologies for the lengthy delay, life got a bit busy. I had typed out a long rambling reply but basically it came down to my own personal strugle over the words artist (which I have only recently accepted as a title) and artisan (which I initially thought was a put down to the many great potters on the forum).
I really enjoyed the article on Mrs Robineau and the Scarab vase but had trouble working out what made it art... In the end this definition makes it easy to split the line
An artist refers to the making of tangible or intangible products as an expression of creativity and imagination for purely aesthetic reasons. An artisan, meanwhile, though spurred by the same impulses, produces crafts, which, though they may be acquired only for decoration, are designed to be practical.
After lots of reading & processing of it I liek the idea of being an artisan but dont have the skills yet, can I be an artisans apprentice? I dont want to be an artist, never did really & even less now I know
In ancient Greece sculptors and painters were held in low regard, somewhere between freemen and slaves, their work regarded as mere manual labour.~In Our Time: The Artist BBC Radio 4, TX 28th March 2002
I havent tried genuine Yixing clay, I wish I could get some. I have found a couple of really nice commercial clays available locally & will experiment with doctoring them in due time
Matt
Guest- Guest
 Re: Carving a pot
It has been a few years since these pots were made but they finally got fired, the first a month ago, the second has just come out of the kiln from wednesdays 13hr wood firing.

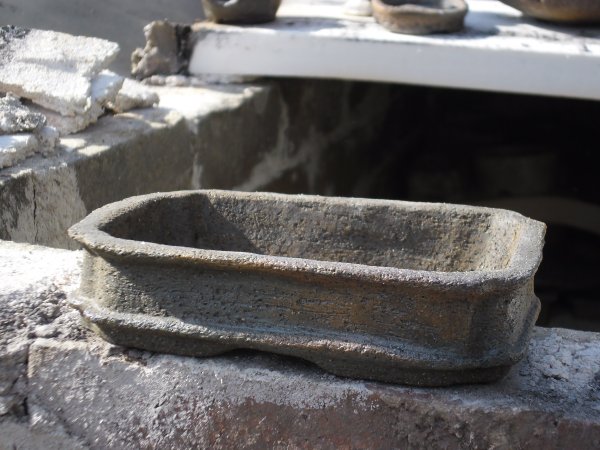
Hope you like them as much as I do...
Matt


Hope you like them as much as I do...
Matt
Guest- Guest
 Similar topics
» preliminary carving bougainvillea stump
» What happened to that Hawthorn from Joy of Bonsai
» work day in the yard
» First attempt at carving
» progress carving
» What happened to that Hawthorn from Joy of Bonsai
» work day in the yard
» First attempt at carving
» progress carving
Page 1 of 1
Permissions in this forum:
You cannot reply to topics in this forum


