RESTYLING MY MUGO NAMED "Z".
+13
Wesley
alex e
my nellie
Tom McCue
rolandp
Robert Steven
martin kolacia
David Carvalho
NemusStipes
eric sanders
Hans Vleugels
Pavel Slovák
Hans van Meer.
17 posters
Page 1 of 2
Page 1 of 2 • 1, 2 
 RESTYLING MY MUGO NAMED "Z".
Hi Everybody,
In early 2002 I had the honour to be invited by Mark Noelanders to give a 3 hour evening demonstration in March that same year at his Bonsai club in Belgium (B.A.B Belgium Bonsai association). Although I was really excited at the prospect to give a demonstration at this club that already had seen most off the big names demonstrate, it also put me under a lot of pressure! How and were could I find material good enough to work on and that would entertain this knowledgeable crowd? I spend many day’s visiting all my regular material addresses here in Holland, but could not find anything remotely interesting or good enough! So in a last desperate attempt to find something, I drove with my wife An trough Belgium to try our luck at the Bonsai dealers we knew there! At the end of a long day driving, with out finding anything suitable and affordable, we had become pretty desperate! We had only one more Bonsai centre to visit and had not much hope to find something there. But we did! In the back of the garden, hidden away from sight, we found some really weird and impossible shaped Pine yamadori! And that was just what I was looking for, ugly and affordable!
One off them immediately jumped out to me, a Mugo that looked like the mark of Zorro! It was basically a long and thin Z shaped tree full of happy mistakes and with only some long branches in it’s top. The base and the first 10 cm/2,5 inch upwards the trunk were really thin and then suddenly changed into a big lump that was formed over many years out off old deadwood with thick living veins running over it! From that point the trunk becomes thinner again and stays the same thickness until the first sharp bent to the left. The next section of the trunk is slightly curved and falls abrupt downwards to the left. Some time, long ago ,this section of the trunk was split right trough the middle by mother nature, leaving a long opening that looked very strange, like two branches melted together! And again this section also had no taper what so ever! At the end of that section there was a other abrupt change of direction to the right side from witch one thick branch and a few thinner ones grew upwards. Out off these branches I had to create the whole future Bonsai! A big risk to try in a 3 hour demo, but this is what I like to do, trying to create a Bonsai out of challenging material! Because when it all falls together and it works it can become really special and unique! I always had, and still have, that motivation to work with impossible and unlikely material! At first because there simply just wasn't any good material to be found here in Holland, but latter I discovered that I really like that challenge to find something interesting or even beautiful in these ugly duckling trees! So this Mugo, that we instantly named Z, was just right to show what my interest in Bonsai are.
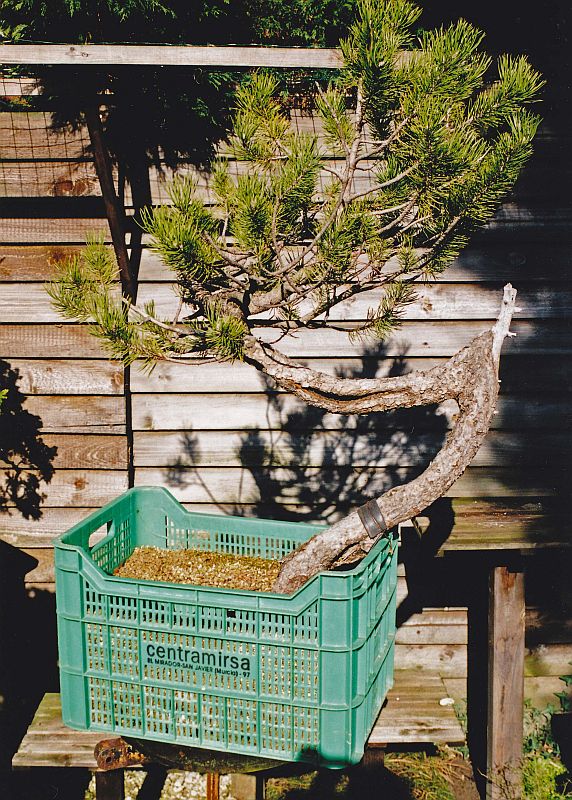
Below: The first pictures of “Z” in my garden. This is the planed front side of the tree.
Below: Close up of the section were all the branches grew from. Only the thick branch will be used to create the whole top section!

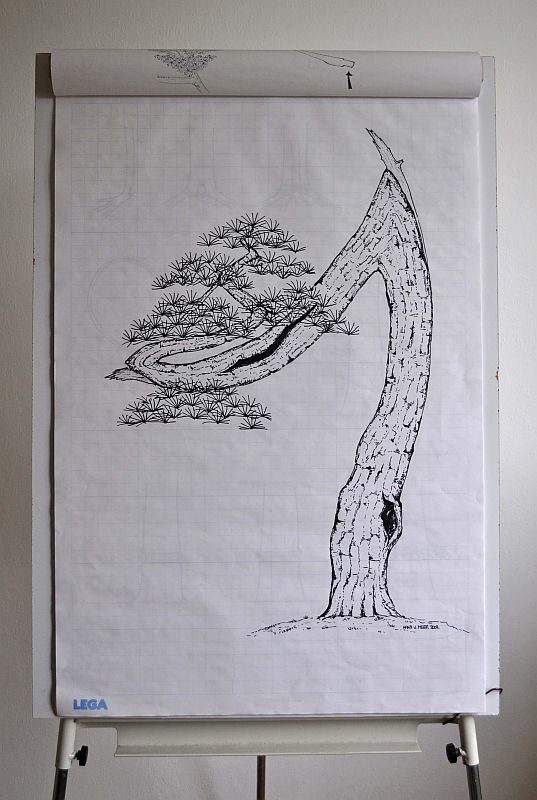
Below: This is the design that I made as a reverence for the demo.
Below: March 2002. This is the start of my 3 hour demo at the BAB clubhouse.
Just one the right side of my top hand finger is were I sawed out a wedge, separating the branch from the deadwood section on the right. Allowing (I hoped) the branch to bend easier and further to the left side! The branch will be protected from breaking and ripping with layers in water socked raffia, tape and thick copper wire.

Below: This is probably the first demo tree that could receive Belgium radio!

Below: The most difficult part of this demo, bringing down that thick branch, has worked out just fine. With out any splitting or cracking! But to make it in time I had help wiring the last branches from one of the friendly members of the club.

Below: Bonsai is hard work!

Below: The finished result of 3 hours hard work. Before I started I had explained to the audience that I would not try to make a compact tree. Most of the foliage was simply to far away from the base of the trunk and I don’t like to twist and curl long branches just for the look of it. So I just created the desired outline with the long branches. And explained that in the coming years I will use the proper technique to force the tree to back bud so that in time I could shorten those long branches to the desired shorter length!

So last week, almost 10 years after it’s first styling, I restyled “Z” once again.
Below: Before the work started. The tree looks realy wild in this picture and I have to admit that this has it's charm to!
Below: 3 major branches were removed during this restyling.

Below: Close up, as seen from the right side, of the strange but beautiful deadwood section on the lower part of the trunk.

Below: Close up of the split trunk.

Below: Close up of the thick branch that, with the help of a cut out wedge, was controlled ripped away from the deadwood. The green arrow shows the point up to were the branch was attached to the deadwood (yellow arrow).

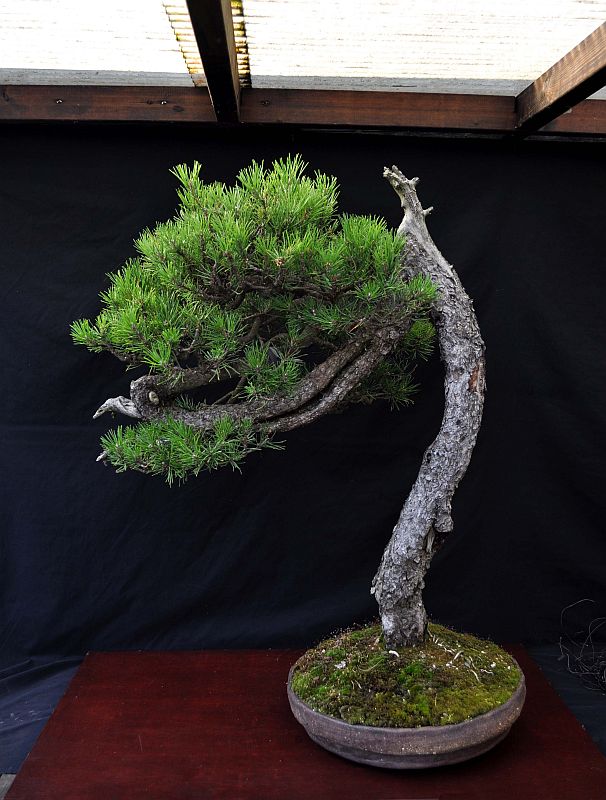
Below: The finished result in a pot by Brian Allbright.

Below: Close up of the finished top section. Most needles are just 1,5 centimeter/ half a inch long!

I am pretty pleased with this new image of “Z”! Although new image, I wasn't fare off in my original drawing from 2002! I like how "Z" changed from a unwanted tree into a impressive Bonsai, in less than a decade! Next year he will be repotted into the same pot but with fresh soil. And than he can grow freely for some time to get extra strong, while we will work together to get even more new buds on the older branches. And before we will both know it a other decade is gone!
I hope you enjoyed this story?! You can read and see more on my blog [url=HERE][/url]
Cheers,
Hans van Meer.
In early 2002 I had the honour to be invited by Mark Noelanders to give a 3 hour evening demonstration in March that same year at his Bonsai club in Belgium (B.A.B Belgium Bonsai association). Although I was really excited at the prospect to give a demonstration at this club that already had seen most off the big names demonstrate, it also put me under a lot of pressure! How and were could I find material good enough to work on and that would entertain this knowledgeable crowd? I spend many day’s visiting all my regular material addresses here in Holland, but could not find anything remotely interesting or good enough! So in a last desperate attempt to find something, I drove with my wife An trough Belgium to try our luck at the Bonsai dealers we knew there! At the end of a long day driving, with out finding anything suitable and affordable, we had become pretty desperate! We had only one more Bonsai centre to visit and had not much hope to find something there. But we did! In the back of the garden, hidden away from sight, we found some really weird and impossible shaped Pine yamadori! And that was just what I was looking for, ugly and affordable!
One off them immediately jumped out to me, a Mugo that looked like the mark of Zorro! It was basically a long and thin Z shaped tree full of happy mistakes and with only some long branches in it’s top. The base and the first 10 cm/2,5 inch upwards the trunk were really thin and then suddenly changed into a big lump that was formed over many years out off old deadwood with thick living veins running over it! From that point the trunk becomes thinner again and stays the same thickness until the first sharp bent to the left. The next section of the trunk is slightly curved and falls abrupt downwards to the left. Some time, long ago ,this section of the trunk was split right trough the middle by mother nature, leaving a long opening that looked very strange, like two branches melted together! And again this section also had no taper what so ever! At the end of that section there was a other abrupt change of direction to the right side from witch one thick branch and a few thinner ones grew upwards. Out off these branches I had to create the whole future Bonsai! A big risk to try in a 3 hour demo, but this is what I like to do, trying to create a Bonsai out of challenging material! Because when it all falls together and it works it can become really special and unique! I always had, and still have, that motivation to work with impossible and unlikely material! At first because there simply just wasn't any good material to be found here in Holland, but latter I discovered that I really like that challenge to find something interesting or even beautiful in these ugly duckling trees! So this Mugo, that we instantly named Z, was just right to show what my interest in Bonsai are.
Below: The first pictures of “Z” in my garden. This is the planed front side of the tree.

Below: Close up of the section were all the branches grew from. Only the thick branch will be used to create the whole top section!

Below: This is the design that I made as a reverence for the demo.

Below: March 2002. This is the start of my 3 hour demo at the BAB clubhouse.
Just one the right side of my top hand finger is were I sawed out a wedge, separating the branch from the deadwood section on the right. Allowing (I hoped) the branch to bend easier and further to the left side! The branch will be protected from breaking and ripping with layers in water socked raffia, tape and thick copper wire.

Below: This is probably the first demo tree that could receive Belgium radio!

Below: The most difficult part of this demo, bringing down that thick branch, has worked out just fine. With out any splitting or cracking! But to make it in time I had help wiring the last branches from one of the friendly members of the club.

Below: Bonsai is hard work!

Below: The finished result of 3 hours hard work. Before I started I had explained to the audience that I would not try to make a compact tree. Most of the foliage was simply to far away from the base of the trunk and I don’t like to twist and curl long branches just for the look of it. So I just created the desired outline with the long branches. And explained that in the coming years I will use the proper technique to force the tree to back bud so that in time I could shorten those long branches to the desired shorter length!

So last week, almost 10 years after it’s first styling, I restyled “Z” once again.
Below: Before the work started. The tree looks realy wild in this picture and I have to admit that this has it's charm to!

Below: 3 major branches were removed during this restyling.

Below: Close up, as seen from the right side, of the strange but beautiful deadwood section on the lower part of the trunk.

Below: Close up of the split trunk.

Below: Close up of the thick branch that, with the help of a cut out wedge, was controlled ripped away from the deadwood. The green arrow shows the point up to were the branch was attached to the deadwood (yellow arrow).

Below: The finished result in a pot by Brian Allbright.

Below: Close up of the finished top section. Most needles are just 1,5 centimeter/ half a inch long!

I am pretty pleased with this new image of “Z”! Although new image, I wasn't fare off in my original drawing from 2002!
I hope you enjoyed this story?! You can read and see more on my blog [url=HERE][/url]
Cheers,
Hans van Meer.
Last edited by Hans van Meer. on Wed Sep 21, 2011 8:03 am; edited 3 times in total

Hans van Meer.- Member
 Re: RESTYLING MY MUGO NAMED "Z".
Dear Hans
Very perfect work with amazing results. there is no need to compliment. What the eyes see is perhaps perfect. Preparation, vision, implementation and development. Everything perfect. It is only necessary congratulations.Thanks for sharing.


Best regards Pavel
Very perfect work with amazing results. there is no need to compliment. What the eyes see is perhaps perfect. Preparation, vision, implementation and development. Everything perfect. It is only necessary congratulations.Thanks for sharing.


Best regards Pavel

Pavel Slovák- Member
 Re: RESTYLING MY MUGO NAMED "Z".
*jaw drops*
Wow! That's an amazing job you did there!
Wow! That's an amazing job you did there!

NemusStipes- Member
 Re: RESTYLING MY MUGO NAMED "Z".
after a few years perfect result -....congratulation

martin kolacia- Member
 Re: RESTYLING MY MUGO NAMED "Z".
Great work Han. I also feel honoured to be invited for the coming Marc's program in Feb., but unfortunately it's on the Chinese New Year and I am so sad to cancell it... You were lucky...

Robert Steven- Member
 Re: RESTYLING MY MUGO NAMED "Z".
One more time a amazig story with even more amazing result.
Thanks a lot for sharing it with us.
Thanks a lot for sharing it with us.

rolandp- Member
 Re: RESTYLING MY MUGO NAMED "Z".
The hands of a talented artist transformed an unhappy raw material into a happy bonsai!
Don't stop treating us with their progression.
Thank you!
PS : Congratulations on Twan's arrival! This is your life and soul!
Dear Hans, I wish you a lot of happy decades with your trees!Hans van Meer. wrote: ... ... And before we will both know it a other decade is gone!
Don't stop treating us with their progression.
Thank you!
PS : Congratulations on Twan's arrival! This is your life and soul!

my nellie- Member
 Mugo named "z"
STUNNING!!!!! job Hans  as Pavel says the picture tells
the story!...........................................................................
[ but!! if it were mine I would prob loose bottom left hand branch]
regards Alex e
 as Pavel says the picture tells
 the story!...........................................................................
[ but!! if it were mine I would prob loose bottom left hand branch]
regards Alex e


alex e- Member
 Re: RESTYLING MY MUGO NAMED "Z".
As usual, you tell an interesting and witty tale, Hans. I love what you have done with what was pretty grim material. I enjoy seeing what can be created from an ugly duckling. Well done.

Harleyrider- Member
 Re: RESTYLING MY MUGO NAMED "Z".
Hans, you really created a daring tree. 
Very impressive what you done with this one.
Regards
Morten
Very impressive what you done with this one.
Regards
Morten
Guest- Guest
 Re: RESTYLING MY MUGO NAMED "Z".
Thanks you guy's for your nice words! It is always nice to know that your work and Bonsai are appreciated. Especially in the case of this oddly shaped tree! I took a bit of a change when I choose to use this tree for this demo, but I was so intrigued by that lightning like zig zag movement of the trunk! I just had to have a go and try to incorporate that unique and strange feature in to a believable Bonsai design! Now I dont make my designs to please everybody and I do understand that some might not even like them at all! But in my own way I always do try to make a thing of beauty or at least of interest. In Bonsai, especially when you start from scratch, it takes a very long time before you get feedback on your work and design. So after then years of working on a idea that I had all those years ago, it is good to know that "Z" is appreciated! 
Hi Alex,
if it was your tree I would tell you to never loose that branch!
No just kidding!!! This has always been a cliff hanger even during this restyling. But you have to believe me that in real live this branch give a different impression than on any picture! There is so much empty space underneed that trunk and when you remove it all emphasize wile lie on that long and cracked trunk. What bothers me about that branch is that you can see it hanging straight down trough that gap between the trunks and that goose against the left to right movement of the trunk! But even so, it looks so good in real live! And in a few years time that branch will be longer so that it can hang more freely in that open space and I kinda what to wait how that will look! I can always cut it off later!
Below: Close up of the top Jin all made by mother nature.

Thanks for the interest!
Cheers,
Hans van Meer.
alex e wrote:STUNNING!!!!! job Hansas Pavel says the picture tells
the story!...........................................................................
[ but!! if it were mine I would prob loose bottom left hand branch]
regards Alex e
Hi Alex,
if it was your tree I would tell you to never loose that branch!

No just kidding!!! This has always been a cliff hanger even during this restyling. But you have to believe me that in real live this branch give a different impression than on any picture! There is so much empty space underneed that trunk and when you remove it all emphasize wile lie on that long and cracked trunk. What bothers me about that branch is that you can see it hanging straight down trough that gap between the trunks and that goose against the left to right movement of the trunk! But even so, it looks so good in real live! And in a few years time that branch will be longer so that it can hang more freely in that open space and I kinda what to wait how that will look! I can always cut it off later!
Below: Close up of the top Jin all made by mother nature.

Thanks for the interest!
Cheers,
Hans van Meer.

Hans van Meer.- Member
 Re: RESTYLING MY MUGO NAMED "Z".
I took a bit of a change when I choose to use this tree for this demo, but I was so intrigued by that lightning like zig zag movement of the trunk! I just had to have a go and try to incorporate that unique and strange feature in to a believable Bonsai design! Now I dont make my designs to please everybody and I do understand that some might not even like them at all! But in my own way I always do try to make a thing of beauty or at least of interest.
It is innovation and the willingness to take risks that keeps the art of bonsai alive and moving forward, Hans. I'd much rather have a tree that causes raised eyebrows and much debate than one that looks the same as everyone elses. Well done, I say, and keep it up!

Harleyrider- Member
 Re: RESTYLING MY MUGO NAMED "Z".
Excellent report Hans, with a fantastic result. I love it.
This is a photo for you that I titled "Mark of Zorro"

This is a photo for you that I titled "Mark of Zorro"


Kev Bailey- Admin
 Re: RESTYLING MY MUGO NAMED "Z".
Stunning picture, Kev! Now, if only we could see Hans' tree against that backdrop!

Harleyrider- Member
 Re: RESTYLING MY MUGO NAMED "Z".
Maybe something like this 
And by the way a beautiful photo Kev,I hope you don't mind I have used your photo as a background for the tree from Hans.
Gr Ed

And by the way a beautiful photo Kev,I hope you don't mind I have used your photo as a background for the tree from Hans.
Gr Ed


Ed van der Reek- Member
 Re: RESTYLING MY MUGO NAMED "Z".
Thanks for that, Ed. It looks every bit as good as I imagined!

Harleyrider- Member
 Re: RESTYLING MY MUGO NAMED "Z".
Harleyrider wrote:I took a bit of a change when I choose to use this tree for this demo, but I was so intrigued by that lightning like zig zag movement of the trunk! I just had to have a go and try to incorporate that unique and strange feature in to a believable Bonsai design! Now I dont make my designs to please everybody and I do understand that some might not even like them at all! But in my own way I always do try to make a thing of beauty or at least of interest.
It is innovation and the willingness to take risks that keeps the art of bonsai alive and moving forward, Hans. I'd much rather have a tree that causes raised eyebrows and much debate than one that looks the same as everyone elses. Well done, I say, and keep it up!
Thanks! And I will! I could not stop even if I wanted to!
Cheers,
Hans van Meer.

Hans van Meer.- Member
 Re: RESTYLING MY MUGO NAMED "Z".
Ed van der Reek wrote:Maybe something like this
And by the way a beautiful photo Kev,I hope you don't mind I have used your photo as a background for the tree from Hans.
Gr Ed
Great virtual my little friend with big trees!
Show us your handy work that you did during the last week!!!
Cheers,
Hans van Meer.

Hans van Meer.- Member
 Re: RESTYLING MY MUGO NAMED "Z".
Kev Bailey wrote:Excellent report Hans, with a fantastic result. I love it.
This is a photo for you that I titled "Mark of Zorro"
Thanks Kev and excellent photo indeed! I have some were a similar evening picture, all though not half as good as yours, with a clear "V" for vendetta in it. Tata tata tata ta ta TAAAAA BOOM!!
 Great movie!
Cheers,
Hans van Meer.

Hans van Meer.- Member
 Re: RESTYLING MY MUGO NAMED "Z".
Hi Kev,
Am I right in thinking that sunset shot is from the pier at Whitby in N Yorks ?
When was it taken, recently?
Graham
Am I right in thinking that sunset shot is from the pier at Whitby in N Yorks ?
When was it taken, recently?
Graham
graham walker- Member
Page 1 of 2 • 1, 2 
 Similar topics
» RESTYLING MY MUGO PINE NAMED "LITTLE CHAPEL".
» Pinus mugo (han-kengai) - restyling
» RESTYLING "WOLFIE" MY MUGO PINE.
» A stone named Mi Fu
» The tree named KING
» Pinus mugo (han-kengai) - restyling
» RESTYLING "WOLFIE" MY MUGO PINE.
» A stone named Mi Fu
» The tree named KING
Page 1 of 2
Permissions in this forum:
You cannot reply to topics in this forum


