


Big ol Layer
Page 2 of 3 •  1, 2, 3

 Re: Big ol Layer
![]() Guest Tue Jun 29, 2010 4:56 am
Guest Tue Jun 29, 2010 4:56 am
Guest- Guest

Re: Big ol Layer
![]() NeilDellinger Tue Jun 29, 2010 12:09 pm
NeilDellinger Tue Jun 29, 2010 12:09 pm
Questions:
There are two branches on the front pf the tree, just to left of the hollow. One is positioned upwards, the other sharply downwards. Do you intend to leave those? I like the upward growing shoot for a few different reasons as opposed to the one positioned down.
There are numerous shoots one the left of the trunk, do you intend to leave all of those? Could one or two be moved across the back to give some more weight to the right side of the tree (as a back branch)? I am guessing few buds emerged to the right of the hollow/back?
Clearly its a great tree any way you look at it.
Neil
NeilDellinger- Member
Re: Big ol Layer
![]() Guest Tue Jun 29, 2010 8:26 pm
Guest Tue Jun 29, 2010 8:26 pm
Guest- Guest
Re: Big ol Layer
![]() NeilDellinger Tue Jun 29, 2010 11:52 pm
NeilDellinger Tue Jun 29, 2010 11:52 pm
You did say that. I missed your comment about leaving the extras. I do the same thing pretty often with my elms. Any way its a cool tree.
Neil
NeilDellinger- Member
Re: Big ol Layer
![]() Hans van Meer. Thu Jul 01, 2010 1:22 am
Hans van Meer. Thu Jul 01, 2010 1:22 am
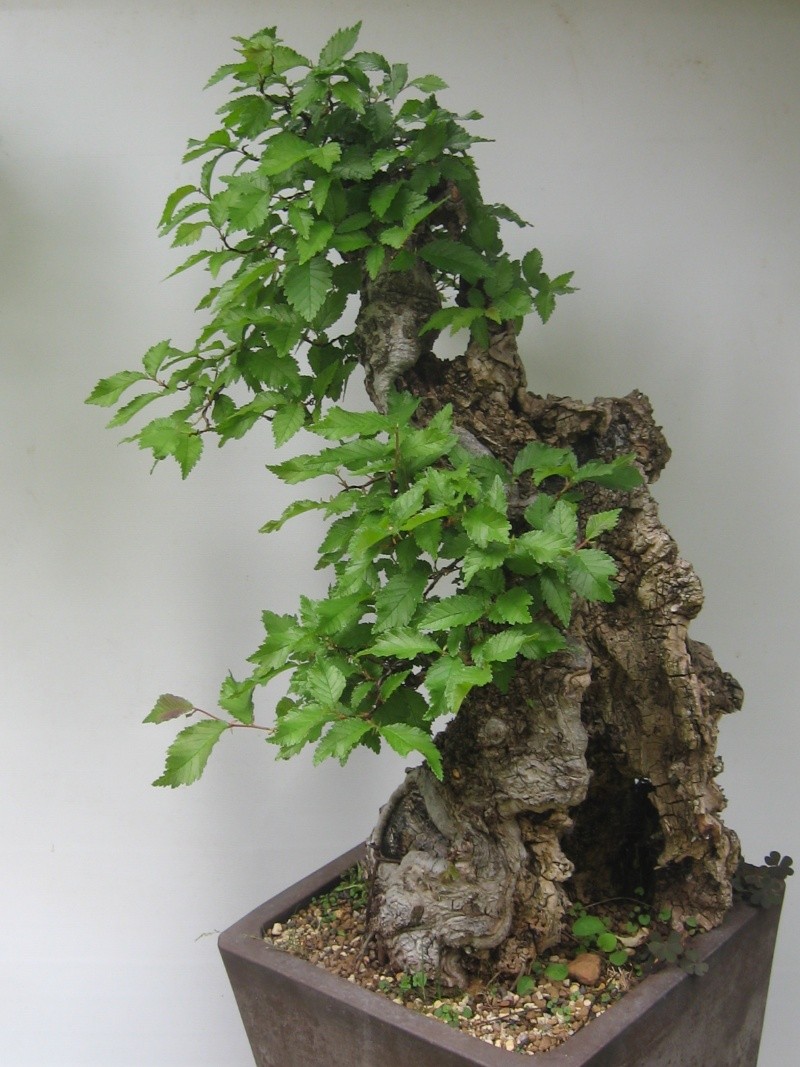
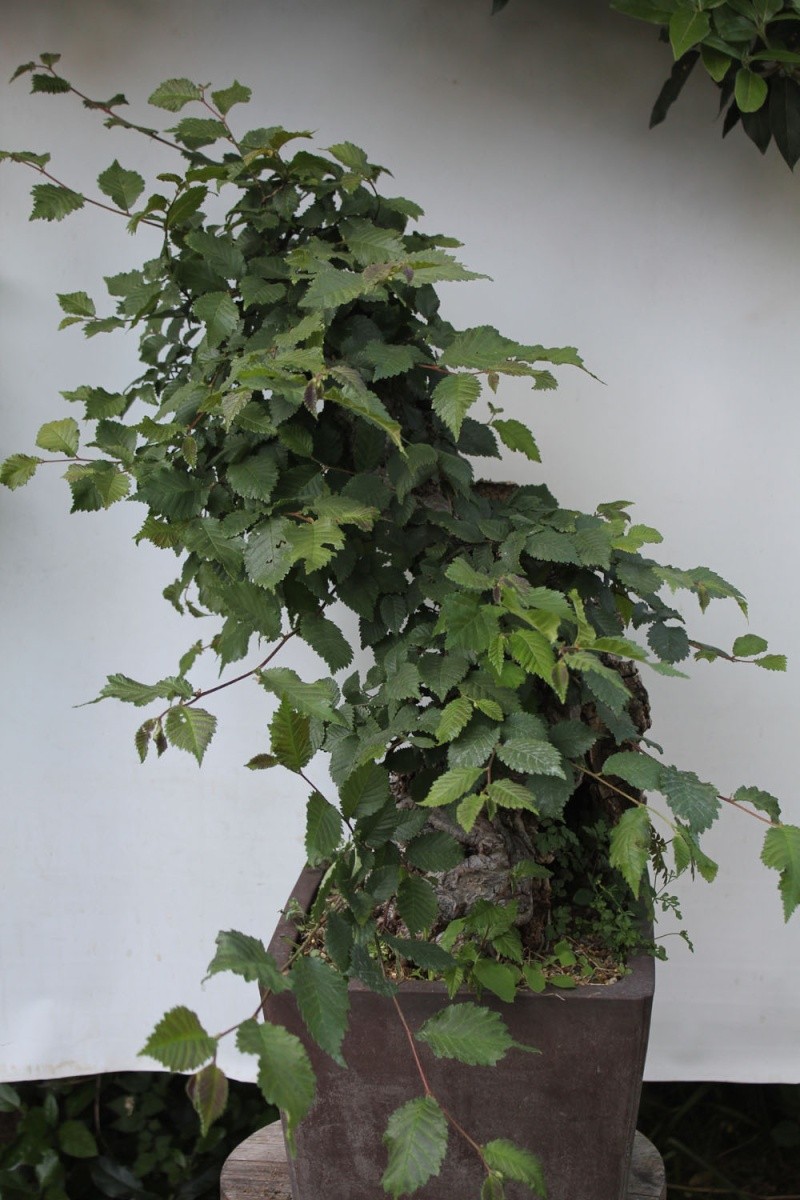
nice stump you got there!
As promised, although a bit late, here is my view on your tree as it is now!
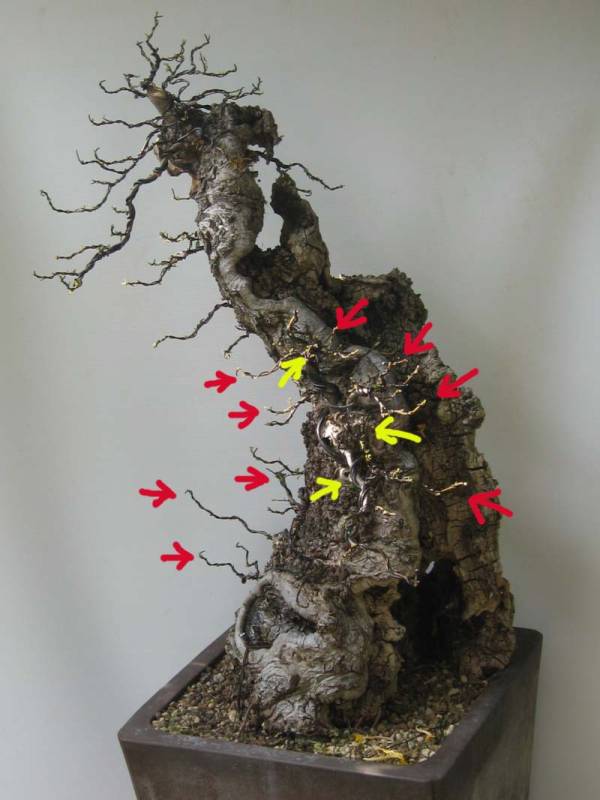
Those branches (red and yellow arrows) on the lower part of the tree are all clustered together. So in the future, when they mature, you will end up with a bush like tree, with out the proper branch structure to resemble a large tree in nature!
The Yellow arrow branches all emerge from the front side of the tree and that is mostly not don this low on a tree! Poking the eye you know!
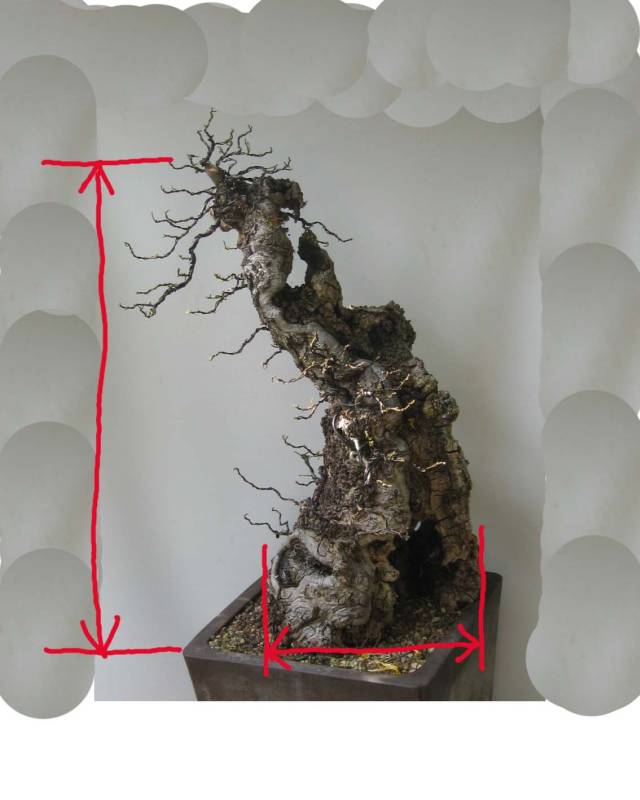
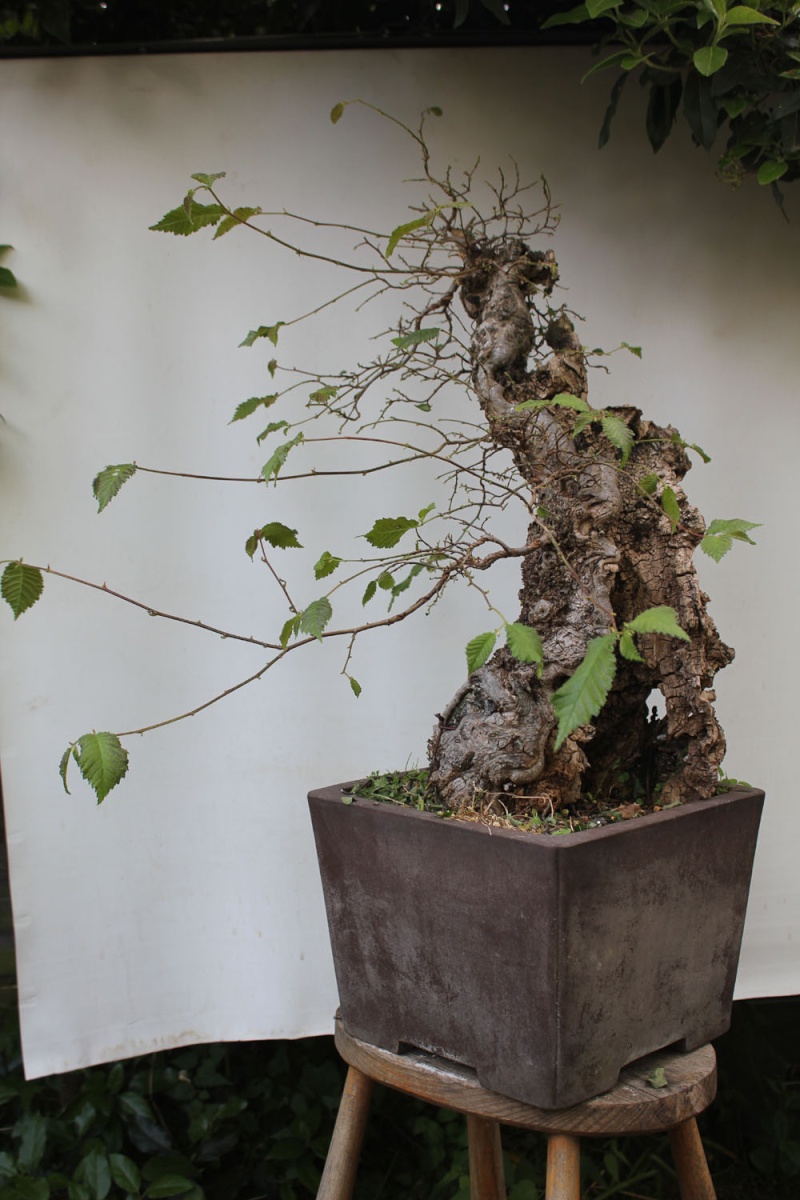
If you look at the above picture you can see the hight of the tree in relation to the base of the trunk. This gives you a possible idea of the size and hight of the tree as it would be in nature. With this knowledge you can figure out how the tree could have or should more or less look in real live!
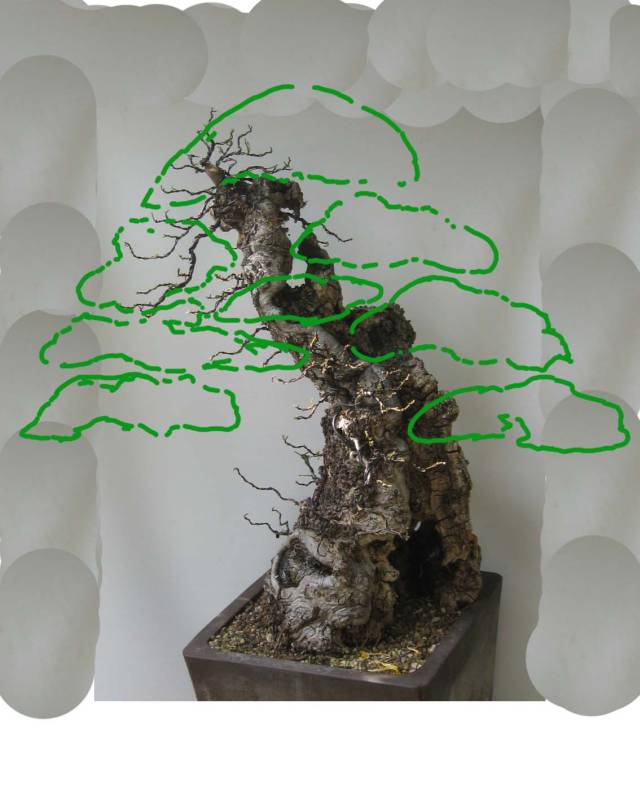
Above: Something like that would be possible! The bulk of the foliage is in proportion to the size and height of the trunk! Remember this is not a design, it is just to give you an general idea from witch height you want your branches to be placed!

Above: This is one of the many posible designs, but it is one I like my self. The bottom section of the tree is left branch less, like with a old tree. Nothing is disturbing our view of that beautiful battered trunk line and Shari! And the negative spaces on both sides of the trunk are wonderful!

Above: This is a rough impression of the image I see in your tree. It is just a drawing to show you the outlines of the image, in real live the branch structure and image would be more like a deciduous tree, and not so symmetrical This design shows all the beauty of the trunk movement with its lovely Shari. The falling branch is placed perfectly and gives the tree balance and makes it special! It is a mixture between old and new school, almost Bunjin like!
Any way it is very late and I am of to bed now, I hope it will give you some idea or help my friend!
Cheers,
Hans van Meer.
---------------------------------------------------------------------------

Hans van Meer.- Member
Re: Big ol Layer
![]() NeilDellinger Thu Jul 01, 2010 2:54 am
NeilDellinger Thu Jul 01, 2010 2:54 am
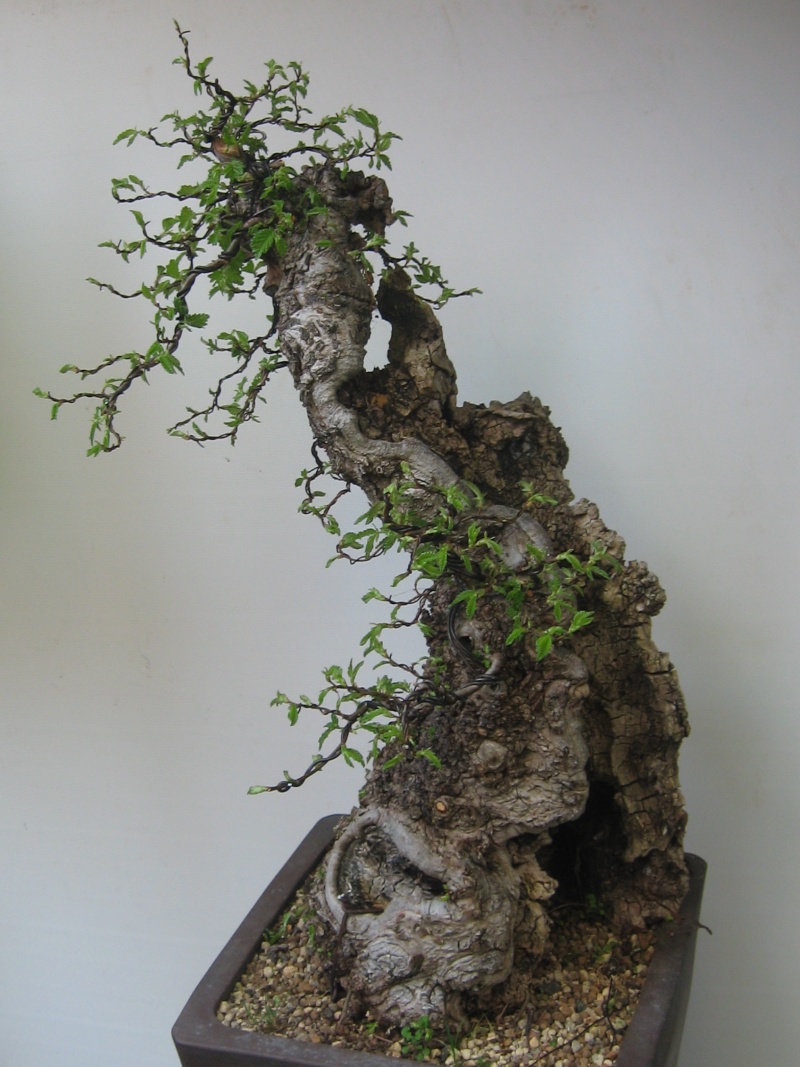
I like the first outline hans provided.
Last edited by NeilDellinger on Thu Jul 01, 2010 3:51 am; edited 1 time in total (Reason for editing : typo)
NeilDellinger- Member
Re: Big ol Layer
![]() Guest Thu Jul 01, 2010 4:29 am
Guest Thu Jul 01, 2010 4:29 am
Guest- Guest
Big ol Layer
![]() Guest Fri Jul 09, 2010 7:28 pm
Guest Fri Jul 09, 2010 7:28 pm
Guest- Guest
Big ol layer
![]() moyogijohn Fri Jul 09, 2010 9:08 pm
moyogijohn Fri Jul 09, 2010 9:08 pm
moyogijohn- Member
Big ol layer
![]() Guest Fri Jul 09, 2010 9:18 pm
Guest Fri Jul 09, 2010 9:18 pm
Guest- Guest
Re: Big ol Layer
![]() anttal63 Fri Jul 09, 2010 9:55 pm
anttal63 Fri Jul 09, 2010 9:55 pm

anttal63- Member
Re: Big ol Layer
![]() prestontolbert Fri Jul 09, 2010 10:54 pm
prestontolbert Fri Jul 09, 2010 10:54 pm

prestontolbert- Member
Re: Big ol Layer
![]() Guest Fri Jul 09, 2010 11:57 pm
Guest Fri Jul 09, 2010 11:57 pm
My regime involves 2 components. Ronseal wet rot wood hardener, a spirit based resin and teak oil as a waterproofer. I have preserved the deadwood on another Elm for over 10 years but have noticed a deterioration over the last couple of years. The problem lies where the deadwood meets the soil. My plan for the future is to remove all the deadwood at soil level and hopefully avoiding repeat wetting and drying of the deadwood.prestontolbert wrote:I was just wondering about the deadwood. What are you doing for preservation?
Guest- Guest
Re: Big ol Layer
![]() Ricky Keaton Sat Jul 10, 2010 5:35 am
Ricky Keaton Sat Jul 10, 2010 5:35 am

Ricky Keaton- Member
Re: Big ol Layer
![]() Guest Sat Jul 10, 2010 10:43 am
Guest Sat Jul 10, 2010 10:43 am
Guest- Guest
Re : Big ol Layer
![]() Bob Brunt Sat Jul 10, 2010 11:34 am
Bob Brunt Sat Jul 10, 2010 11:34 am
This is turning out to be a very informative post.I don't yet have an elm in my collection but this makes me want to go out and get one...Not that I have found any up here in the northwest.I haven't tried air layering yet.I have my eye on a few local trees (Birch ) that I could either air layer or maybe even ground layer.Will have a bash next spring ....Cheers Will keep up the good work.


Bob Brunt- Member
Re : Big ol Layer
![]() Guest Sat Jul 10, 2010 11:56 pm
Guest Sat Jul 10, 2010 11:56 pm
Guest- Guest
Re: Big ol Layer
![]() Ricky Keaton Mon Jul 12, 2010 2:30 am
Ricky Keaton Mon Jul 12, 2010 2:30 am
will baddeley wrote:Hello Ricky. I have found Elm species very easy to layer. After collection, the tree was allowed to gain strength for 2 years. Strong branch growth means strong root growth. In the Spring, as the buds are about to break, I removed a strip of bark and cambium about 2" wide all the way round the live vein. Special care should be made to remove all the cambium so there is no bridge across the gap. It is easy to see any residual cambium as it turns brown in the air. It is also important to have a very clean cut, so use sharp tools. I then made a ring of pot mesh, about 6" deep and place it around the tree, resting it on the old soil. This was then filled with sphagnum moss and pushed in tightly so that all of the cut area was in good contact with the moss. Within 6 weeks, root tips were growing out through the mesh, so I removed the airlayer with a sharp saw, Trying not to disturb the moss too much as the new roots are fragile. This was then potted up and left until Spring, before removing the moss.
great, ok what is the ring of pot mesh?
what was the diameter of the pot?
so the ring cut was only a few inches above the existing soil?
would u happen to have a picture of the tree with the layer on it?
Ricky Keaton- Member
Re: Big ol Layer
![]() Guest Mon Jul 12, 2010 3:36 am
Guest Mon Jul 12, 2010 3:36 am
In this case the point of airlayer was just above soil level. If it were for instance, at the top of the tree and the diameter at the place of airlayering is 3" 75mm. Find a plastic garden pot with a base diameter of at least 6" 150mm. Cut a straight line from the rim to the bottom and from the bottom to the middle of the base. Then cut a 3" 75mm hole in the middle of the base. Cut away your ring of bark as in previous post and then place your split pot around the trunk. 2 holes in t5he rim of the pot with wires attatched, will help you secure the pot to the tree and stop it slipping down. Holes on either side of the split in the pot are wired together making the pot rigid again. Pack the pot with moss and then water. Another tip is to rotate the tree on a regular basis for a nice even rooting.
Guest- Guest
Re: Big ol Layer
![]() Kev Bailey Mon Jul 12, 2010 9:31 am
Kev Bailey Mon Jul 12, 2010 9:31 am
Next problem. How to encourage even rooting on thick branches layered on a tree in the ground? I frequently have layers with one side well rooted and none on the other.
Kev Bailey- Admin
Re: Big ol Layer
![]() Andrei Darusenkov Mon Jul 12, 2010 9:49 am
Andrei Darusenkov Mon Jul 12, 2010 9:49 am
Best,
Andrei
Andrei Darusenkov- Member
Big ol Layer
![]() Guest Mon Jul 12, 2010 9:37 pm
Guest Mon Jul 12, 2010 9:37 pm
Guest- Guest
Big ol Layer
![]() Guest Fri Jul 23, 2010 2:19 pm
Guest Fri Jul 23, 2010 2:19 pm
Guest- Guest
Feeding every watering
![]() Guest Wed May 25, 2011 9:26 pm
Guest Wed May 25, 2011 9:26 pm
Guest- Guest
Feeding every watering
![]() Guest Wed May 25, 2011 9:30 pm
Guest Wed May 25, 2011 9:30 pm
Guest- Guest
Page 2 of 3 • 1, 2, 3
» Where to layer?
» Small Elm winter image
» To air layer or not to air layer?
» BUNJIN KINGSVILLE