Tool Etching Tutorial
+7
ironman
Fore
Jim Doiron
BigDave
gman
ironhorse
Just Mike
11 posters
Page 1 of 1
 Tool Etching Tutorial
since i got a few people interested in a process for ething your initials/mark onto tools, and promised i would do a tutorial for it...here it is.
first, let me start this off by giving a shout out to the staff over at bonsaimonk, especially Karen...they are honest people that truly do aim for customer satisfaction above all else...Karen was incredibly helpfull and forthright with answering any and all of my questions, even before i was a "customer"...like i said, the customer service was simply outstanding, and i was able to puchase 2 yagimitsu tools on sale for around 100 bucks...now, im sure a lot of you already knew all of this, but this was my first experience dealing with them, and in a world where service seems to be taking a backseat, my transaction and conversations with Karen was a breath of fresh air.
this is my first tutorial, so if i leave anything out, or something isnt clear, please feel free to ask questions...
basically this process will show you how to etch a mark or design into metal without any fancy eqipment or anything like that...this tutorial is aimed at carbon steels...im not sure how well it would work on stainless...it probably would, but may take much much longer, and i have never personally done this on stainless, so i cant attest to the results one would achieve.
THINGS YOU WILL NEED
1. a bonsai tool
2. electrical tape
3. 4 alligator clips
4. 2 lengths of wire
5. a battery (i used one of those blocky 6v's, but other kinds will work too)
6. some cotton swabs
7. brine (salt water)
8. rubbing alcohol
the first thing you want to do is gather all of your materials
-to make the brine just dissolve salt into warm water until no more salt will dissolve
-attach the alligator clips to your lengths of wire so that you have a clip on each end (4 clips total)
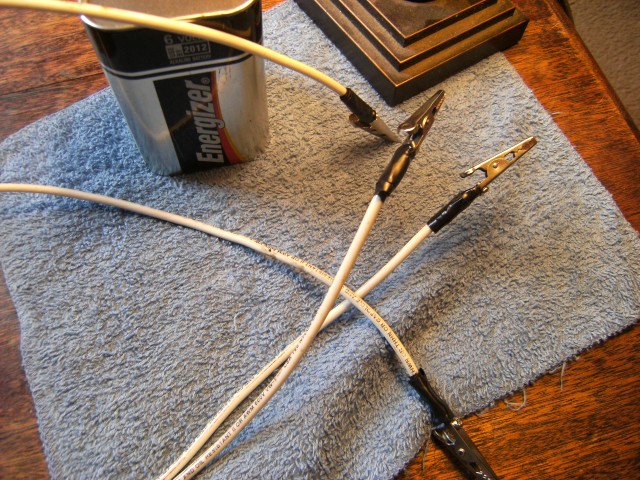
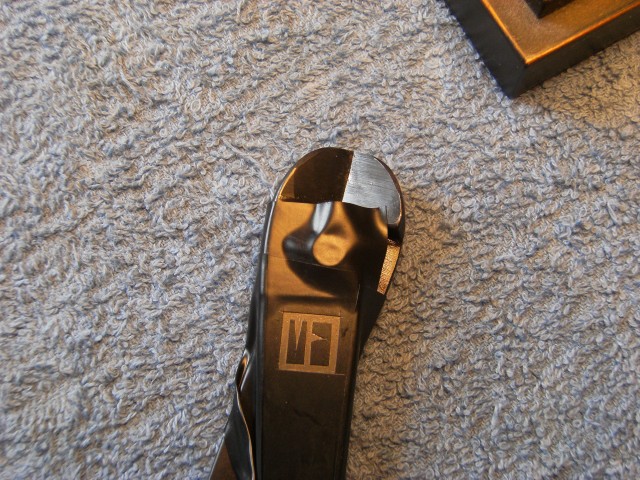
now, what we need to do is mask off the tool with electrical tape and cut out the portions you would like to etch...the first thing to do is to clean the area very well will rubbing alchohol...you want to be sure to clean any oils/dirt from that area...the elctrical tape is what will protect the rest of the tool during the etching process, so be sure to do a good job on this part, and make sure that there arent any exposed areas near the place where you are wanting to etch...after you have applied the tape, then simply take a sharp razor blade and cut out the design you would like to etch...you can also use nail polish to paint on the design...this will be easier for marks with curves in them...just remember, if you use nail polish, then make sure you apply it pretty thick, and allow plenty of time for drying/curing...
this is what it should like...
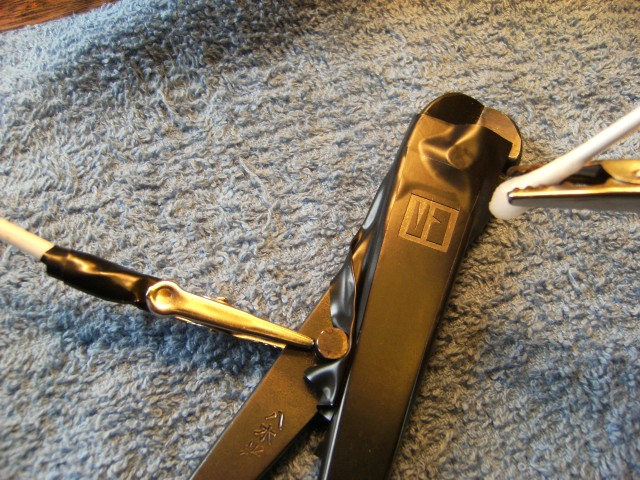
-connect one side of a wire to the positive post of the battery and the other side to an exposed metal part of your tool
-dip a cotton swab in the brine so that it is wet but not dripping (i usually give it a couple shakes to make sure it wont drip) and connect the other wire towards the tip of the cotton swab, and the other side connected to the negative post of your battery.
at this point you have a positive wire running from your battery and clipped onto your tool, and a negative wire running from your battery to your cotton swab
it should look something like this...
now, to begin the etching process, simply move your wet cotton swab over the area you want to etch...you will want to apply light pressure...at this point you should be able to hear the etching if you listen carefully...
NOTE: ONLY ALLOW THE COTTON SWAB TO TOUCH, DO NOT TOUCH ANY EXPOSED METAL WITH THE ALLIGATOR CLIP ATTACHED TO YOUR SWAB.
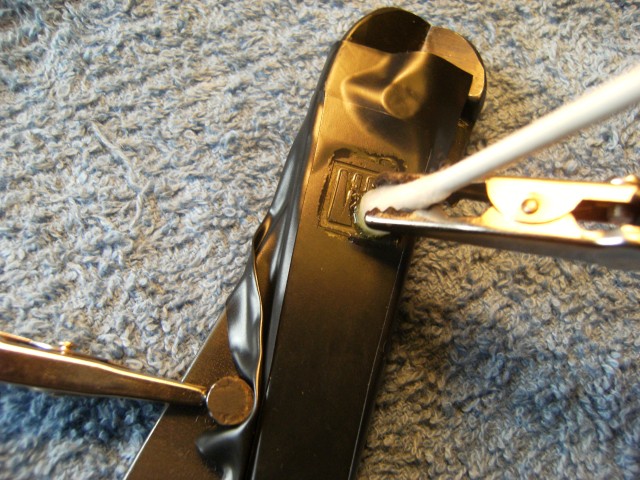
after a few seconds of etching you will notcie the brine starting to get black...this is the result of corroding away the exposed metal...usually, i will wipe a couple times and re-wet (is that even a word?) my swab...
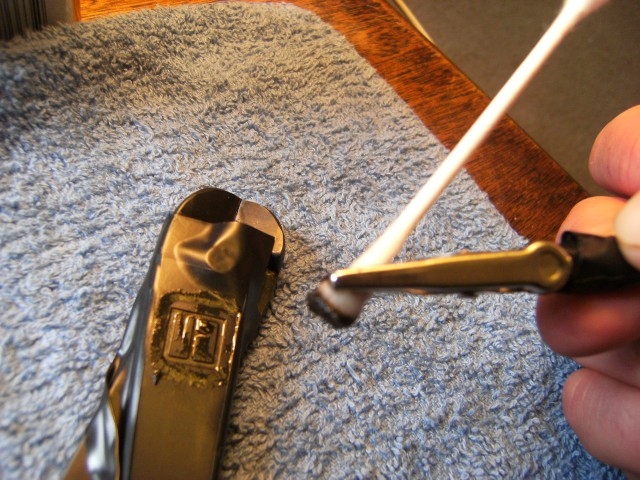
when you are happy with how deep the etch is, then wipe off the excess brine (which is now pretty grimy and gunky), and thoroughly clean the area with rubbing alcohol...the last thing you want to do is leave corrosive salt-water on your tool...then, remove all of the tape, and thoroughly clean the whole tool with alcohol just to make sure...then apply whatever oil you use on your tools...

i wish i could give you an exact time as to how long the etch takes, but that depends on the battery you are using...for me, using the big 6 volt battery, it took about 2 minutes per etch...basically, the longer you etch, the deeper your mark will be.
first, let me start this off by giving a shout out to the staff over at bonsaimonk, especially Karen...they are honest people that truly do aim for customer satisfaction above all else...Karen was incredibly helpfull and forthright with answering any and all of my questions, even before i was a "customer"...like i said, the customer service was simply outstanding, and i was able to puchase 2 yagimitsu tools on sale for around 100 bucks...now, im sure a lot of you already knew all of this, but this was my first experience dealing with them, and in a world where service seems to be taking a backseat, my transaction and conversations with Karen was a breath of fresh air.
this is my first tutorial, so if i leave anything out, or something isnt clear, please feel free to ask questions...
basically this process will show you how to etch a mark or design into metal without any fancy eqipment or anything like that...this tutorial is aimed at carbon steels...im not sure how well it would work on stainless...it probably would, but may take much much longer, and i have never personally done this on stainless, so i cant attest to the results one would achieve.
THINGS YOU WILL NEED
1. a bonsai tool
2. electrical tape
3. 4 alligator clips
4. 2 lengths of wire
5. a battery (i used one of those blocky 6v's, but other kinds will work too)
6. some cotton swabs
7. brine (salt water)
8. rubbing alcohol
the first thing you want to do is gather all of your materials
-to make the brine just dissolve salt into warm water until no more salt will dissolve
-attach the alligator clips to your lengths of wire so that you have a clip on each end (4 clips total)

now, what we need to do is mask off the tool with electrical tape and cut out the portions you would like to etch...the first thing to do is to clean the area very well will rubbing alchohol...you want to be sure to clean any oils/dirt from that area...the elctrical tape is what will protect the rest of the tool during the etching process, so be sure to do a good job on this part, and make sure that there arent any exposed areas near the place where you are wanting to etch...after you have applied the tape, then simply take a sharp razor blade and cut out the design you would like to etch...you can also use nail polish to paint on the design...this will be easier for marks with curves in them...just remember, if you use nail polish, then make sure you apply it pretty thick, and allow plenty of time for drying/curing...
this is what it should like...

-connect one side of a wire to the positive post of the battery and the other side to an exposed metal part of your tool
-dip a cotton swab in the brine so that it is wet but not dripping (i usually give it a couple shakes to make sure it wont drip) and connect the other wire towards the tip of the cotton swab, and the other side connected to the negative post of your battery.
at this point you have a positive wire running from your battery and clipped onto your tool, and a negative wire running from your battery to your cotton swab
it should look something like this...

now, to begin the etching process, simply move your wet cotton swab over the area you want to etch...you will want to apply light pressure...at this point you should be able to hear the etching if you listen carefully...
NOTE: ONLY ALLOW THE COTTON SWAB TO TOUCH, DO NOT TOUCH ANY EXPOSED METAL WITH THE ALLIGATOR CLIP ATTACHED TO YOUR SWAB.

after a few seconds of etching you will notcie the brine starting to get black...this is the result of corroding away the exposed metal...usually, i will wipe a couple times and re-wet (is that even a word?) my swab...

when you are happy with how deep the etch is, then wipe off the excess brine (which is now pretty grimy and gunky), and thoroughly clean the area with rubbing alcohol...the last thing you want to do is leave corrosive salt-water on your tool...then, remove all of the tape, and thoroughly clean the whole tool with alcohol just to make sure...then apply whatever oil you use on your tools...

i wish i could give you an exact time as to how long the etch takes, but that depends on the battery you are using...for me, using the big 6 volt battery, it took about 2 minutes per etch...basically, the longer you etch, the deeper your mark will be.
Last edited by Just Mike on Fri Jan 11, 2013 12:03 am; edited 2 times in total
Just Mike- Member
 Re: Tool Etching Tutorial
Great idea, much better than the colored electrical tape I use to identify mine. Thanks

Jim Doiron- Member
 Re: Tool Etching Tutorial
Very cool Mike! Thanks for sharing. I too would like to get rid of the colored plastic tape.
How did you keep the square border so clean it the elec. tape is being corroded off? Did you reapply the tape halfway thru?
How did you keep the square border so clean it the elec. tape is being corroded off? Did you reapply the tape halfway thru?

Fore- Member
 Re: Tool Etching Tutorial
Fore wrote:Very cool Mike! Thanks for sharing. I too would like to get rid of the colored plastic tape.
How did you keep the square border so clean it the elec. tape is being corroded off? Did you reapply the tape halfway thru?
no no...the electrical tape doesnt corrode at all...the salt-water wont penetrate the electrical tape or corode it...any area covered with tape prevents the electrified salt water from penetrating to the metal...so, what is being corroded is the exposed areas of metal where the tape was cut away and removed...it may be hard to see because i used black tape on a black tool...
...i just used a very sharp razor blade to cut out my mark
i hope that made sense...let me know if i need to clarify further.

Just Mike- Member
 Re: Tool Etching Tutorial
so...i dug up a piece of left over steel i had to demonstrate this technique using nail polish...hopefully this will show a better contrast and make it easier to understand what is going on...
first thing i did was use a pencil to sketch out my name in katakana...and then used nail polish to paint around it...this can get tricky in tight spaces, so using a toothpick to kinda "push" the nail polish into the tight areas is easier than trying to actually paint it on...

after allowing plenty of time to dry, i then masked off the edges with electrical tape to make sure none of the salt water gets onto any part that i do not want etched...
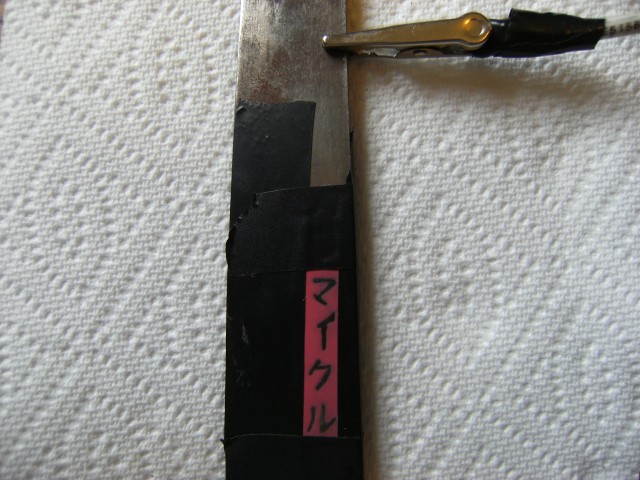
then hook up my wires and start etching

after wiping off the gunky water a couple times during the etch (and changing to a clean cotton swab), and i am happy with my etch...i unhook all the wires, wipe the area clean, remove the tape, and then use acetone to remove the nail polish and clean the area...
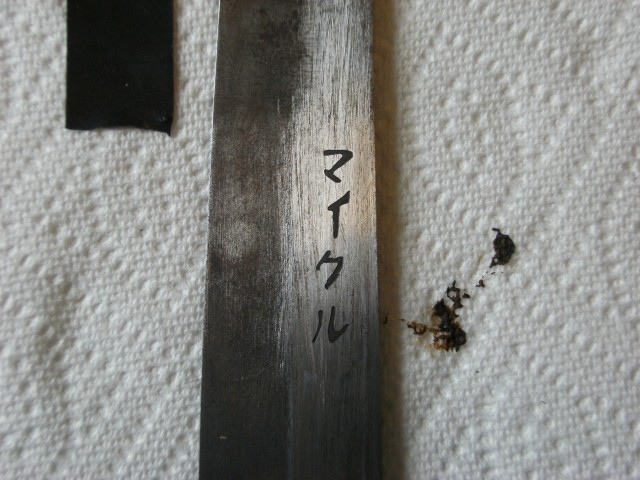
i hope that helped clear up any questions, and to show how to use the nail nail polish to etch designs that would be difficult to do by cutting out areas of electrical tape...
first thing i did was use a pencil to sketch out my name in katakana...and then used nail polish to paint around it...this can get tricky in tight spaces, so using a toothpick to kinda "push" the nail polish into the tight areas is easier than trying to actually paint it on...

after allowing plenty of time to dry, i then masked off the edges with electrical tape to make sure none of the salt water gets onto any part that i do not want etched...

then hook up my wires and start etching

after wiping off the gunky water a couple times during the etch (and changing to a clean cotton swab), and i am happy with my etch...i unhook all the wires, wipe the area clean, remove the tape, and then use acetone to remove the nail polish and clean the area...

i hope that helped clear up any questions, and to show how to use the nail nail polish to etch designs that would be difficult to do by cutting out areas of electrical tape...

Just Mike- Member
 Re: Tool Etching Tutorial
Gotcha, Thanks Mike. I'll def. give this a try...looks too fun not too lol

Fore- Member
 Re: Tool Etching Tutorial
Fore wrote:Gotcha, Thanks Mike. I'll def. give this a try...looks too fun not too lol
it is pretty fun actually...matter of fact you have to be carefull or you will find yourself looking around for things that "need" to etched lol

Just Mike- Member
 Re: Tool Etching Tutorial
@ just Mike,
Thanks ever so much. I can't hardly wait till I start etching this weekend!
I may even etch my bonsai digging tools!
Thanks ever so much. I can't hardly wait till I start etching this weekend!
I may even etch my bonsai digging tools!
ironman- Member
 Re: Tool Etching Tutorial
Thanks for posting Mike, we're always getting our tools mixed up at workshops, this should help.
Geoff
Geoff
geoff- Member
 Re: Tool Etching Tutorial
Thanks Mike, that is a great tutorial and could be very useful in proving ownership, especially at hectic workshops and club meets.

Kev Bailey- Admin
 Re: Tool Etching Tutorial
You're Welcome everyone...glad a few people could find some use out of it.

Just Mike- Member
 Re: Tool Etching Tutorial
wow, awesome Mike and thank you for sharing. I got everything ready to start. First I will do a couple of tests before I start etching everything in my house 

Saamy- Member
 Re: Tool Etching Tutorial
Great tutorial! Definitely going to do this to my newly acquired tools! :-D
Mike
Mike
mikebonsai- Member
 Similar topics
» Toolbox to go to the club
» 'Feedly' reader and download for around 300 bonsai blogs
» Mauro's Jin Tool
» Tool Caddy
» Where can I get the tool in this video?
» 'Feedly' reader and download for around 300 bonsai blogs
» Mauro's Jin Tool
» Tool Caddy
» Where can I get the tool in this video?
Page 1 of 1
Permissions in this forum:
You cannot reply to topics in this forum


