


Boxwood - threadgrafting branches
Page 1 of 2 • 1, 2 

 Boxwood - threadgrafting branches
![]() JMcCoy Mon Apr 09, 2012 11:51 pm
JMcCoy Mon Apr 09, 2012 11:51 pm
First get a good "whip", a branch that had grown out for about a year (at least for a season) & cut off all side branches:

Then cut off every other alternating leaf, trying to leave the remaining ones in a spiral around the branch as much as possible:

Lay a thin piece of wire along the branch. It should stick out much longer than the whip itself. Wrap the branch and the wire together tightly with non-sticking tape, curling and spiralling the leaves as they're wrapped tight:

Continue the tape out past the branch and onto the wire for a few turns, winding tightly. I then use a bit of sticky tape at the end to keep the green tape in place:

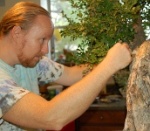
I drill a 1/4 inch hole, beginning from the outside where I want the branch to be. Boxwood is dense so drill slowly so as not to heat up the wood too much, then clean the ragged edges on each side with a grafting knife or razor blade:

Poke the cocooned branch through, using the wire as a guide and something to pull with, unwind the tape and remove the wire, then gently wire the branch upward to give it a bit of lift:


I poke piece of chopstick or toothpick on the bottom-side of the new branch to fill the gap in the hole (which you needed to push the leaves through), and put a good blob of cut-paste on each side to seal the wound.
Now comes the hard part.. don't touch it for a minimum of 2 years - no trimming, no wiring. Only lightly wire to keep it going in the right direction is ok. You want to give the new branch as much energy as possible, and the more leaves the better. Once it looks like it has fused, leave it longer! Only separate it when the backside of the graft has withered and there is no more green in that part of the cambium.

Last edited by JMcCoy on Fri Jul 27, 2012 2:08 am; edited 1 time in total (Reason for editing : clarification)
JMcCoy- Member

Re: Boxwood - threadgrafting branches
![]() JMcCoy Tue Apr 10, 2012 12:11 am
JMcCoy Tue Apr 10, 2012 12:11 am


Every branch on this tree was threadgrafted and it was finally brought into better proportions:


I'm now working on thickening the new branches and healing the wounds. It's still years away from being in a "finished" bonsai state, but it's been a fun ride getting there! I hope everyone has enjoyed my little adventure!
By the way, even though I keep popping up on topics about Boxwood, I swear I work on other stuff too!

JMcCoy- Member
Re: Boxwood - threadgrafting branches
![]() DreadyKGB Tue Apr 10, 2012 12:20 am
DreadyKGB Tue Apr 10, 2012 12:20 am
Thanks for this. You seem to be the resident boxwood master. Another great informational thread, and one that I will utilizing. I like the wrapping technique. I'd like to see your other trees as well.
Todd

DreadyKGB- Member
Re: Boxwood - threadgrafting branches
![]() Poink88 Tue Apr 10, 2012 12:43 am
Poink88 Tue Apr 10, 2012 12:43 am
Poink88- Member
Re: Boxwood - threadgrafting branches
![]() JMcCoy Tue Apr 10, 2012 1:28 am
JMcCoy Tue Apr 10, 2012 1:28 am
You seem to be the resident boxwood master.
No, no master!
Joey
JMcCoy- Member
Re: Boxwood - threadgrafting branches
![]() John Quinn Tue Apr 10, 2012 1:37 am
John Quinn Tue Apr 10, 2012 1:37 am

John Quinn- Member
Re: Boxwood - threadgrafting branches
![]() drgonzo Tue Apr 10, 2012 2:11 am
drgonzo Tue Apr 10, 2012 2:11 am
-Jay

drgonzo- Member
Re: Boxwood - threadgrafting branches
![]() my nellie Tue Apr 10, 2012 7:30 am
my nellie Tue Apr 10, 2012 7:30 am
A brilliant idea and one more great tutorial by Joey for the new "library" that Fiona is preparing!
Thank you very much once again!

my nellie- Member
Re: Boxwood - threadgrafting branches
![]() my nellie Tue Apr 10, 2012 7:31 am
my nellie Tue Apr 10, 2012 7:31 am
The essence of bonsai art itself! Bonsai no kokoro (Saburo Kato).JMcCoy wrote: ... ... No, no master!I just have a few tricks to share, that's all. But thank you both!
Joey
my nellie- Member
Re: Boxwood - threadgrafting branches
![]() sunip Tue Apr 10, 2012 8:58 am
sunip Tue Apr 10, 2012 8:58 am
Thanks, i remember asking about backbudding on boxwood and not getting any answer.
Good to see some practical experience with threadgrafting, it takes a few years
but waiting for some backbudding could take longer.
On the picture i see the whip is still green on the spot where its comes out of the drillhole,
is this necessary?
And the second question is, do you scrap the first layer to free the cambium on the whip at the out coming spot?
Sunip
sunip- Member
Re: Boxwood - threadgrafting branches
![]() Rob Kempinski Tue Apr 10, 2012 1:54 pm
Rob Kempinski Tue Apr 10, 2012 1:54 pm


Rob Kempinski- Member
Re: Boxwood - threadgrafting branches
![]() MrFancyPlants Tue Apr 10, 2012 2:48 pm
MrFancyPlants Tue Apr 10, 2012 2:48 pm
Thanks,
David D.

MrFancyPlants- Member
Re: Boxwood - threadgrafting branches
![]() Poink88 Tue Apr 10, 2012 3:23 pm
Poink88 Tue Apr 10, 2012 3:23 pm
Joey,JMcCoy wrote:I poke piece of chopstick or toothpick on the bottom-side of the new branch to fill the gap in the hole (which you needed to push the leaves through), and put a good blob of cut-paste on each side to seal the wound.
Is it critical that the chopstick or toothpick be on the bottom side? I thought the reverse is better (top side so the branch is at the bottom) since (in my little experience) it looks like the bark rolls faster at the bottom. Your thoughts on this?
How flush should the toothpick/chopstick be to the wall of the main branch? Or do you recess it in a bit?
Thank you.
Poink88- Member
Re: Boxwood - threadgrafting branches
![]() JMcCoy Tue Apr 10, 2012 3:56 pm
JMcCoy Tue Apr 10, 2012 3:56 pm
by sunip on Tue Apr 10, 2012 2:58 am
Hello Joey,
Thanks, i remember asking about backbudding on boxwood and not getting any answer.
Good to see some practical experience with threadgrafting, it takes a few years
but waiting for some backbudding could take longer.
On the picture i see the whip is still green on the spot where its comes out of the drillhole,
is this necessary?
And the second question is, do you scrap the first layer to free the cambium on the whip at the out coming spot?
I'm sorry I must have missed that post. It's not necessary for the stem to be green, but usually the long whips are new and green, plus it's best for the stem to be as small as possible to pass through the hole with the bundle of leaves. On occation, the "cocoon" is too large and I have to drill a slightly bigger hole, which means the healing/grafting time is increased. I never scrape the cambium on the whip. Over the many months/years it takes to bond well and graft, it would have calloused over at that point anyway.
JMcCoy- Member
Re: Boxwood - threadgrafting branches
![]() JMcCoy Tue Apr 10, 2012 4:01 pm
JMcCoy Tue Apr 10, 2012 4:01 pm
drgonzo Yesterday at 8:11 pm
.I could definitely see the tape and wire technique being useful for thread grafting many species that resent a full defoliation or have large cumbersome buds, like American Beech. Excellent tutorial and I will remember this approach as I look at some bare spots on a few of my trees this summer.
-Jay
Hi Jay,
We don't have beech here to play with, so I wouldn't know, but it may help in protecting the buds. If threadgraft is the option, I can imagine this technique could be helpful with any evergreen, maybe even juniper or pine, if they are wrapped carefully.
JMcCoy- Member
Re: Boxwood - threadgrafting branches
![]() JMcCoy Tue Apr 10, 2012 4:18 pm
JMcCoy Tue Apr 10, 2012 4:18 pm
by Poink88 on Tue Apr 10, 2012 9:23 am
Is it critical that the chopstick or toothpick be on the bottom side? I thought the reverse is better (top side so the branch is at the bottom) since (in my little experience) it looks like the bark rolls faster at the bottom. Your thoughts on this?
How flush should the toothpick/chopstick be to the wall of the main branch? Or do you recess it in a bit?
Hi Dario,
Well, this is the way I see the fluid dynamics of plants: The proto-callous/tissue is formed by the leaves and is deposited as nutrients return to the roots on the outer layer of the tree; the liquid the roots take in is moving up inside the tree. I would imagine that in a very long time-lapse it would look like nutrients running down and building girth to the tree like a waterfall. I know that it can form from the bottom - up as well, especially in newly cut branches, but with a strong growing normal tree, it's top - down. In any case, with my grafts on Boxwood the callous always forms at the top-side of a wound first and strongest, so this is where I try to make the tightest bond with the whip and the trunk.
I put the spacer chopstick/toothpick flush with the edge, and I wedge it on both sides of the opening, front and back. This is to prevent the whip from moving and possibly breaking. Almost nothing is more frustrating than waiting years on a new branch you are babying along, only to have it accidentally snap off because of extra movement! Been there!
Last edited by JMcCoy on Tue Apr 10, 2012 6:21 pm; edited 1 time in total
JMcCoy- Member
Re: Boxwood - threadgrafting branches
![]() Poink88 Tue Apr 10, 2012 4:39 pm
Poink88 Tue Apr 10, 2012 4:39 pm
Thanks for the explanation, sounds good to me!
I have an idea
 to tweak this technique that could potentially reduce the set time considerably but will see how it works first before sharing. I normally just blurt my ideas out but this will have to wait just because it is crazy. LOL I have a few boxwood that will benefit on having some strategically located branches anyway.
 Thanks again!!!
Poink88- Member
Re: Boxwood - threadgrafting branches
![]() JMcCoy Tue Apr 10, 2012 6:22 pm
JMcCoy Tue Apr 10, 2012 6:22 pm
I have an idea to tweak this technique that could potentially reduce the set time considerably but will see how it works first before sharing. I normally just blurt my ideas out but this will have to wait just because it is crazy. LOL
Hey, blurt away! Nothing's sacred here.
JMcCoy- Member
Re: Boxwood - threadgrafting branches
![]() Poink88 Tue Apr 10, 2012 6:37 pm
Poink88 Tue Apr 10, 2012 6:37 pm
You asked for it so here it goes.JMcCoy wrote:I have an idea to tweak this technique that could potentially reduce the set time considerably but will see how it works first before sharing. I normally just blurt my ideas out but this will have to wait just because it is crazy. LOL
Hey, blurt away! Nothing's sacred here.
1. After the whip is threaded through...secure it so it won't slip back out but DO NOT set in the hole yet.
2. Let the whip bud and branch. Should happen fairly fast if done early spring or any growing season.
3. Once the new branches hardened a bit (maybe after having 4 pairs of leaves each branch)...back the whip out until the branch area is just barely in the hole.
4. Wedge the holes as needed (more on the entry point than the exit OR cover the lower point (most likely the entry point) and inject wood glue inside the hole. This should provide a VERY tight seal and induce swelling in no time.
These added steps can (in theory) potentially shorten the graft time by half or more. As a bonus, you will have more options choosing your branch later.
What do you think?
Poink88- Member
Re: Boxwood - threadgrafting branches
![]() JMcCoy Wed Apr 11, 2012 5:15 am
JMcCoy Wed Apr 11, 2012 5:15 am
I really like the idea of using glue inside to hold it firm, and may try that next time too. Not sure about leaving them loose though.. it seems to me that to take advantage of any callous and thickening as soon as possible to start the bond gets the new branch on its way fastest. Try out your ideas though.. and any others that pop up, it's a great way to expand the possibilites!
JMcCoy- Member
Re: Boxwood - threadgrafting branches
![]() Poink88 Wed Apr 11, 2012 2:03 pm
Poink88 Wed Apr 11, 2012 2:03 pm
I imagine the callous formation won't happen (enough to close the gap anyway) in months. Long before then, the needed branches should have sprouted and ready to be set. That is the way I see it. I would have done it already if I have a whip I can use but for now I have to wait for one to be long enough.
Any delay on the whip thickening will be more than compensated by the branches thickening at twice or triple the rate at the branch area. Again, that is how I see it theoretically. I will let you know if it works once I've done one.
Thanks!
Poink88- Member
Re: Boxwood - threadgrafting branches
![]() The Lad Thu May 31, 2012 7:22 pm
The Lad Thu May 31, 2012 7:22 pm
What a great way to thread many many thanks for sharing as the saying goes "A Picture Speaks more than a Thousand Words"
I will be checking this Forum more to get lots more Inspirational ideas
Thanks again
Jim thelad

The Lad- Member
Re: Boxwood - threadgrafting branches
![]() Neli Thu Nov 29, 2012 11:11 am
Neli Thu Nov 29, 2012 11:11 am

Neli- Member
Page 1 of 2 • 1, 2
» dry buxus harlandii started to shoot new boughs, cut old ones?
» Help with Boxwood
» Just Dug Up this Holly - Need Help Please
» Help with boxwood
|
|
|