Yew - first styling
4 posters
Page 1 of 1
 Yew - first styling
Hi,
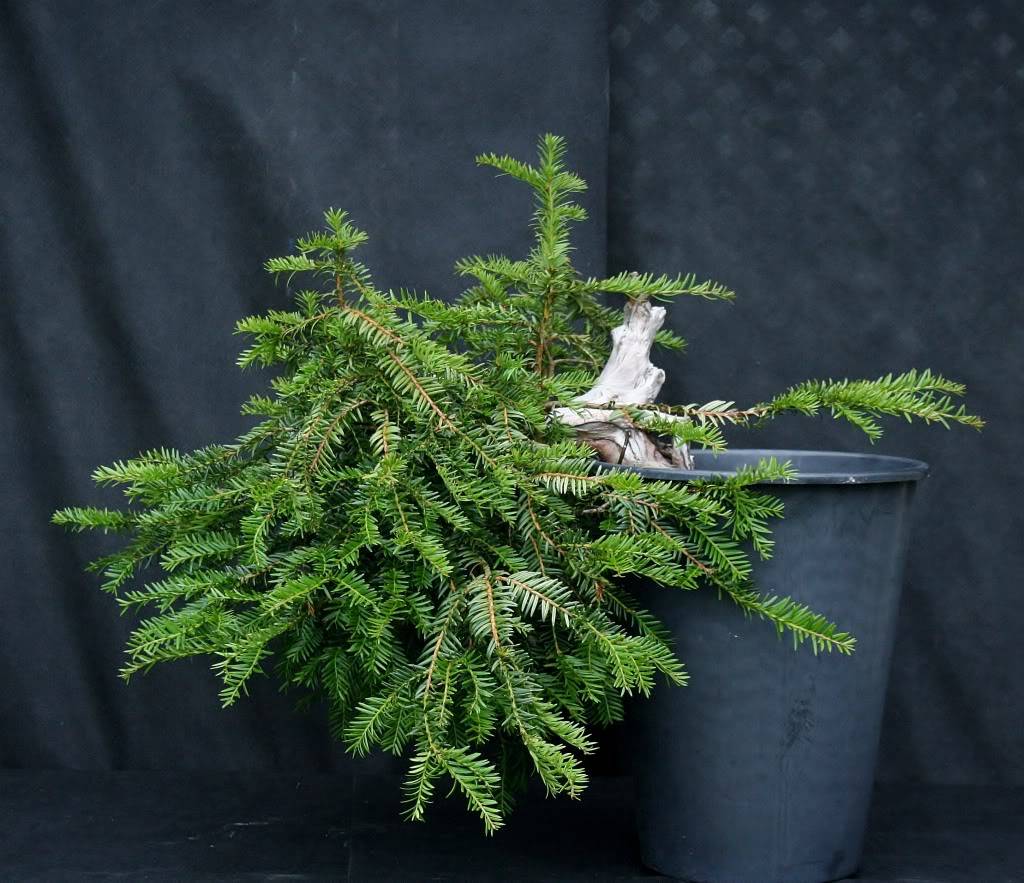
i started to wire this raw piece of material at the weekend show and have just finished the initial first styling.
It is a nice yamadori Yew (Taxus baccata) that was picked to create a cascade - mainly because i havent got a yew bonsai, and i havent got a cascade either !
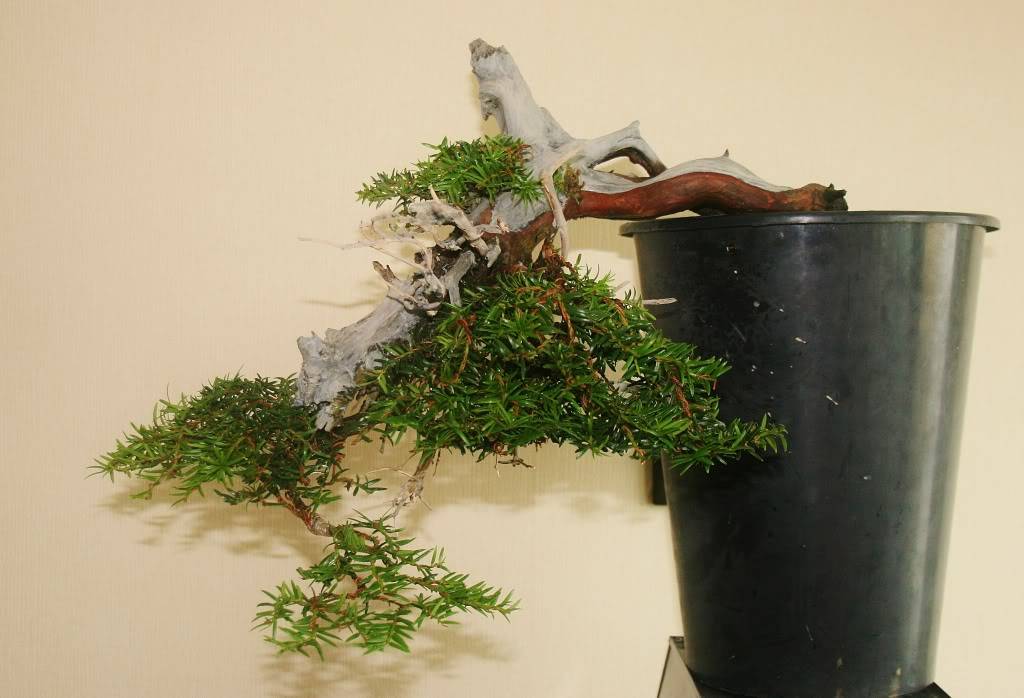
This is just the first basic styling and as the foliage develops some more small shoots i'll break the larger mass into 3 or 4 smaller pads. The lowest pad is obviosly the weakest atm but energy will be directed to it and a sacrifice shoot will be left to grow on it too, so that it bulks up.
Originally i was planning for one single foliage mass in layered clouds, under the trunk line, but when we shielded the other foliage with a towel it gave a very flat 2 dimensional look to the tree and no feeling of depth, so the back pad, lower pad and small crown were formed - i may in time remove the top one but at the moment I like the contrast with the deep glossy green and the dead wood so it can stay.
Before:

After:

cheers Marcus
i started to wire this raw piece of material at the weekend show and have just finished the initial first styling.
It is a nice yamadori Yew (Taxus baccata) that was picked to create a cascade - mainly because i havent got a yew bonsai, and i havent got a cascade either !
This is just the first basic styling and as the foliage develops some more small shoots i'll break the larger mass into 3 or 4 smaller pads. The lowest pad is obviosly the weakest atm but energy will be directed to it and a sacrifice shoot will be left to grow on it too, so that it bulks up.
Originally i was planning for one single foliage mass in layered clouds, under the trunk line, but when we shielded the other foliage with a towel it gave a very flat 2 dimensional look to the tree and no feeling of depth, so the back pad, lower pad and small crown were formed - i may in time remove the top one but at the moment I like the contrast with the deep glossy green and the dead wood so it can stay.
Before:

After:

cheers Marcus

marcus watts- Member
 Re: Yew - first styling
Extremely promising, Marcus. Looking forward to seeing its development.
Can you give us an indication of size please?
Can you give us an indication of size please?

fiona- Member
 Yew - first styling
Looking good Marcus. Looks like you've changed the angle of the tree within the pot as the deadwood on top is now further over. Is it a pot within a pot? Not quite sure about the lowest pad moving back under the cascade.
Guest- Guest
 Re: Yew - first styling
Guest wrote:Looking good Marcus. Looks like you've changed the angle of the tree within the pot as the deadwood on top is now further over. Is it a pot within a pot? Not quite sure about the lowest pad moving back under the cascade.
Who's the guest?
Guest- Guest
 Re: Yew - first styling
hi,
originally the trunk was level so rather than work with the pot tilted I took the tree and roots out of the pot without disturbing, then added 6" more soil mix (akadama & kiryu) to the bottom of the pot and put the tree back in so the trunk cleared the rim of the pot. This let the trunk lean down a lot more in a natural cascade as it dropped lower under its own weight. (The main root that is now visible was originally inside the pot but not covered in soil - no soil was removed from the top, just more added to the bottom)
Size - this is a little small tree - pot is 14" high, verticle from low pad to tip of deadwood is also 14", diagonally from tip to roots 18"
Bottom pad - haha - this was originally (1) part of the back pad, then (2) i tried using it to just extend the cascade further with a lower pad - but this made it look like every other cascade tree that gets styled - (like a flight of stairs), so (3) was to work it back out of the wind & towards the mountain. The 2D photo doesnt show it is actually coming forward to the viewer and not back under the cascade, but i think it will be blended to the back pad a little more so it looks like a seperate layer of that foliage mass - as the scale of the picture goes 1cm up 3cm to the left.
who is guest haha

marcus watts- Member
 Re: Yew - first styling
Guest wrote:Looking good Marcus. Looks like you've changed the angle of the tree within the pot as the deadwood on top is now further over. Is it a pot within a pot? Not quite sure about the lowest pad moving back under the cascade.
Hey guest!! What happened man?
You are the best teacher around here, Just let the P_ _cks do their stuffs and continue what you do best...sharing your knowledge and showing trees coming from a real artistic ability of a person and not from a popularity show.
They are not worth it man.
regards,
jun
Guest- Guest
 Re: Yew - first styling
Marcus, I do apologize for the invasion, but.... put the blame on Jun
Dear Guest, may I remind that you also have a pending thread on carving?
Dear Guest, may I remind that you also have a pending thread on carving?

my nellie- Member
 Re: Yew - first styling
Would you consider removing the apical foliage mass, the one located at the left side of the upper jin? I think that by removing it the tree will gain a lot of maturity.
carlos- Member
 Re: Yew - first styling
carlos wrote:Would you consider removing the apical foliage mass, the one located at the left side of the upper jin? I think that by removing it the tree will gain a lot of maturity.
hi, yes, well worth considering, or it could be moved down lower on the trunk ? as i wanted a 'back branch' to give proper depth to the tree - looking at the picture it would look good half way down the trunk, framing the dead wood with dark foliage - i've tended to consider this cascade as a tree upside down as well - that branch is the first branch and the apex is at the bottom, coming forward to the viewer - a slightly alternative idea but it still gives a nice image
I've eased the lowest pad closer to the end one so it appears as a layer of the same, but i've retained it coming forward as again this gives the real 3D tree a lot more depth. - its tricky to not style the tree so it only looks good as a flat picture - i think on any tree we style the branches and trunk on the left, centre and right are the important 'photo' parts of the tree but the most important bits to make a convincing real tree in the flesh are the front and back areas.
3D cameras wont be far away now - that will be cool
i'll take another picture with the tweaks in place

marcus watts- Member
 6 months later in a pot
i went to visit a bonsai potter (Gordon Hunt) yesterday who it turned out lived less than an hour from me.
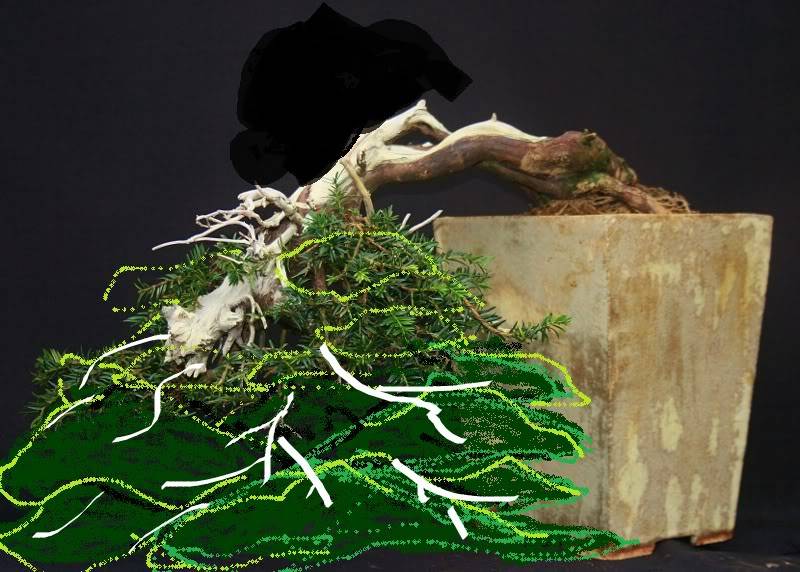
visiting the studio it seemed best to relieve him of some stock as this cascade pot caught my eye and the yew was still sat in the plastic pot. over the last months i tweaked the tree a bit - all the little pads of foliage became annoying so i removed some, and moved the others into one mass.
The tree went straight from the plastic into the new pot and the gaps round the edge were filled with soil - no root disturbance as it is the wrong time of year. I plan to continue training layers of growth downwards while extending the foliage width - maybe even all the way down into a true cascade - and the heavy bit of dead stump stuck up needs making lighter too - its a bit chunky i think.

We ended up with a big box of accent and small shohin pots too.....so lots to play about with in the coming months
i'm not so good at paint but this sort of thing maybe

thanks marcus
visiting the studio it seemed best to relieve him of some stock as this cascade pot caught my eye and the yew was still sat in the plastic pot. over the last months i tweaked the tree a bit - all the little pads of foliage became annoying so i removed some, and moved the others into one mass.
The tree went straight from the plastic into the new pot and the gaps round the edge were filled with soil - no root disturbance as it is the wrong time of year. I plan to continue training layers of growth downwards while extending the foliage width - maybe even all the way down into a true cascade - and the heavy bit of dead stump stuck up needs making lighter too - its a bit chunky i think.

We ended up with a big box of accent and small shohin pots too.....so lots to play about with in the coming months
i'm not so good at paint but this sort of thing maybe

thanks marcus

marcus watts- Member
 Similar topics
» Help with styling
» How about styling something like this?
» Field tree
» San jose juniper
» My Smallest NZ Tea Tree
» How about styling something like this?
» Field tree
» San jose juniper
» My Smallest NZ Tea Tree
Page 1 of 1
Permissions in this forum:
You cannot reply to topics in this forum


