Yellow Cedar - Chamaecyparis nootkatensis
4 posters
Page 1 of 1
 Yellow Cedar - Chamaecyparis nootkatensis
Hi Folks,
Just wanted to share my latest project, it will take a few more sessions and years to get close to the image I have and maybe it never will but I’ll give it a good shot.
The photos show how I’ve split off the one live vein feeding the top and its little brother at the bottom. I want to carve the outer sap wood off the wooden trunk to see what the heartwood reveals and then wrap the vein loosely around the newly shaped trunk….but I’ll leave a considerable gap between the two to evoke a feeling of decades or even centuries of decay and strife.
It was uncanny that Si Ngugen over at bonsainut came up with a sketch/vision that was really close to the one I had, but this species foliage will not lend itself to a “flat top” as Si had shown….so I elaborated it and coloured the attached version to show a potential final look and the contrast that I should get between the yellow of the trunk, the bark (outer bark removed highlighted with walnut oil) and the lush green of the foliage.
Maybe not a true bonsai (and maybe even scorned by purists)……but fun just the same…
Cheers
Gman


gman- Member
 Update - The Spirit of Nootka
Hi there,
An update…………..
While working on this project I've come up with the name/idea of "The Spirit on Nootka" which encompasses the concept of the live vein wrapping around (protecting if you will) the old trunk which I’ve carved down (the inner spirit of the tree).
As I've stated before – by definition it’s not a bonsai nor a phoenix graft/tanuki by any means…… but it’s been a fun ride so far.
The Carving of the Old Mostly Deadwood Trunk”:
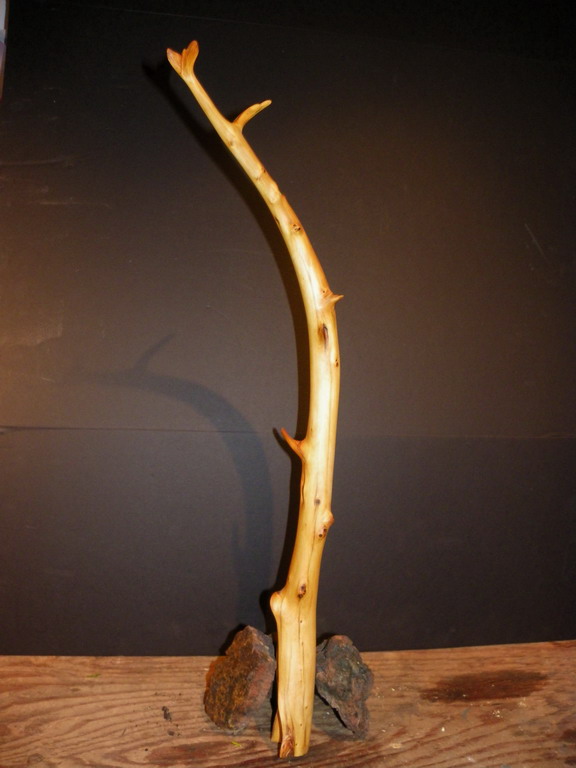
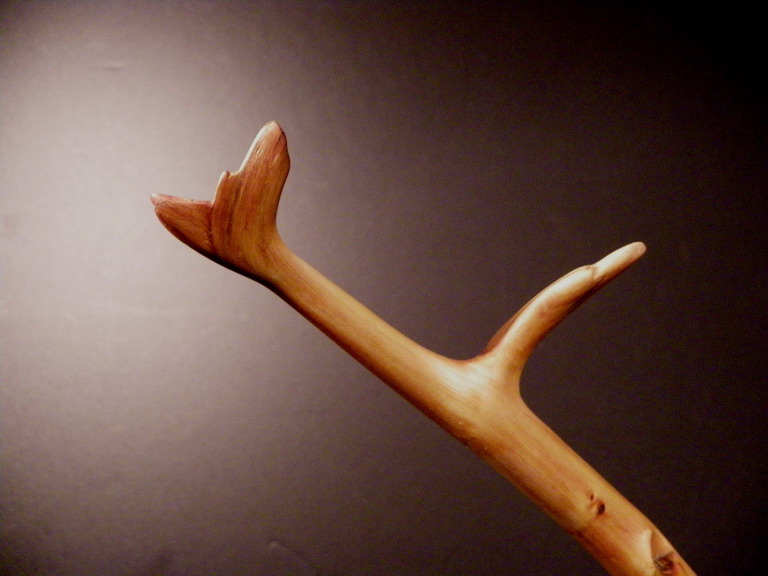
Much to the dismay of my mentor I removed the live vein from the mostly deadwood trunk which as you can see I have carved – before = first photo and now = second photo. I was able to find some interesting features within the old deadwood trunk (see photo #3) and ironically a couple of them depict some mystic creatures of the west coast photos 4 and #5.


gman- Member
 Update Cont'd
The Outer Main Tree:
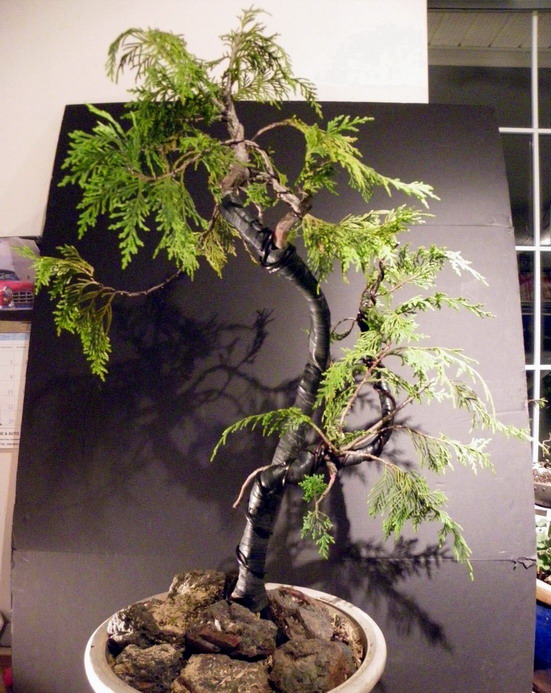
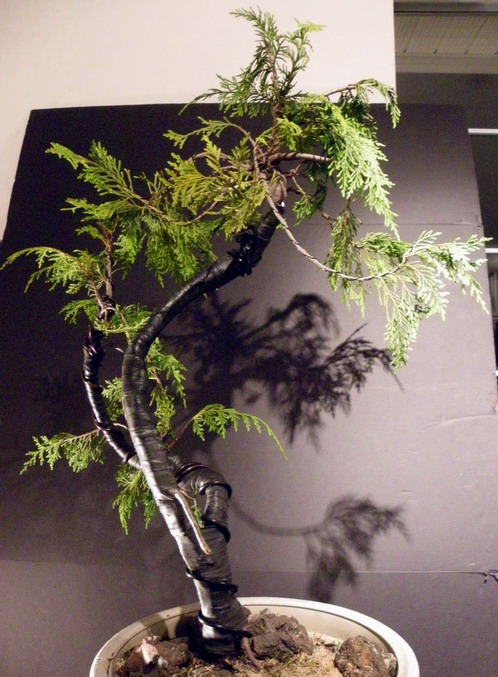
Once the vein was removed I reduced the wooden core by carving (both power and hand tools) the entire length of it ensuring the middle was deeper and tapering to the outside (the natural curve). I also ran my carver (along the bottom) into the top of the tree so that I could bury some large wire(s) into it for future bending/styling. The secondary stem also was carved (grooved) and wires were aligned into the main groove and the entire length was wrapped with strips of inner tube.
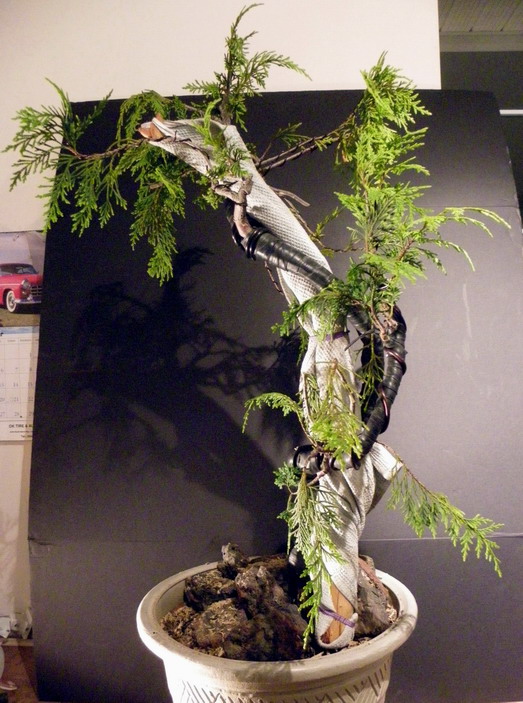
I then took a ½” plastic tube (used in outdoor irrigation) that I had filled with various lengths of aluminum wire, using the largest (6ml) first and decreasing the size until I couldn’t jam any more in. I left about 3-4” of the wires hanging out of the bottom which I fixed to the lowest parts of the live vein (hooked onto roots buried in the soil). I then molded the wired tube (along the carved groove) to the shape of the live vein and put two layers of inner tubes strips to hold it in place. In the upper section I removed the outer plastic tube and embedded a number of wires into the final 3” of the carved groove.
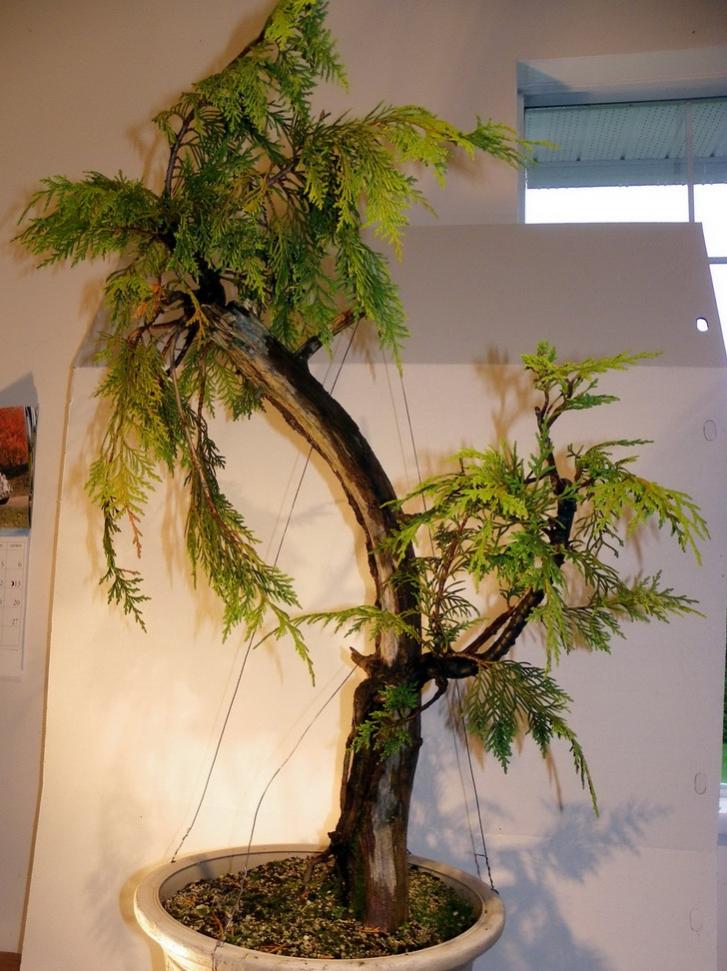
I then started at the bottom and gently bent the live vein into the curves you see in first & second photo and the third photo shows it with the wrapped (still wet) wooden trunk. I tried a number of positions for the trunk and have a few options for its final position. I will continue to bend the live vein over time as want more of a curve but I didn’t want to push it too far this session. I’ll also reduce the foliage some more as it looks too leggy at the moment and luckily there are a lot of small branches to work with.
Cheers
G


gman- Member
 Re: Yellow Cedar - Chamaecyparis nootkatensis
Hi, "G" man ,
I brought a yellow cedar home this summer from campbell river. I haven't done a thing with it and won't till spring. Not used to seeing it used as bonsai so anxious to see what your up to. What soil mix did you use?
thanks
I brought a yellow cedar home this summer from campbell river. I haven't done a thing with it and won't till spring. Not used to seeing it used as bonsai so anxious to see what your up to. What soil mix did you use?
thanks
dick benbow- Member
 Re: Yellow Cedar - Chamaecyparis nootkatensis
Hi Dick, I assume you collected one?dick benbow wrote:Hi, "G" man ,
I brought a yellow cedar home this summer from campbell river. I haven't done a thing with it and won't till spring. Not used to seeing it used as bonsai so anxious to see what your up to. What soil mix did you use?
thanks
You are right, they are uncommon as Bonsai (limited geographical range) but more recently they are becoming popular with a few of us Pacific Northwest practitioners. One of our club members has a really old looking one that he’s started working on so if I get the chance I’ll get a photo or two of it and post them.
Like I stated in my post, I don’t consider this a bonsai (an abstract composition perhaps) but it's giving me an opportunity to learn how to keep them alive, fertilzer regime, how to treat the foliage, how it takes to wiring etc.
As you can see it’s in a large plastic garden pot and the upper 1/3 of soil mix covers the original rootball) is what I had available…..Seasoil (a local produced product of fish-mulch & decomposed hemlock bark), a small amount of perlite and crushed granite. The lower 2/3's is just a organic soil mix. I’ve found them to be really hardy and they respond well to fertilizer turning a nice dark green.
Good luck with your and keep us posted.
Cheers Graham

gman- Member
 Re: Yellow Cedar - Chamaecyparis nootkatensis
are you planning to let the very shiny smooth 'sculpture' wood roughen and age or is it more of an artistic piece of work you plan? - either or would be really good, but i think a 'tree like' true bonsai image doesnt go with the almost varnished looking polished wood.
As a piece of art combining living and dead its really nice - but i think it is certainly a tanuki now as the trunk became very much dead once it was cut off the living roots - the fact they were both once a single living tree doesnt change the outcome due to total seperation - tanauki is living tree and dead tree attached together - the source of the woods makes no diference. To seperate the living areas down only to the root line , work the trunk and then attach it all back without ever seperating would create the non tanuki you describe I think.
nice arty piece though
marcus

marcus watts- Member
 Re: Yellow Cedar - Chamaecyparis nootkatensis
[quote="marcus watts"]are you planning to let the very shiny smooth 'sculpture' wood roughen and age or is it more of an artistic piece of work you plan? - either or would be really good, but i think a 'tree like' true bonsai image doesnt go with the almost varnished looking polished wood.
As a piece of art combining living and dead its really nice - but i think it is certainly a tanuki now as the trunk became very much dead once it was cut off the living roots - the fact they were both once a single living tree doesnt change the outcome due to total seperation - tanauki is living tree and dead tree attached together - the source of the woods makes no diference. To seperate the living areas down only to the root line , work the trunk and then attach it all back without ever seperating would create the non tanuki you describe I think.
nice arty piece though
Marcus
Hey Marcus, I'm not sure about the final texture of the deadwood or design for that matter, I'll just wait and see how it has responded to the wiring and how much of a root ball I have next spring.
A little more history ........This piece of material was actually a natural tanuki, the live vein was barely attached to the dead wood. When I found the tree (about 30feet long) it was lying horizontal, being knocked over by previous harvesting (the stump/original roots had long died and rotted away) however the upper live section that was lying flat against an old red cedar log had started to take root (which is common practice with this species), however I wasn't comfortable with the amount of root mass so I cut throught the old section of dead wood (detaching it from the original tree) and prepared the rooted section with some moss and soil and collected it a year later.
It really has no nebari per se so I thought why not try soemting different.
Cheers G

gman- Member
 Re: Yellow Cedar - Chamaecyparis nootkatensis
thanks for your feedback and hopefully a picture to see....

dick benbow- Member
 Re: Yellow Cedar - Chamaecyparis nootkatensis
Here is a picture of it in 2008, as you can see, it was just a section of the original yellow cedar that had started to root. If you look closely you can see some of the roots....the stump wasn't going to make much of anything so I took the live part. The rings showed that its at least 70 years old......dick benbow wrote:thanks for your feedback and hopefully a picture to see....
I'll post it again this spring.
Till then cheers. G


gman- Member
 Re: Yellow Cedar - Chamaecyparis nootkatensis
An update almost 3 years in the making.....


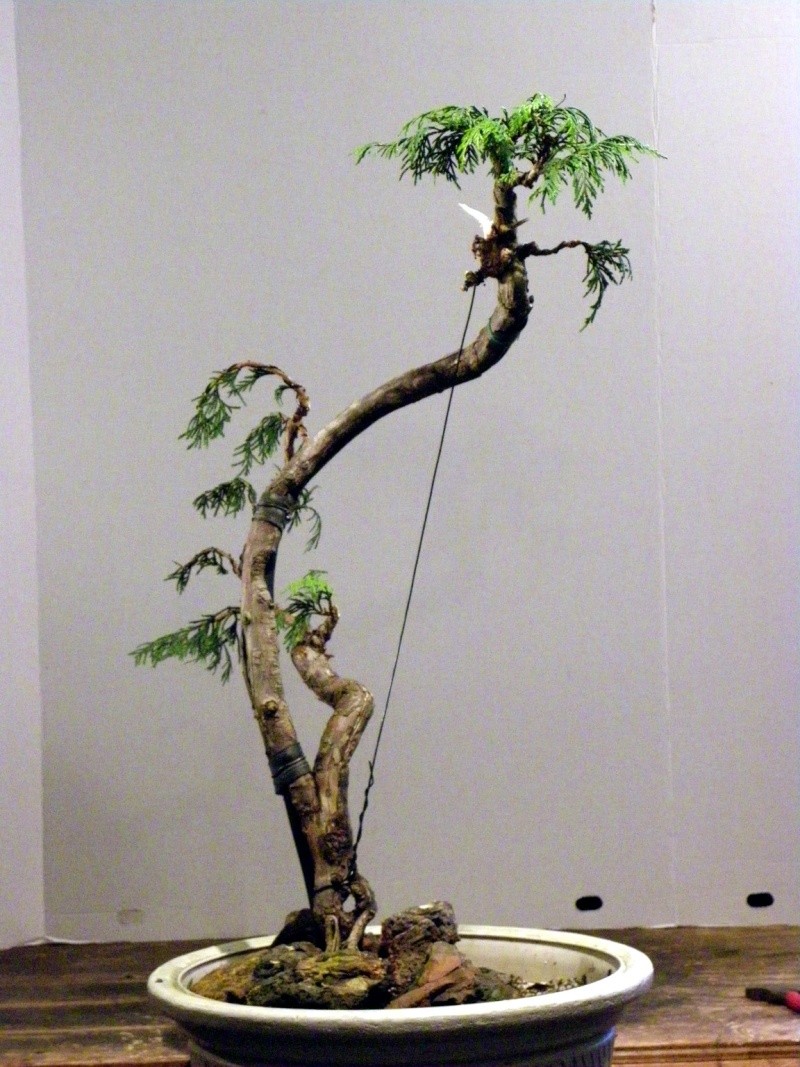
Thanks for looking,
Cheers Graham


Thanks for looking,
Cheers Graham

gman- Member
 Update
It grew well this summer so I gave it a fall trim.........need a few more vigorous growing years before I'll feel comfortable removing the inner support rod and into a lot more attractive pot.
BEFORE
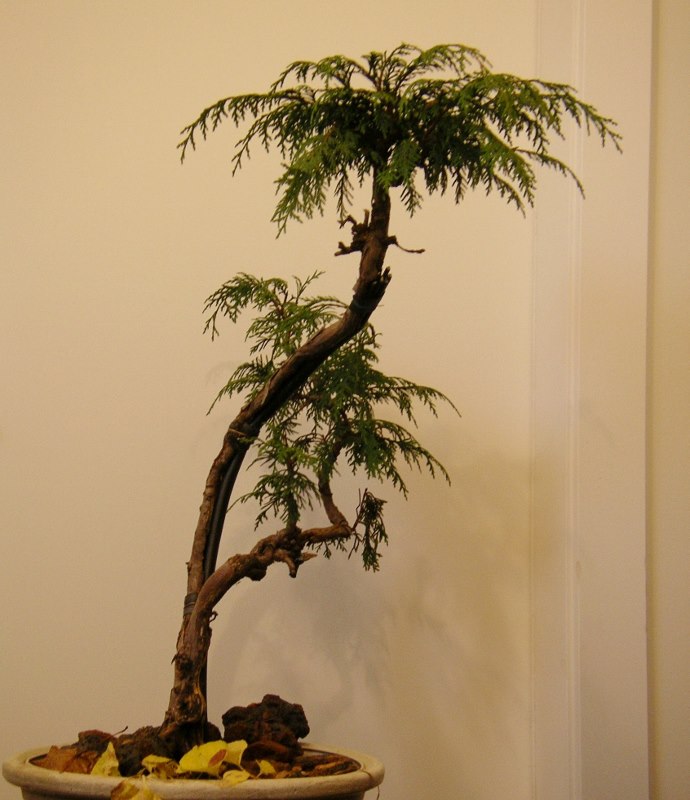
AFTER

Cheers Graham
BEFORE

AFTER

Cheers Graham

gman- Member
 Re: Yellow Cedar - Chamaecyparis nootkatensis
i am really looking forward to seeing this one come to fruition...

Kevin S - Wisco Bonsai- Member
 Similar topics
» yellow cedar
» Alaska Yellow-Cedar
» EASTERN RED CEDAR - BONSAI GETTING YELLOW
» Alaska Yellow Cedar Update
» Chamaecyparis shohin
» Alaska Yellow-Cedar
» EASTERN RED CEDAR - BONSAI GETTING YELLOW
» Alaska Yellow Cedar Update
» Chamaecyparis shohin
Page 1 of 1
Permissions in this forum:
You cannot reply to topics in this forum


