OOPS!!! I STYLED A BONSAI !!!
+9
Hans Vleugels
my nellie
Pavel Slovák
mike page
ybonsai
Ed van der Reek
Kev Bailey
irene_b
Hans van Meer.
13 posters
Page 1 of 2
Page 1 of 2 • 1, 2 
 OOPS!!! I STYLED A BONSAI !!!
Hi everybody,
spread over the last few day's I restyled one of my Mugo Pines named "Little Chapel". With the progressive styling story of this same tree, that covers the complete progress right from me collecting it, and trough its first styling, I won the first AoB professional styling competition back in 2007. Here !!! (still waiting for my first price though )
)
Below: Collecting "Little Chapel" in Austria, back in 2004.

Now 3 years after that first styling, I felt it was safe and time to give it its second styling!
Below: Close up of the base with all its natural deadwood.

First all the needles from last years were removed by plucking them off one at a time. In this way most of the needles sheets will stay behind on the branch. From these needle sheets new buds will grow much easier! This way there is also more room to wire the tree right up to the tips, as long as you are careful not to damage all the small new buds!
Below: This is how the tree looked before styling.

Below: This remaining stump that I had left on after shortening the former main cascading branch in the original design (red arrow), is now dry and needs to be reduced and formed in the style of the all ready exciting long Jin behind it.

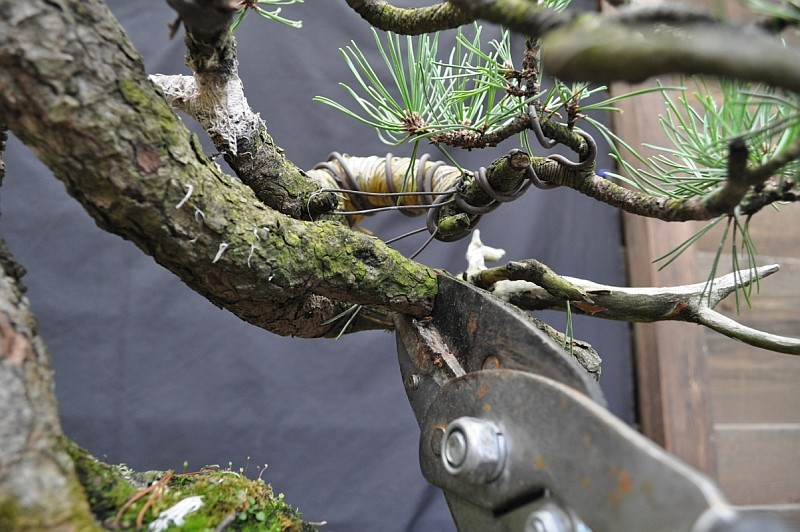
Below: So I shortened it with a large cutter.
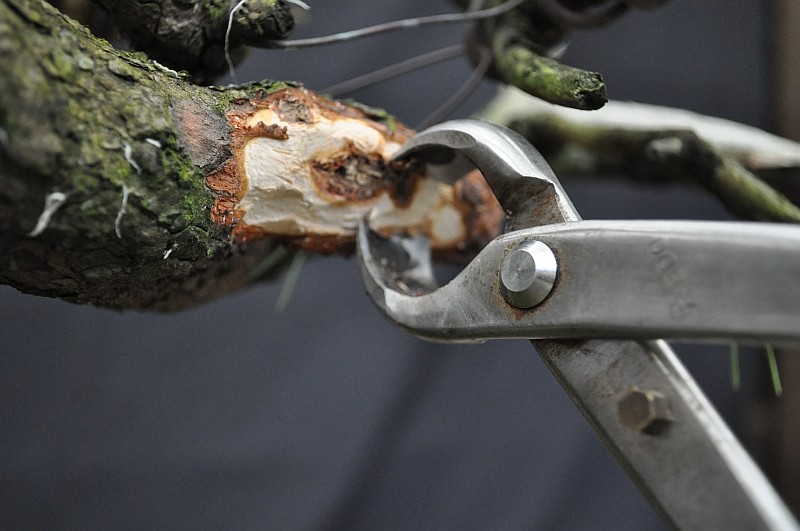
Below: I like to work with these kind of cutters to remove the bark and to give a straight stump its new movement.
spread over the last few day's I restyled one of my Mugo Pines named "Little Chapel". With the progressive styling story of this same tree, that covers the complete progress right from me collecting it, and trough its first styling, I won the first AoB professional styling competition back in 2007. Here !!! (still waiting for my first price though
Below: Collecting "Little Chapel" in Austria, back in 2004.

Now 3 years after that first styling, I felt it was safe and time to give it its second styling!
Below: Close up of the base with all its natural deadwood.

First all the needles from last years were removed by plucking them off one at a time. In this way most of the needles sheets will stay behind on the branch. From these needle sheets new buds will grow much easier! This way there is also more room to wire the tree right up to the tips, as long as you are careful not to damage all the small new buds!
Below: This is how the tree looked before styling.

Below: This remaining stump that I had left on after shortening the former main cascading branch in the original design (red arrow), is now dry and needs to be reduced and formed in the style of the all ready exciting long Jin behind it.

Below: So I shortened it with a large cutter.

Below: I like to work with these kind of cutters to remove the bark and to give a straight stump its new movement.

Last edited by Hans van Meer. on Mon Aug 23, 2010 2:31 am; edited 1 time in total

Hans van Meer.- Member
 Part II
Below: By carefully removing wood from all angels, more movement is created from all sides.
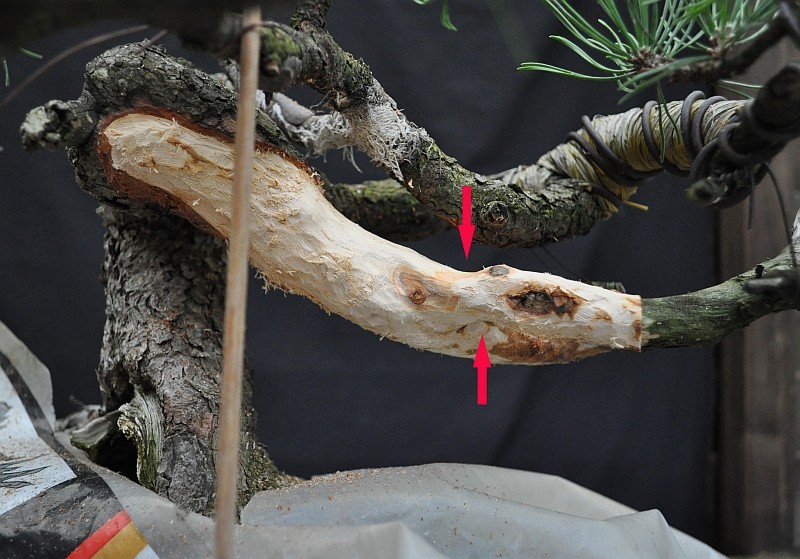
Below: Already the Jin behind the one I am working on is more visible from the front. Creating enormous dept to the whole composition.
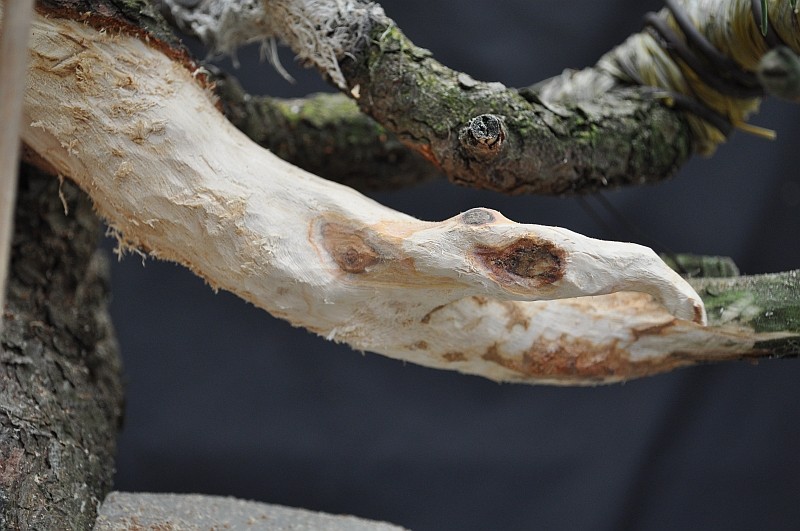
Below: Good enough for now! In the near future, when the new image is more fixed in my mind, I will work on this Jin to refine it some more.

Below: Time to start wiring!


Below: Already the Jin behind the one I am working on is more visible from the front. Creating enormous dept to the whole composition.

Below: Good enough for now! In the near future, when the new image is more fixed in my mind, I will work on this Jin to refine it some more.

Below: Time to start wiring!


Hans van Meer.- Member
 PART III
Below: What could be more pleasant than wiring a small tree in the morning sun?
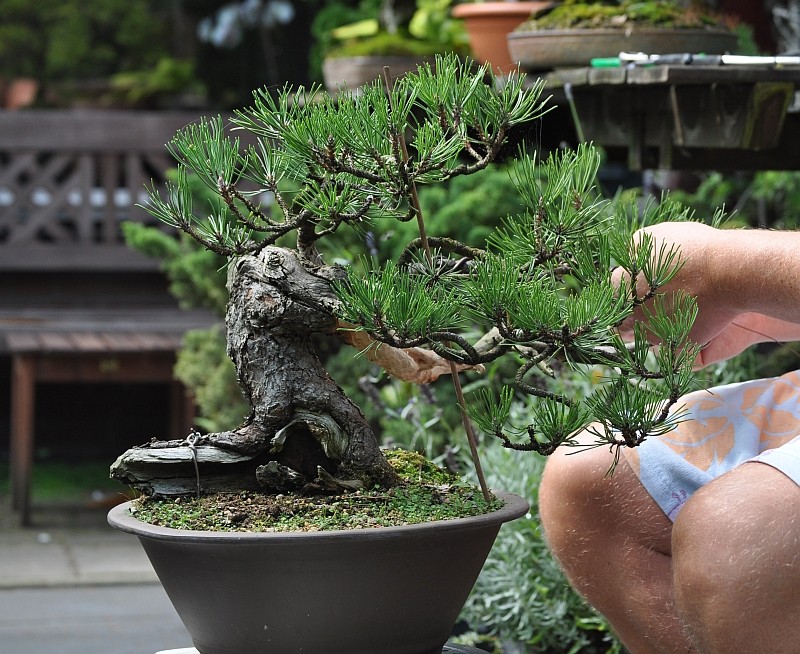
Below: Wiring is don, now for the fun part, going blank and bringing the foliage in to its place! HUUuuuuummmmmmm!

Below: The end result from this styling session.

I am realy pleased with the progression this little Pine made in such a short time! For now this tree will stay a few years longer in this over sized training pot. In the future it will be planted slightly tilted to the left, in a more or less same shape pot, but without the rim and with some more texture. This new angle will bring even more movement into the lower section of this massive trunk! The large empty space on the left side of the tree, counterbalances the foliage mass of the cascading branches well. Bringing balance to the whole composition. The empty space on the right side of the trunk, now gives you a peek at the long deadwood branches in the back. Showing us all the struggle this old survivor had to endure over the decades it is standing on this hilltop! This open space makes me feel like I could walk under need those cascading branches and sit down in their shade, with some bread, cheese and red wine, looking down over the valley. HHHMMMMMMM!!!
Tomorrow I will clean up the old deadwood and tread it with Lime sulfur and after that this "Little Chapel" Pine is put back into his place in the sun to enjoy the last weeks of Summer!
Although this simple Bonsai work, may seam a bit old fashion to some, I still hope that you enjoyed this little story?!
Cheers,
Hans van Meer.

Below: Wiring is don, now for the fun part, going blank and bringing the foliage in to its place! HUUuuuuummmmmmm!


Below: The end result from this styling session.

I am realy pleased with the progression this little Pine made in such a short time! For now this tree will stay a few years longer in this over sized training pot. In the future it will be planted slightly tilted to the left, in a more or less same shape pot, but without the rim and with some more texture. This new angle will bring even more movement into the lower section of this massive trunk! The large empty space on the left side of the tree, counterbalances the foliage mass of the cascading branches well. Bringing balance to the whole composition. The empty space on the right side of the trunk, now gives you a peek at the long deadwood branches in the back. Showing us all the struggle this old survivor had to endure over the decades it is standing on this hilltop! This open space makes me feel like I could walk under need those cascading branches and sit down in their shade, with some bread, cheese and red wine, looking down over the valley. HHHMMMMMMM!!!
Tomorrow I will clean up the old deadwood and tread it with Lime sulfur and after that this "Little Chapel" Pine is put back into his place in the sun to enjoy the last weeks of Summer!
Although this simple Bonsai work, may seam a bit old fashion to some, I still hope that you enjoyed this little story?!

Cheers,
Hans van Meer.
Last edited by Hans van Meer. on Mon Aug 23, 2010 2:39 am; edited 2 times in total

Hans van Meer.- Member
 Re: OOPS!!! I STYLED A BONSAI !!!
Lovely development sequence Hans and a great result. I'm looking forward to seeing it in it's final pot in a year or two.
Thanks for posting.
Thanks for posting.

Kev Bailey- Admin
 Re: OOPS!!! I STYLED A BONSAI !!!
irene_b wrote:I love where you have taken this one Hans!!
Thanks MOM !!!!
Big kiss from me !!!!
Hans van Meer.

Hans van Meer.- Member
 Re: OOPS!!! I STYLED A BONSAI !!!
You just have to like this,great stuff Hans. 
Greetings Ed
Greetings Ed

Ed van der Reek- Member
 Re: OOPS!!! I STYLED A BONSAI !!!
Nice progression!
The tree is looking good in such a short time!
I like the way you styled this one.
I'm also more into the traditional
Best regards,
Yannick
The tree is looking good in such a short time!
I like the way you styled this one.
I'm also more into the traditional
Best regards,
Yannick
ybonsai- Member
 Re: OOPS!!! I STYLED A BONSAI !!!
HAIKU
ANCIENT LITTLE PINE
IN THE HAND OF THE MASTER
SOON A MASTERPIECE
ANCIENT LITTLE PINE
IN THE HAND OF THE MASTER
SOON A MASTERPIECE

mike page- Member
 Re: OOPS!!! I STYLED A BONSAI !!!
I did enjoy this "little story" about this "simple Bonsai work", Hans!!!Hans van Meer. wrote: ... ... ... The empty space on the right side of the trunk, now gives you a peek at the long deadwood branches in the back. Showing us all the struggle this old survivor had to endure over the decades it is standing on this hilltop! This open space makes me feel like I could walk under need those cascading branches and sit down in their shade, with some bread, cheese and red wine, looking down over the valley. HHHMMMMMMM!!!
... .... ...
Although this simple Bonsai work, may seam a bit old fashion to some, I still hope that you enjoyed this little story?!
Cheers,
Hans van Meer.
The above part of your story is what I enjoyed most!
Thank you for the "tutorial"!
PS: I wish you receive your prize soon!

my nellie- Member
 Re: OOPS!!! I STYLED A BONSAI !!!
Maybe old fashioned  - yes - I love it.
This is a wonderfull job Hans. Share some of that red wine in the shadow of these branches. As Pavel points out, this tree has some fantastic details, making it very convincing and with good movement explaining its growth pattern. Look forward to visit this tree when sitting in its new pot in future.
Best regards
Morten
Guest- Guest
 Re: OOPS!!! I STYLED A BONSAI !!!
Nice work, like the styling...
One question though Hans... Aren't you going to use a torch to burn the newly created deadwood? I always like to peel of the fibers from a stump like that, so it looks more natural. And then I burn the wood with a torch so it looks even more 'lived'...
Regards,
Hans
One question though Hans... Aren't you going to use a torch to burn the newly created deadwood? I always like to peel of the fibers from a stump like that, so it looks more natural. And then I burn the wood with a torch so it looks even more 'lived'...
Regards,
Hans

Hans Vleugels- Member
 Re: OOPS!!! I STYLED A BONSAI !!!
Dear Hans.
I love this detailed progress series with all the description and of course the end result as well.
It really bring the feeling of styling a tree over to the reader...not only the techniques but the whole thinking procedure...the part which I personally like the most in our little bonsai word.
In my eyes this post is the best post on this forum...thanks a lot for sharing this whit us.

rolandp- Member
 Re: OOPS!!! I STYLED A BONSAI !!!
Great work Hans...I like it very much. May I have it now please? 
Mike
Mike

Mike Jones- Member
 Re: OOPS!!! I STYLED A BONSAI !!!
Kev Bailey wrote:Lovely development sequence Hans and a great result. I'm looking forward to seeing it in it's final pot in a year or two.
Thanks for posting.
Hi Kev,
so do I, now the hunt for a suitable pot is on to get me through that two years waiting period. But I dont mind at all, because those waiting months are a intricate and precious part of what I consider Bonsai art to be. A decade of caring for your art project, leading it to your idea of beauty, how good can an art form get!? I still love it!!!
Cheers,
Hans van Meer.

Hans van Meer.- Member
 Re: OOPS!!! I STYLED A BONSAI !!!
Nice work on the little tree. Hans.
And while waiting it seems we need just one more and then one more tree to have something to work on. Soon the garden is full of trees.
Hans van Meer. wrote:Kev Bailey wrote:Lovely development sequence Hans and a great result. I'm looking forward to seeing it in it's final pot in a year or two.
Thanks for posting.
Hi Kev,
so do I, now the hunt for a suitable pot is on to get me trough those two years waiting period. But I dont mind at all, because those waiting mounts are a intricate and precious part of what I consider Bonsai art to be. A decade of caring for your art project, leading it to your idea of beauty, how good can a art form get!? I still love it!!!
Cheers,
Hans van Meer.
And while waiting it seems we need just one more and then one more tree to have something to work on. Soon the garden is full of trees.


Rob Kempinski- Member
 Re: OOPS!!! I STYLED A BONSAI !!!
Ed van der Reek wrote:You just have to like this,great stuff Hans.
Greetings Ed
Ha die Edje,
glad you like it my friend!! But you hat to like it, because if you didn't...no more coffee for you!!!
Yannick wrote: Nice progression!
The tree is looking good in such a short time!
I like the way you styled this one.
I'm also more into the traditional
Best regards,
Yannick
Thanks Yannick,
glad you like it so far!
Well I have to say that I always keep a open mind when I style a tree. I do like to use the more traditional way of arranging my foliage layers, and that is not because I have to rigid follow the classical Japanese style or anything! But because I feel that their way of building up their layered foliage pads is the most logical and brings out the best result in Pines and Junipers a like! In trees this size it is all about the details and their way leaves a lot of room for open spaces and brings believable debts to the branch structure. Their way of branch building is well plant and when you look up close you will see that every little branch is placed deliberately and planed! This kind of branch building is a art form at it self and takes years to archive! It is way more difficult than the more simple silhouette building you see so often in the more modern styles. Whether you like it or not, a lot of these modern styled trees only look good in a picture, from close up you can often see how little work and though went into creating their branch structure.
But on the other hand, no matter how much I like to build up my branches and foliage layers in that way, it is only to bring out the best of the rest of the tree. The non foliage part of my trees are mostly free style and can go in all directions. In the rest of the tree I dont mind strange and wild things at all! Just like in this tree, were the more traditional artist would work on refining the base of the tree and the deadwood protruding out to the left, I embraced this ugliness and build my whole design around it! So I think that my work is a mixture of the best of both worlds. Not looking overly styled, bud just enough to show the true spirit of the whole tree and my design!
Cheers,
Hans van Meer.

Hans van Meer.- Member
 Re: OOPS!!! I STYLED A BONSAI !!!
mike page wrote:HAIKU
ANCIENT LITTLE PINE
IN THE HAND OF THE MASTER
SOON A MASTERPIECE
Thanks Mike,
that is highly appreciated indeed!
Hans van Meer.

Hans van Meer.- Member
 Re: OOPS!!! I STYLED A BONSAI !!!
Hi Hans,
It takes something special for me to comment and stop lurking in the back ground - I think you've one a great job with this tree! I like it a lot. A very intersting story/progression series as well.
Also good wiring - which is nice to see! Nobody ever really talks about wiring but its so important!
Jonny.
Jonny D- Member
 Re: OOPS!!! I STYLED A BONSAI !!!
Thanks Pavel!
Yes it is all to easy to hide the importance features of your tree when you style it. In this tree the foliage is only there to highlight and enhance the amazing trunk with all its abrupt movement and spiraling old deadwood.
Cheers,
Hans van Meer.

Hans van Meer.- Member
 Re: OOPS!!! I STYLED A BONSAI !!!
my nellie wrote:Hans van Meer. wrote: ... ... ... The empty space on the right side of the trunk, now gives you a peek at the long deadwood branches in the back. Showing us all the struggle this old survivor had to endure over the decades it is standing on this hilltop! This open space makes me feel like I could walk under need those cascading branches and sit down in their shade, with some bread, cheese and red wine, looking down over the valley. HHHMMMMMMM!!!
... .... ...
Although this simple Bonsai work, may seam a bit old fashion to some, I still hope that you enjoyed this little story?!
Cheers,
Hans van Meer.
I did enjoy this "little story" about this "simple Bonsai work", Hans!!!
The above part of your story is what I enjoyed most!
Thank you for the "tutorial"!
PS: I wish you receive your prize soon!
Hi My Nellie,
good to hear you liked my little story so far ! And that price is not so important when you have a tree like this !!
Cheers,
Hans van Meer.

Hans van Meer.- Member
 Re: OOPS!!! I STYLED A BONSAI !!!
You bet!Hans van Meer. wrote: ... ... ...And that price is not so important when you have a tree like this !!
... ...


my nellie- Member
 Re: OOPS!!! I STYLED A BONSAI !!!
Hans Vleugels wrote:Nice work, like the styling...
One question though Hans... Aren't you going to use a torch to burn the newly created deadwood? I always like to peel of the fibers from a stump like that, so it looks more natural. And then I burn the wood with a torch so it looks even more 'lived'...
Regards,
Hans
Hi Hans, and thanks!!
Yes, like I wrote I had planed to work on the deadwood today. Because yesterday I was running out of steam and my torch out of gas!
The whole long jin section still needs a lot of shaping and refining and after that I will torch it, clean it and protect and bleach it with lime sulfur. But I am sorry to say that we had a pretty big storm last night and it rained most of this day so I have to do this in a few days when the weather clears up a bit! I will post the pictures when I have finished the work!
Cheers,
Hans van Meer.

Hans van Meer.- Member
 Re: OOPS!!! I STYLED A BONSAI !!!
rolandp wrote:Dear Hans.
I love this detailed progress series with all the description and of course the end result as well.
It really bring the feeling of styling a tree over to the reader...not only the techniques but the whole thinking procedure...the part which I personally like the most in our little bonsai word.
In my eyes this post is the best post on this forum...thanks a lot for sharing this whit us.
Hi Roland,
I am glad you enjoyed my little story so much. I kept records/story's like this of most of my trees. You can find a lot of those stories on my Karamotto website, check it out if you like?! The link is below this post! I know that a lot of people like to read those progressive stories, because that is how I learned most of my early bonsai knowledge and techniques, from reading the progressive stories in Bonsai Today magazine! I red them over and over again and I still do! That's why I started my website in the first place, to tell those live stories of my little trees. To be enjoyed and I hope as a source of inspiration to other enthusiast?!
Cheers,
Hans van Meer.

Hans van Meer.- Member
Page 1 of 2 • 1, 2 
 Similar topics
» Videos of a Maple being styled by William N. Valavanis using a Pine bonsai styling technique
» Tamarisk bonsai
» winter color
» oops I did it again
» re-styled juniper blaww
» Tamarisk bonsai
» winter color
» oops I did it again
» re-styled juniper blaww
Page 1 of 2
Permissions in this forum:
You cannot reply to topics in this forum


