


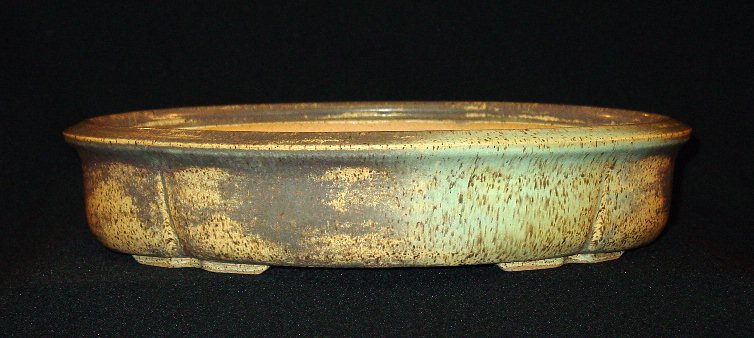
My "cut oval"

 My "cut oval"
![]() Tom Benda Tue Dec 22, 2009 3:29 pm
Tom Benda Tue Dec 22, 2009 3:29 pm
This pot is still just raw. I´ve built and fired 3 pots like this, but I have only 1 photo of a pot with "bad" glaze.
http://picasaweb.google.cz/lh/photo/Pk2B1gCDW9PfCp1esG7jgg?feat=directlink
http://picasaweb.google.cz/lh/photo/PYhP2fjhTuStR1ts-4bbhw?feat=directlink
http://picasaweb.google.cz/lh/photo/xQ0Eut_nqi0fIYLz9Bc6ng?feat=directlink
the older one:
http://picasaweb.google.cz/lh/photo/5cKcChmdY4k9IgouKV6xww?feat=directlink
Tom Benda- Member

Re: My "cut oval"
![]() Rob Addonizio Tue Dec 22, 2009 6:42 pm
Rob Addonizio Tue Dec 22, 2009 6:42 pm
Is the last photo the pot that you refer to as a bad glaze? If so, I have to disagree with you. It may not be your original intent, but the end result is really quite interesting on its own.
Just my two cents...
BTW the form looks good too.
Happy potting

Rob Addonizio- Member
Re: My "cut oval"
![]() Tom Benda Tue Dec 22, 2009 9:02 pm
Tom Benda Tue Dec 22, 2009 9:02 pm
thank You very much for Your "two cents" :-). Maybe the finished pot was on a colder place in my kiln, or it needed longer burning, higher temperature... I am still beginning to learn my kiln, I´ve burned just 4 times in it.
Tom Benda- Member
Re: My "cut oval"
![]() Mario Stefano Tue Dec 22, 2009 9:06 pm
Mario Stefano Tue Dec 22, 2009 9:06 pm
Tom Benda wrote:
... I´ve burned just 4 times in it.
...excellent you burned every time .... Bravo!

Mario Stefano- Member
Re: My "cut oval"
![]() EdMerc Tue Dec 22, 2009 9:26 pm
EdMerc Tue Dec 22, 2009 9:26 pm

EdMerc- Member
Re: My "cut oval"
![]() Mario Stefano Tue Dec 22, 2009 9:45 pm
Mario Stefano Tue Dec 22, 2009 9:45 pm
Mario Stefano wrote:Tom Benda wrote:
... I´ve burned just 4 times in it.
...excellent you burned every time .... Bravo!
Oh, i ment that you manage to burn your pots just fine every time, i like them
Mario Stefano- Member
Re: My "cut oval"
![]() Robert Wallace Tue Dec 22, 2009 11:03 pm
Robert Wallace Tue Dec 22, 2009 11:03 pm
Robert
Robert Wallace- Member
Re: My "cut oval"
![]() Stone Monkey Wed Dec 23, 2009 5:52 am
Stone Monkey Wed Dec 23, 2009 5:52 am
Nice to see your pictures and your pots. Looking good


Many thanks for showing your work
Regards
Andy

Stone Monkey- Member
Re: My "cut oval"
![]() Guest Wed Dec 23, 2009 9:25 am
Guest Wed Dec 23, 2009 9:25 am
Thrown then distorted, then rim, then feet!
Do I win the pot then?

Yours (in anticipation)
Tony
Guest- Guest
Re: My "cut oval"
![]() Stone Monkey Wed Dec 23, 2009 2:24 pm
Stone Monkey Wed Dec 23, 2009 2:24 pm
Sort of
I would post some tutorials on here about techniques used but it has upset some people in the potting community when I posted them on the old IBC in the past. That's the funny thing in the non Bonsai potting world everyone is more than happy to share knowledge and technique but in the Bonsai potting world it is the opposite, which I understand to certain degree, glazes etc. Personally I don't think technique sells the pot. The end product and "The Pot" sells the pot, if you catch my drift. We are free to teach Bonsai Techniques and show how to why not pottery techniques
Sorry Tom don't mean to detract from your post. Personally I love to see "How I do it" posts.
Regards
Andy
Stone Monkey- Member
Re: My "cut oval"
![]() Rick Moquin Wed Dec 23, 2009 2:35 pm
Rick Moquin Wed Dec 23, 2009 2:35 pm
Stone Monkey wrote:Tony
Sort ofand then a little bit more.
I would post some tutorials on here about techniques used but it has upset some people in the potting community when I posted them on the old IBC in the past.
... and that is sad indeed. I believe though that it is more the voice of the few than the many.
That's the funny thing in the non Bonsai potting world everyone is more than happy to share knowledge and technique but in the Bonsai potting world it is the opposite, which I understand to certain degree, glazes etc.
... and I can't support that in principal.
Personally I don't think technique sells the pot.
... exactly!
The end product and "The Pot" sells the pot, if you catch my drift. We are free to teach Bonsai Techniques and show how to why not pottery techniques
FWIW I always enjoyed seeing pot fabrication step by step from start to finish. It is a great tutorial for many artists not just potters. I believe if more folks posted their efforts it would increase the value of their wares, not take away from them as some seem to think. Folks will recognize good work and quality, something a novice cannot achieve without years of practice and experience.

Rick Moquin- Member
Re: My "cut oval"
![]() Dale Cochoy Wed Dec 23, 2009 4:52 pm
Dale Cochoy Wed Dec 23, 2009 4:52 pm
I hope they fire/glaze ok.
Tom, I agree, I like the design and that glaze. I have a similar ash glaze I love!
How are these pots firing? Thats a LOT of cutting! Are the seems holding up ok through two firings?
Andy, that rim is beautiful and looks like it took a while!
 and the pot appears flawless thus far.
Here is one I made a while back, about 17" , pretty much as Tony describes.
Dale

Dale Cochoy- Member
Re: My "cut oval"
![]() peter krebs Wed Dec 23, 2009 6:44 pm
peter krebs Wed Dec 23, 2009 6:44 pm
You potted some beautiful pots there.
The shape looks good, but unfortunately I made bad experience with this technique.
About 15 years ago I made 10 pots using this technique, oval and round.
Of these 10 pots, 3 broke in daily use, all exactly at the joints; whether the others survived I don't know.
Handling and frost are the great enemies of this technique.
If you potter them for yourself, it's maybe not such a big problem.
And these are the weaknesses of this technique:
For better understanding, I made 3 small drawings.

In this drawing you can see in the cross section the configuration of the clay particles in a clay plate. The clay particles are intertwined and are therefore very stable.

In this drawing, the clay plate is cut and the clay particles have lost contact.

In this drawing, the cut was repaired with fresh clay. The cut is not visible any more, but in cross section, one sees clearly the clay particles have no good connection, and that is the weak point.
The daily use of the bonsai pot causes fine hairline cracks, and wind, weather and frost begin their destructive work.
In Andy's pot the surface is not vulnerable to these forces, and if the clay is good and high fired the pot can be guaranteed to withstand up to minus 30 ° C.
Pots made on a wheel have an extremely good structure of clay particles.
A potter can avoid many problems if he knows about these structures.
Best regards
Peter

peter krebs- Member
Re: My "cut oval"
![]() tomas g Wed Dec 23, 2009 9:22 pm
tomas g Wed Dec 23, 2009 9:22 pm

tomas g- Member
Re: My "cut oval"
![]() pjkatich Wed Dec 23, 2009 9:26 pm
pjkatich Wed Dec 23, 2009 9:26 pm
Nice looking pot. I hope to see the finished product when it comes out of the kiln.
From the pictures you posted, it looks like you made two different pots then cut and reassembled them into one. Thanks for sharing.
Andy,
I would not let the whining of a few paranoid individuals stop you from posting a tutorial or two. I for one would encourage you to do so if you have the time. As you stated, "Personally I don't think technique sells the pot. The end product and "The Pot" sells the pot, if you catch my drift." I could not have said it any better myself.
I have always found it very interesting to see how other potters work. I did a tutorial on how to make an oval pot earlier in the year on another forum which was very well received.
Peter,
Great explanation on the mechanical processes involved with this type of pot construction.
Cheers and Happy Holidays to all.
Paul

pjkatich- Member
Re: My "cut oval"
![]() Dale Cochoy Wed Dec 23, 2009 10:22 pm
Dale Cochoy Wed Dec 23, 2009 10:22 pm


Dale
Dale Cochoy- Member
Re: My "cut oval"
![]() Stone Monkey Wed Dec 23, 2009 10:53 pm
Stone Monkey Wed Dec 23, 2009 10:53 pm
Peter
Loved your drawings and explanation
Tom
Was your original pot shapes thrown, slabbed or coiled?
I know I can vouch for Dale and I, as most of the round pots thrown have turned feet. The altered, well my altered pots do have separate feet added. For me its just a question of bagging the pot up and allowing moisture to balance out, no fast drying
 but I still get the odd crack now and again as I am sure we all do. Oh one day to have constant perfect kiln firings
 Merry Christmas to the brothers and sisters of the wondrous stuff called clay
Regards
Andy
Last edited by Stone Monkey on Tue Dec 29, 2009 5:56 am; edited 1 time in total
Stone Monkey- Member
Re: My "cut oval"
![]() peter krebs Thu Dec 24, 2009 5:38 am
peter krebs Thu Dec 24, 2009 5:38 am
You have absolutely right.
We live in an age in which one has access to everything, and that at any time and any place.
That's good, I use these media, Google, Wikipedia, etc.
The other side of the coin: we forget the wonder, the miracle that will charm you.
A magician, who declared to be demystified before his appearance to trick the audience.
regards
Peter
peter krebs- Member
Re: My "cut oval"
![]() peter krebs Thu Dec 24, 2009 5:58 am
peter krebs Thu Dec 24, 2009 5:58 am
this is a great potter problem, because there are 99 possibilities,
33 for potters, 33 for drying, 33 for burning, and the questions:
where do you pottered, where do you dry, where do you burn?
These questions have a potter his life!
regards
Peter
peter krebs- Member
Re: My "cut oval"
![]() Tom Benda Thu Dec 24, 2009 8:32 am
Tom Benda Thu Dec 24, 2009 8:32 am
This pot is made from slabs. First it was one oval piece, then I´ve cut it in thirds and took away a little strip.
I´ve joined it by... How do You call it? My dictionary doesn´t know the word. I use a bit drier one.
I didn´t have problems with pots built like this yet, but it´s not many years I´ve begun potting.
Maybe my good clay with grog helps it. That is a noncommercial clay from one factory for chimney segments. My good friend has a good friend there
I burn my kiln with wood.
Pjkatich, here is another pot - two pots cut, add a small piece for the center part of bottom, join together...
I must try another technique. I´ve never tried coiling!


Sorry for the photo quality. My camera was stolen and I take pictures by mobile phone now...
I just thougt this is still slabbing! I hope these pots survive. I don´t see differences between this "cut" pot and other slabbed pots. By now... Bad experience is good start for further advance.
Tom Benda- Member
Re: My "cut oval"
![]() Rob Addonizio Thu Dec 24, 2009 10:55 pm
Rob Addonizio Thu Dec 24, 2009 10:55 pm
In this drawing, the clay plate is cut and the clay particles have lost contact.
In this drawing, the cut was repaired with fresh clay. The cut is not visible any more, but in cross section, one sees clearly the clay particles have no good connection, and that is the weak point.
Peter, I have one question: did you spend some time to REALLY compress these joins? Remember that clay particles are quite flat, and if compressed, they can realign to form a solid join. The trick is to get an instrument that can slam both sides of the clay together. Beans in old socks can work, as can wood and other things.
Pots made on a wheel have an extremely good structure of clay particles.
This is because the centrifical force of the clay being pushed out and aligned. Which is why some of us potters are wondering exactly how you make pots....
Rob Addonizio- Member
Re: My "cut oval"
![]() peter krebs Fri Dec 25, 2009 6:09 am
peter krebs Fri Dec 25, 2009 6:09 am
a potter must have a think about all his life and experiment.
If you cut apart a pot, then it must be something the clay dried.
If you then fill out with a fresh clay, then you have another problem.
You have the freedom to experiment, but if you experiment pots sold, the risk have the potter.
I must honestly say I do not understand the problem. A lotus, quince, or cloverleaf pot is not difficult to make pottery as a round or oval bowl,
it only takes a little longer.
The second question:
At the wheel you align the clay particles with his fingers again. In the end they are all in one direction.
Without experiments, no pottery comes further.
Surprise, surprise, and again surprise.
regards
Peter
_____________________________________________
THE WORLD OF THE POT: http://www.peter-krebs.de/
peter krebs- Member
» A New Rectangle And An Oval
» Azaleas - "The Snake" and "The Downtrodden"
» Some pots for the new gallery
» Repeating the same photos conversation (Alex/"ogie" & Chris)