Pinus thunbergii 'Thunderhead' progression
2 posters
Page 1 of 1
 Pinus thunbergii 'Thunderhead' progression
(Picture Note: I apologize for the orientation of the pictures. I spent AN HOUR orienting and re-orienting then and no matter what I tried, the image upload software ALWAYS turns my portrait oriented pictures to a landscape orientation. I tried re-orienting them to landscape in hopes the software would orient them as portrait, but no joy. Going forward, when taking pictures with my phone, I'll endeavor to remember to shoot them in landscape if I think I'll be posting them here.)
So, I got this JBP Thunderhead last weekend.
Probably for a lot of the wrong reasons, but I did it anyway.
The tree was 39" above the pot before I trimmed the top candle.
There is potential in there but my initial objective was to get light into the inside areas.
I could poke around inside and see a lot of back budding taking place.
But a lot of back budding that had taken place last year was also in the process of dying due to lack of light.
So, I watched a lot of videos about pruning, trimming, de-candling, de-needling, JBPs and pinus in general.
Here are some initial pics:
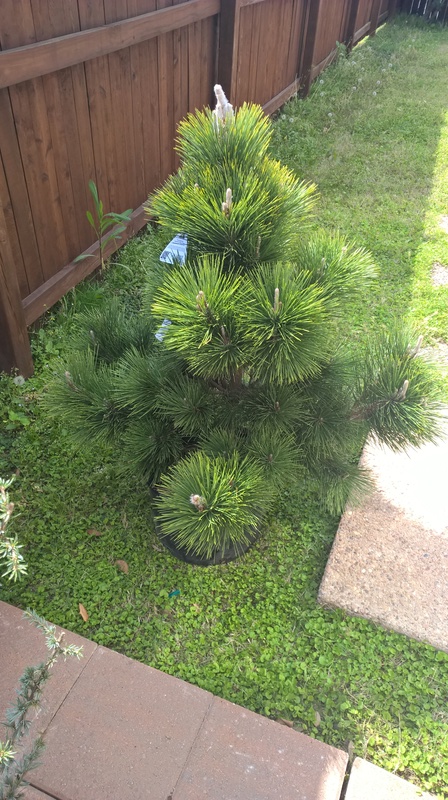
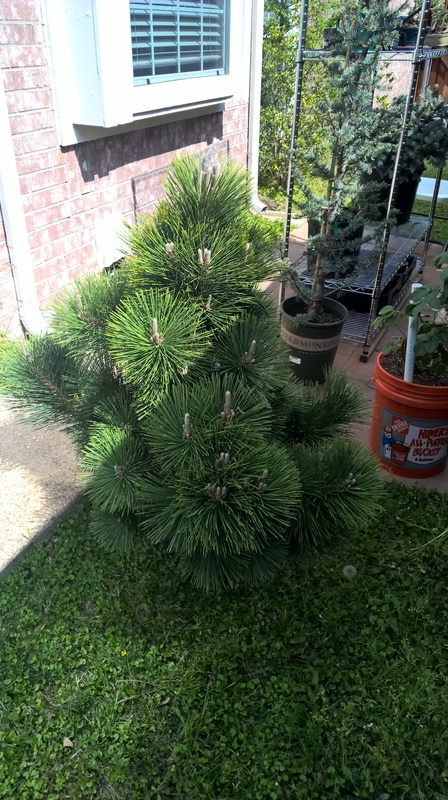
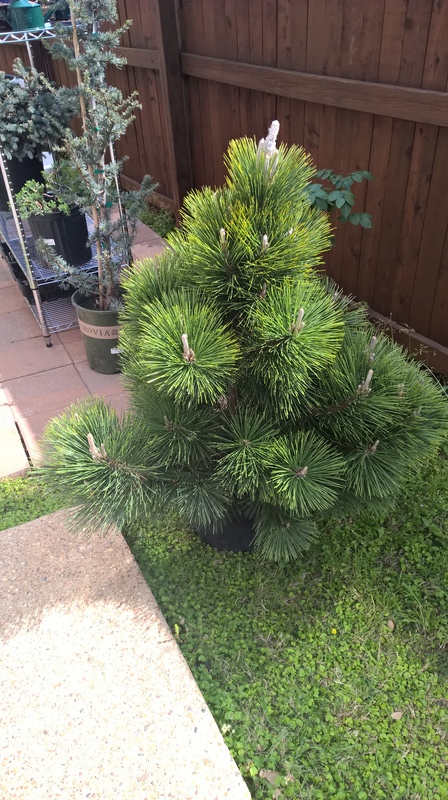

Here are some pics after a ton of needle removal and trimming the candles:
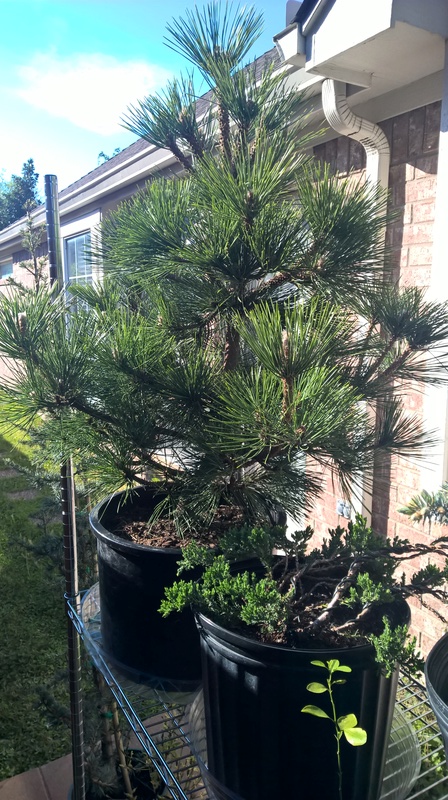
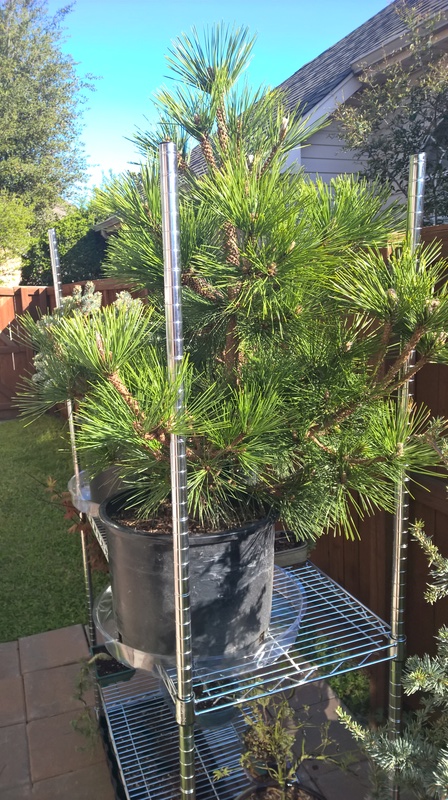
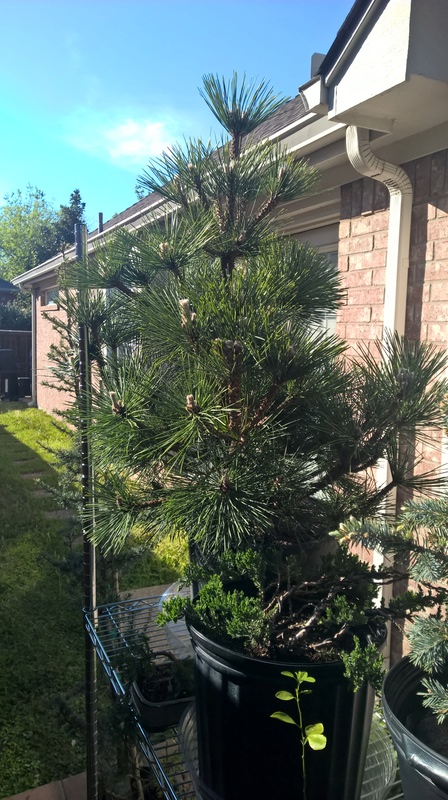
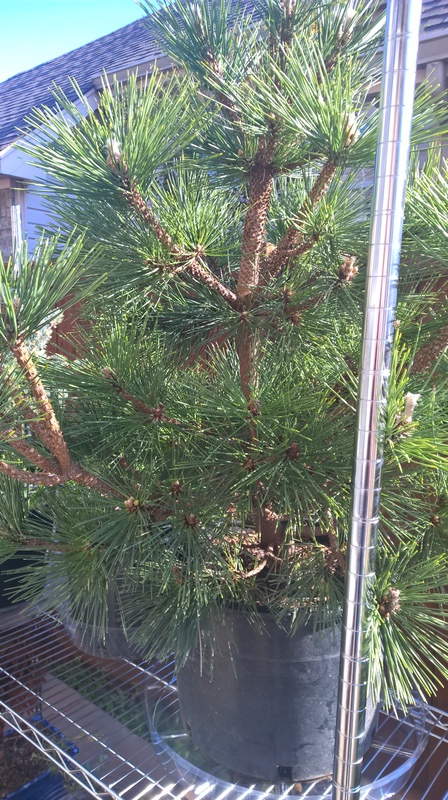
So, I can imagine some may spank me for taking off so many needles.
I'd estimate I took off maybe as much as 60% of the total overall needles.
I know that's a lot, but it really needed it, and frankly I would have liked to take more.
As you can see from the initial pics, the tree is in EXCELLENT health with lots of vigor.
That top candle was almost 6 inches long before I trimmed it.
I do believe the tree will sustain the needle loss and in fact, I already see beneficial signs in the interior branches with buds now appearing where before there was none.
So, I have some thoughts about where to go with this which I'll post below...
So, I got this JBP Thunderhead last weekend.
Probably for a lot of the wrong reasons, but I did it anyway.
The tree was 39" above the pot before I trimmed the top candle.
There is potential in there but my initial objective was to get light into the inside areas.
I could poke around inside and see a lot of back budding taking place.
But a lot of back budding that had taken place last year was also in the process of dying due to lack of light.
So, I watched a lot of videos about pruning, trimming, de-candling, de-needling, JBPs and pinus in general.
Here are some initial pics:


Here are some pics after a ton of needle removal and trimming the candles:


So, I can imagine some may spank me for taking off so many needles.
I'd estimate I took off maybe as much as 60% of the total overall needles.
I know that's a lot, but it really needed it, and frankly I would have liked to take more.
As you can see from the initial pics, the tree is in EXCELLENT health with lots of vigor.
That top candle was almost 6 inches long before I trimmed it.
I do believe the tree will sustain the needle loss and in fact, I already see beneficial signs in the interior branches with buds now appearing where before there was none.
So, I have some thoughts about where to go with this which I'll post below...
Last edited by bilbo on Sun Jul 23, 2017 10:55 pm; edited 1 time in total
bilbo- Member
 Pinus thunbergii thunderhead - ideas and suggestions
So, the base trunk of this tree has what to me is an appealing angle and curve to it, but it is obviously too large as it is.
I've decided to air layer this tree.
But what I'm considering is doing SEVERAL layers, at the same time.
For sure the top section, probably below the top layer of branches.
HOWEVER, I'd also like to get layers from several of the long branches at the same time.
Additionally, I'd also consider placing a second layer on the main trunk below the second or third layer of branches.
Obviously, it is probably safer to do one layer at a time, but to get this tree (and it's layered components) under control anytime within the next 5 years, seems to imply either a lot of air layers, most of them simultaneous, or just pruning and tossing a lot of potentially good material.
I feel like I need to add again, as should be evident from the above pictures, this tree is in stunning health. Brimming with vitality and vigor.
It drinks about 1.5 gallons of water a day.
I'd be VERY HAPPY to read any thoughts or alternative ideas from the wise seasoned experts here and thanks in advance!
bilbo- Member
 Re: Pinus thunbergii 'Thunderhead' progression
Yes, it certainly looks healthy. However it is still a pine and pines can be touchy. If it were mine I would leave it be for the rest of the season and get it in good soil next repotting season. Sun and fertilizer, they sure love organic ferts, you can get Holly Tone at Home Depot or Lowes.
For repotting a good approach is half bare rooting.
For repotting a good approach is half bare rooting.
augustine- Member
 Re: Pinus thunbergii 'Thunderhead' progression
augustine wrote:Yes, it certainly looks healthy. However it is still a pine and pines can be touchy. If it were mine I would leave it be for the rest of the season and get it in good soil next repotting season. Sun and fertilizer, they sure love organic ferts, you can get Holly Tone at Home Depot or Lowes.
For repotting a good approach is half bare rooting.
Thanks Augustine, I appreciate your time and insights.
I have been fertilizing and took your advice to get organic.
I agree it needs to be repotted, but, repotting seems to make more sense after it is smaller in bulk.
The nursery from which it was purchased is only a few miles from my home.
They had it in full sunlight sitting on an elevated deck.
Conditions which are not very different from its new home.
I pay extremely close attention to its life and I can't get over how vigorous this thing is.
Even after trimming all those needles, it continues to drink water like crazy. If I don't give it 1.5 gallons a day, it will be bone dry the next.
The trimmed candles are bursting with new growth as if I never even touched them and, as I hoped, a few new ones have appeared on the inner branches now that sun light is hitting them.
Therefore, I have decided to go ahead and apply some of the layers, but only two, rather than the 5, I was contemplating.
I'll provide some details in the next post below.
bilbo- Member
 Re: Pinus thunbergii 'Thunderhead' progression
I chose sites about as far apart from each other as possible on this tree.
Although I would have liked to have them further out (towards the top and tip) I decided to place them lower and closer to ensure there is more needles to support them with hormone for the rooting.
Before picture, it all its monstrous glory.

After air layers applied (to show where I chose to apply them).
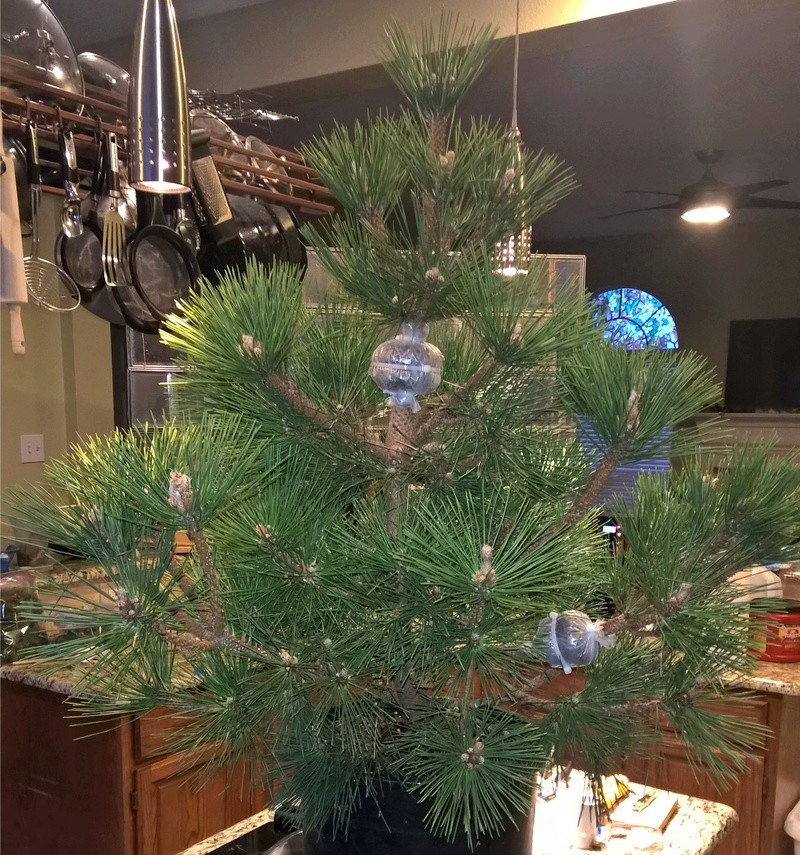
Although I would have liked to have them further out (towards the top and tip) I decided to place them lower and closer to ensure there is more needles to support them with hormone for the rooting.
Before picture, it all its monstrous glory.

After air layers applied (to show where I chose to apply them).

bilbo- Member
 Re: Pinus thunbergii 'Thunderhead' progression
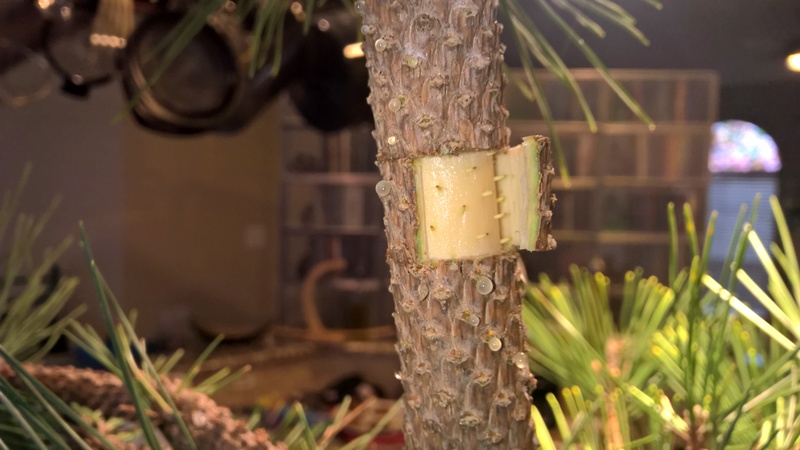
After making two very deep cuts (down to the sapwood) around the circumference of the trunk (about an inch apart), I started to peel the bark off.
Here, in profile, you can clearly make out the actual layers removed.
Periderm, Outer bark;
Secondary phloem, inner bark;
Cambium
Also note the needle rays which extend out from the sapwood layer from the year in which the needles emerged through all the outer layers.
Another note here is that since I had only recently trimmed the needles off (with scissors) the remnants of the fascicles were still in place and had to be scraped off.
Hence the beads of sap you see in this picture.
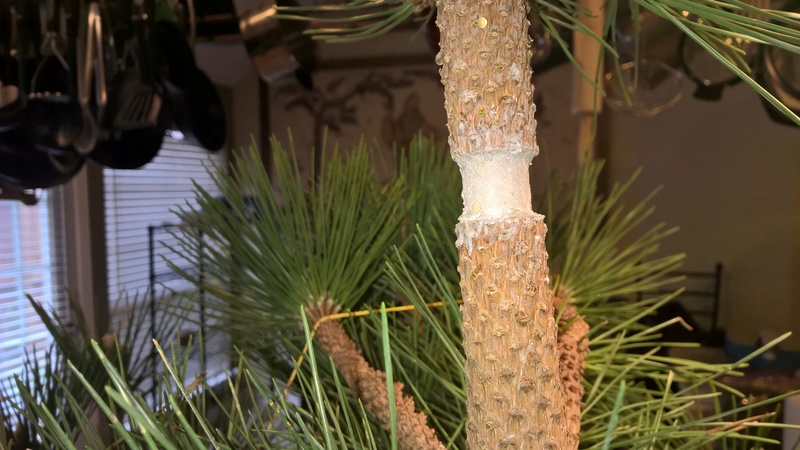
Here, the outer bark is fully removed, sapwood and needle rays plainly visible.
(and yes, in the removed bark, you can plainly see the holes left by the rays like perfectly placed tiny drill holes all the way through the bark)

Rooting hormone applied. Yes, I did scrape the sapwood to remove the rays and scar it.
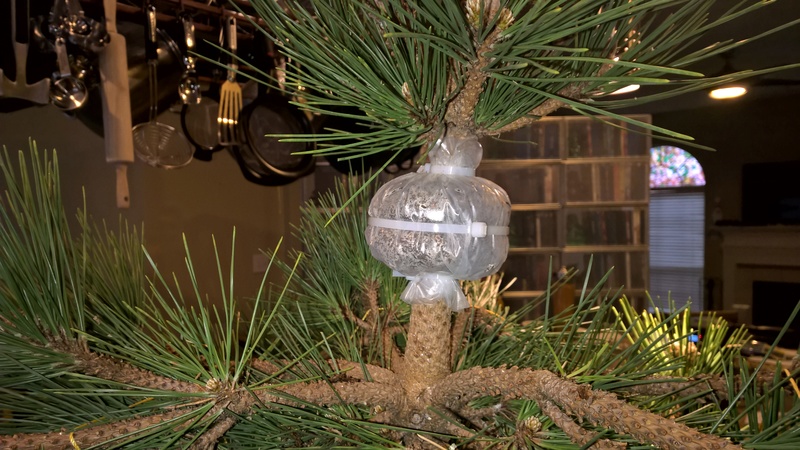
Sphagnum and wrapping applied. For outdoor layers I use 2mil poly, (spooled from a larger roll on a piece of 1" PVC for easier usage), with 3 revolutions.
Top and bottom seal is made with standard 8" wire ties with a couple added in the middle to increase contact pressure between the sphagnum and the layer site.
And a finished view of the layer on the branch too
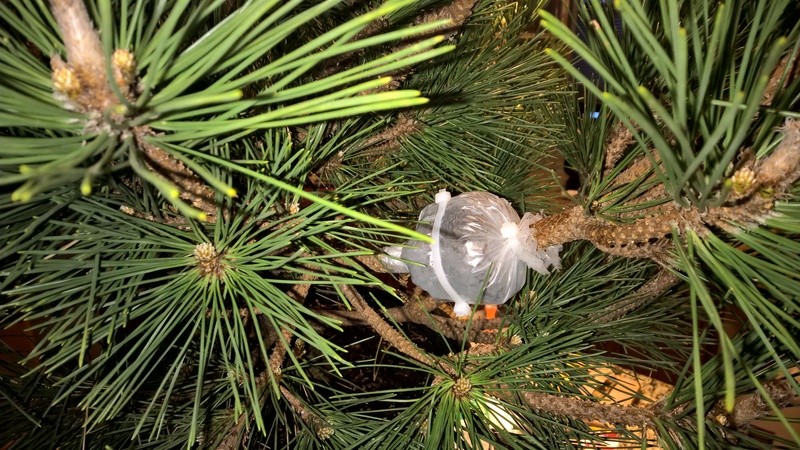
So, now I'll monitor and see how it goes.
I've layered a lot of trees/plants, but never a pine.
Some say it can't be done but I've seen videos where they prove it can.
My Ficus benjamina roots in 2 weeks (+1 week for extra root growth) and Acer Japanese Maples in 5 weeks (+2 weeks for extra root growth).
We'll see how this goes and I'll update later.
Here, in profile, you can clearly make out the actual layers removed.
Periderm, Outer bark;
Secondary phloem, inner bark;
Cambium
Also note the needle rays which extend out from the sapwood layer from the year in which the needles emerged through all the outer layers.
Another note here is that since I had only recently trimmed the needles off (with scissors) the remnants of the fascicles were still in place and had to be scraped off.
Hence the beads of sap you see in this picture.

Here, the outer bark is fully removed, sapwood and needle rays plainly visible.
(and yes, in the removed bark, you can plainly see the holes left by the rays like perfectly placed tiny drill holes all the way through the bark)

Rooting hormone applied. Yes, I did scrape the sapwood to remove the rays and scar it.

Sphagnum and wrapping applied. For outdoor layers I use 2mil poly, (spooled from a larger roll on a piece of 1" PVC for easier usage), with 3 revolutions.
Top and bottom seal is made with standard 8" wire ties with a couple added in the middle to increase contact pressure between the sphagnum and the layer site.

And a finished view of the layer on the branch too

So, now I'll monitor and see how it goes.
I've layered a lot of trees/plants, but never a pine.
Some say it can't be done but I've seen videos where they prove it can.
My Ficus benjamina roots in 2 weeks (+1 week for extra root growth) and Acer Japanese Maples in 5 weeks (+2 weeks for extra root growth).
We'll see how this goes and I'll update later.
bilbo- Member
 Update August 2017
OK, so please I have a couple questions about my tree and as always, any and all insights are appreciated.
First a few updates:
After I posted the last pictures, I went ahead and applied 3 more air layers to 3 more branches.
Then I let it grow.
When it came time to do July candles, I procrastinated by doing all my other JBPs first.
Part of the reason is that:
1. I had no interest in the long branches because I always knew they’d be coming off
2. Even if I wanted to work the long branches I couldn’t work the candles on the branches where there was an air-layer.
3. My target always was the inner back budded branches which had only limited small, or no candles anyway.
So, finally about two weeks ago, when I was in the process of trying to work what few candles I could, I noticed that one of the air layers was rooted!
So I cut it off and checked the others and they were all healing over.
Since I was tired of this monster tree taking up so much space I decided to go ahead and do a major prune.
All the longer, outer branches have now been pruned back to their first nodes and the top 2.5’ also came off.
A tree which was once 4 feet tall and 4 feet wide is now 18” tall and 16” wide with a 2.25” nebari.
I’d like to take steps which would assist in:
1. Insuring I get good vigorous candles next spring from my actual preferred small branches inside and,
2. Being able to repot it in the spring to a large training pot.
There are several of the remaining longer branches I’d like to remove.
Ultimately, I want to do a gin with shari of the entire top so the upper branch node section could come off.
But I don’t want to press it too far too soon.
I could wait on the jin top but feel like I could/should take off some of the top growth to reduce its vigor.
So, my question now becomes: how much further do you think I could go now?
Is the answer a factor of how many needles or how many smaller branches will be left or where they’ll be left?


bilbo- Member
 Similar topics
» New Pinus thunbergii 'Thunderhead' from Air-Layer
» Pinus Thumbergii progression. Videos
» Pinus Bergden & Pinus Thunbergii
» Japanese Black Pine Seedlings - Pinus Thunbergii
» Shohin Pinus thunbergii
» Pinus Thumbergii progression. Videos
» Pinus Bergden & Pinus Thunbergii
» Japanese Black Pine Seedlings - Pinus Thunbergii
» Shohin Pinus thunbergii
Page 1 of 1
Permissions in this forum:
You cannot reply to topics in this forum


