Home made slab for group planting
4 posters
Page 1 of 1
 Home made slab for group planting
Having purchased at a ridiculously cheap price a number of Acers at our Morrison's supermarket for a group planting next spring I was rather daunted by the cost of a raft so thought I would have a go at making one myself with help from various Youtube videos and blogs.
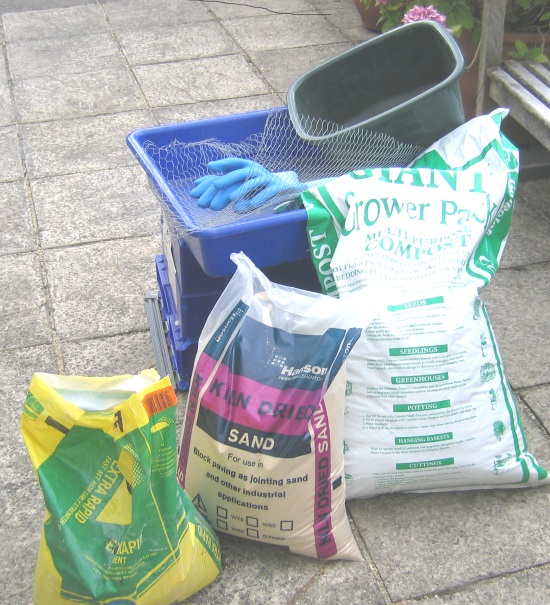
Materials Photo 1

I used rapid drying cement with a sand and peat mixture 1 to 3 for the first go. See further notes- this was an error not to be followed
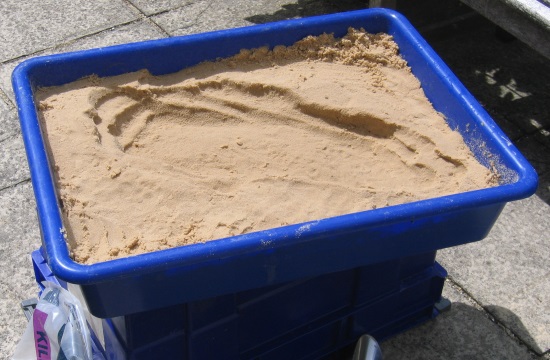
Mould Photo 2

Created a mould in a box of Kiln Dried Sand which is very fine and holds it's shape well when moist
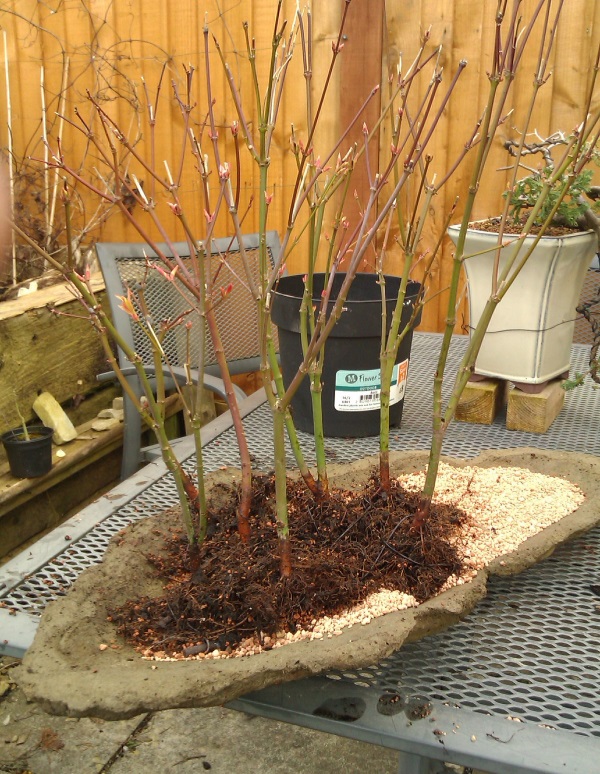
Filling the mould Photo 3

I then lined the mould with cling film,I don't know if this was really necessary but it was a help when I removed the sand. Filled the shape by hand (rubber gloves) .about ½" deep and then laid a strip of chicken wire from almost end to end as reinforcement.Then added about a further ½ inch of mixture.Made two drainage holes and a number of smaller hole for wiring roots.
Finally smoothed off and shaped the inside with damp brush and palette knife
.
The mark 1 version cement & peat did not work! it fell apart when removed .
To continue enthusiasm undaunted
Mark 2 -Cement and sand 1 to 3, not the kiln dried sand but a slightly coarser builders sand with a little of the remaining cement /peat mix thown in.
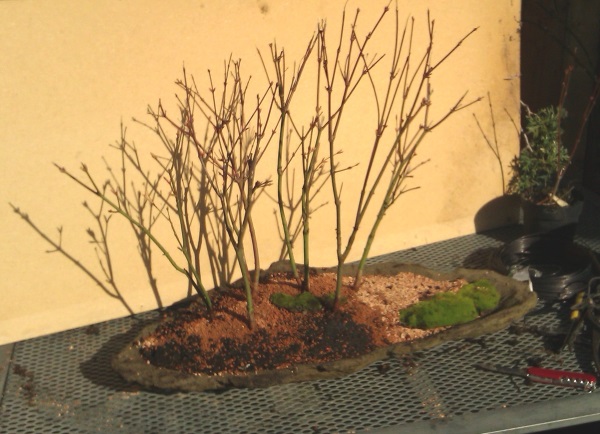
Almost set and dry Photo 4

After it had almost dried out I cut away the sand around the slab and pulled the edges of the cling film up a fraction to round and raise the outed edge.
Finished slab photos 5 & 6

Removed slab from the sand and further hollowed out the planting area, smoothed outer edge with knife and wet brush to eliminate creases from cling film. I am told I must now leave it out for the winter to weather and neutralise it.

I am looking forward to the Mark3 being an further improvement
Materials Photo 1

I used rapid drying cement with a sand and peat mixture 1 to 3 for the first go. See further notes- this was an error not to be followed
Mould Photo 2

Created a mould in a box of Kiln Dried Sand which is very fine and holds it's shape well when moist
Filling the mould Photo 3

I then lined the mould with cling film,I don't know if this was really necessary but it was a help when I removed the sand. Filled the shape by hand (rubber gloves) .about ½" deep and then laid a strip of chicken wire from almost end to end as reinforcement.Then added about a further ½ inch of mixture.Made two drainage holes and a number of smaller hole for wiring roots.
Finally smoothed off and shaped the inside with damp brush and palette knife
.
The mark 1 version cement & peat did not work! it fell apart when removed .
To continue enthusiasm undaunted
Mark 2 -Cement and sand 1 to 3, not the kiln dried sand but a slightly coarser builders sand with a little of the remaining cement /peat mix thown in.
Almost set and dry Photo 4

After it had almost dried out I cut away the sand around the slab and pulled the edges of the cling film up a fraction to round and raise the outed edge.
Finished slab photos 5 & 6

Removed slab from the sand and further hollowed out the planting area, smoothed outer edge with knife and wet brush to eliminate creases from cling film. I am told I must now leave it out for the winter to weather and neutralise it.

I am looking forward to the Mark3 being an further improvement

Michael Cooper- Member
 Re: Home made slab for group planting
thanks for posting this...
it is something our collective is thinking about for a late fall group project after our trees are put down for their long naps...
if you didnt put the cling wrap down, i reckon the sand would have adhered to the mix, providing a rough sand exterior, correct ?
if so, that is something i believe might be desirable to try...
except the cling wrap seemed to provide further shaping help...

Kevin S - Wisco Bonsai- Member
 Re: Home made slab for group planting
Cheers Kevin. That's a thought I suppose, it would have given a sandstone sort of finish, I think I was trying to emulate our local stone which is a smooth faced Lias. A stone which will fracture into slabs but they would be so heavy to use.I have actually been trying to find a bit to use to make the mould shape but no luck so far.
As an after thought I should have pressed four or more indentations into the mould first to create some feet to help drainage
As an after thought I should have pressed four or more indentations into the mould first to create some feet to help drainage

Michael Cooper- Member
 Re: Home made slab for group planting
yeah, i imagine the sandstone-ish finish would only go well with the right sort of tree...
probably something of a tropical or desert nature.
the feet would be a good idea, but might be difficult to make level...
unless you started with a consistent sand depth, say 1-2cm, and then make the foot indentations all the way down to the bottom of the tub.
looking frwrd to seeing the next one as you refine the technique

Kevin S - Wisco Bonsai- Member
 Re: Home made slab for group planting
Mark 3 version done
Length 23 inches by 12" wide
Mixture cement 1 measure- Kiln dried sand 2.75 measures (it just happened to be the KD sand) and about .25 measure of some of the remaining cement /peat dust mixture.
Added three feet indentations at the bottom of the mould to start- Three feet cannot wobble Kevin
Does not show well in photo -two good size drainage holes and 8 small holes for wiring.
Just a note that photos 5 and 6 above were the Mark two hence colour difference from progress pictures.


Last photo- slab after two days and further hollowing out, it was still workable to scrape off and shape inner cavity better to make more room for roots,tried to leave no less than a thickness of about 6mm throughout.

Length 23 inches by 12" wide
Mixture cement 1 measure- Kiln dried sand 2.75 measures (it just happened to be the KD sand) and about .25 measure of some of the remaining cement /peat dust mixture.
Added three feet indentations at the bottom of the mould to start- Three feet cannot wobble Kevin
Does not show well in photo -two good size drainage holes and 8 small holes for wiring.
Just a note that photos 5 and 6 above were the Mark two hence colour difference from progress pictures.


Last photo- slab after two days and further hollowing out, it was still workable to scrape off and shape inner cavity better to make more room for roots,tried to leave no less than a thickness of about 6mm throughout.

Last edited by Michael Cooper on Sat Aug 02, 2014 5:51 pm; edited 1 time in total (Reason for editing : Added informATION)

Michael Cooper- Member
 Re: Home made slab for group planting
Michael Cooper wrote:Added three feet indentations at the bottom of the mould to start- Three feet cannot wobble Kevin
D-OH (sound to accompany forehead slapping)
didnt think of that
looking good and cant wait to try this come late fall round these parts.

Kevin S - Wisco Bonsai- Member
 Re: Home made slab for group planting
After the slab has set, you can submerge it in a basin of water, change the water once every 2 weeks, leave it soak a total of 2 to 3 months. Then it should be ok to use. To test - on the final soak, at an inexpensive (expendable) goldfish or guppy or a few minnows. If the fish survive a week, your slab is completely leached of excess hydroxides.
Nice job, I have thoughts of trying my hand at this sort of thing too.
Nice job, I have thoughts of trying my hand at this sort of thing too.

Leo Schordje- Member
 Re: Home made slab for group planting
yeah leo la fuente... da chopper and i were thinking of a late fall collective project...
might as well make a mess at one place rather than a buncha messes a buncha places
might as well make a mess at one place rather than a buncha messes a buncha places

Kevin S - Wisco Bonsai- Member
 Re: Home made slab for group planting
Wow, somehow managed to miss this thread when it started but I like the results a lot.
I've been looking for a flat rock on which to plant some Larch I have hanging around but haven't had any success finding one. Something similar to your efforts might be my solution, although I note you have to leave it for several months before use so it's too late already for this season.
Still it's very tempting seeing how well your slabs turned out. Nice work and thanks for sharing.
By the way, I also have a few of Morrison's finest Acer Palmatum. I find they're very competitive on price (compared to the ludicrous price charged for acers in most garden centres).
Cheers
Richard

Richard S- Member
 Similar topics
» First slab planting.
» home made cement pots
» Saikei???? (slab planting)
» Bald Cypress Slab Planting Video
» Home made bonsai bench for about $60
» home made cement pots
» Saikei???? (slab planting)
» Bald Cypress Slab Planting Video
» Home made bonsai bench for about $60
Page 1 of 1
Permissions in this forum:
You cannot reply to topics in this forum


