


Kaytunwill Pine
+2
Pavel Slovák
fiona
6 posters
Page 1 of 1

 Kaytunwill Pine
![]() Guest Thu Apr 28, 2011 10:26 pm
Guest Thu Apr 28, 2011 10:26 pm
This is a Pine that Pavel brought over for me last November when he came to Burrs with Mirek and Jakub.
I would not normally work on a pine that had only been potted the year before however this pine was responding well PLUS I used a strong strap to hole the tree firm whilst I worked.
The major branches were first wrapped in Raffia then Self Amalgamating Rubber Tape. Minor branches only had Raffia and thin branches no protection. ONLY copper wire was used.
I tend to style from the bottom up, working each branch and positioning before I wire the next. I always have the image in my head that I wish to achieve, this process saves wiring unnecessary branches.
I decided to work the deadwood after styling as I wanted the canopy to determine the size of the deadwood. On this occasion no long jins or stylised carving, only hand tools were used.
Pavel, If you have any early photos of this tree please post them.... hope you like the tree!
I have named the tree “Kaytunwill”
The pine with the first branches protected


The tree strapped in and the first low branches wired


The low branches styled and placed

The next branch Placed

Branches at the top of the tree are protected with Raffia

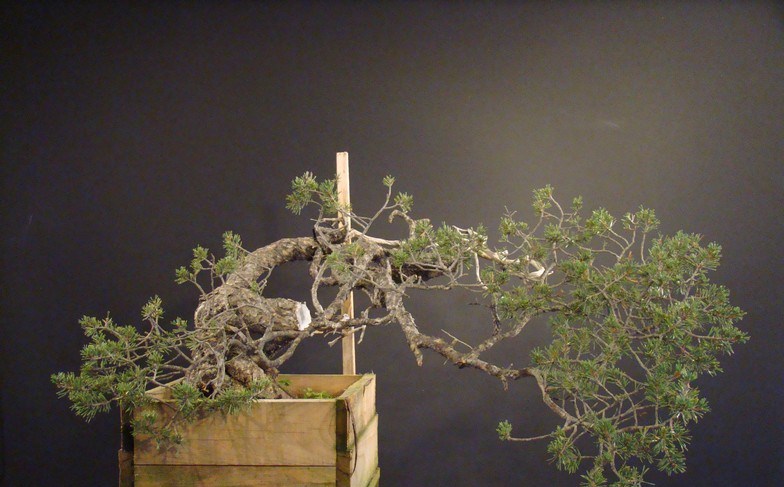
The styling without the deadwood being worked

The large deadwood stump

Stripping and peeling the wood to create a 'Natural' appearance

Creating light and shade and 'tapering' the stump

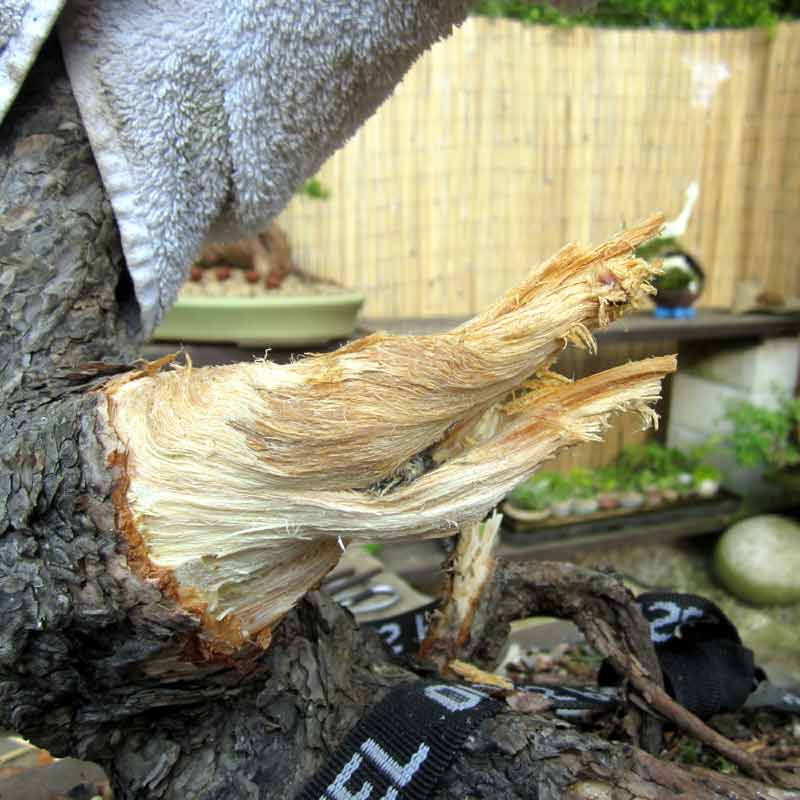
The stump after burning with a small blow torch (see previous post)

How the tree looked at the end of today, I will spend the next few days 'Tweaking' and refining

I would not normally work on a pine that had only been potted the year before however this pine was responding well PLUS I used a strong strap to hole the tree firm whilst I worked.
The major branches were first wrapped in Raffia then Self Amalgamating Rubber Tape. Minor branches only had Raffia and thin branches no protection. ONLY copper wire was used.
I tend to style from the bottom up, working each branch and positioning before I wire the next. I always have the image in my head that I wish to achieve, this process saves wiring unnecessary branches.
I decided to work the deadwood after styling as I wanted the canopy to determine the size of the deadwood. On this occasion no long jins or stylised carving, only hand tools were used.
Pavel, If you have any early photos of this tree please post them.... hope you like the tree!
I have named the tree “Kaytunwill”
The pine with the first branches protected
The tree strapped in and the first low branches wired
The low branches styled and placed
The next branch Placed
Branches at the top of the tree are protected with Raffia
The styling without the deadwood being worked
The large deadwood stump
Stripping and peeling the wood to create a 'Natural' appearance
Creating light and shade and 'tapering' the stump
The stump after burning with a small blow torch (see previous post)
How the tree looked at the end of today, I will spend the next few days 'Tweaking' and refining
Guest- Guest

Kaytunwill Pine
![]() Guest Fri Apr 29, 2011 12:33 am
Guest Fri Apr 29, 2011 12:33 am
What is a Kaytunwill Pine Tony? Dramatic movement in this Pine and great progression pics.
Guest- Guest
Re: Kaytunwill Pine
![]() Guest Fri Apr 29, 2011 12:37 am
Guest Fri Apr 29, 2011 12:37 am
will baddeley wrote:What is a Kaytunwill Pine Tony? Dramatic movement in this Pine and great progression pics.
Cummon Will work it out mate!

Guest- Guest

fiona- Member
Re: Kaytunwill Pine
![]() Guest Fri Apr 29, 2011 12:44 am
Guest Fri Apr 29, 2011 12:44 am
Sorry. Whizzed straight over my head. Spell it out to me Tony 
Guest- Guest
Re: Kaytunwill Pine
![]() Guest Fri Apr 29, 2011 12:45 am
Guest Fri Apr 29, 2011 12:45 am
will baddeley wrote:Sorry. Whizzed straight over my head. Spell it out to me Tony
K_A_T_E_A_N_D_W_I_L_L
Jesus
Guest- Guest
Kaytunwill Pine
![]() Guest Fri Apr 29, 2011 12:54 am
Guest Fri Apr 29, 2011 12:54 am
I'm so glad to be missing out on this one tomorrow. Sorry for being so slow Tony.
Guest- Guest
Kaytunwill Pine
![]() Guest Fri Apr 29, 2011 1:13 am
Guest Fri Apr 29, 2011 1:13 am
That may have been said with the wrong sentiment. I just have other commitments.
Guest- Guest
Re: Kaytunwill Pine
![]() Pavel Slovák Fri Apr 29, 2011 12:05 pm
Pavel Slovák Fri Apr 29, 2011 12:05 pm
Hi Tony
Very nice work. Big future tree.

It is a tree in autumn 2010.

Gretings Pavel
Very nice work. Big future tree.
It is a tree in autumn 2010.
Gretings Pavel

Pavel Slovák- Member
slight change
![]() Guest Fri Apr 29, 2011 10:12 pm
Guest Fri Apr 29, 2011 10:12 pm
Thanks Pavel, I knew I could rely on you.
After a bit of 'tweaking' I have changed the front and moved some of the foliage

After a bit of 'tweaking' I have changed the front and moved some of the foliage
Guest- Guest
Re: Kaytunwill Pine
![]() Rob Kempinski Fri Apr 29, 2011 10:23 pm
Rob Kempinski Fri Apr 29, 2011 10:23 pm
That looks good Tony. Like the negative space.
I was going to work on a bonsai today and name it "Endeavor" in honor of the last launch, but it scrubbed today.
I was going to work on a bonsai today and name it "Endeavor" in honor of the last launch, but it scrubbed today.

Rob Kempinski- Member
Re: Kaytunwill Pine
![]() Paul B (Scotland) Sun May 01, 2011 12:09 am
Paul B (Scotland) Sun May 01, 2011 12:09 am
tony wrote:will baddeley wrote:Sorry. Whizzed straight over my head. Spell it out to me Tony
K_A_T_E_A_N_D_W_I_L_L
Jesus
Glad you asked that Will - had me wondering too. I thought it was a Lancashire thing - maybe a pattern on a flatcap or some magic ingredient you add to a hotpot
Great transformation Tony, you've really brought out a great image from Pavel's original stock.
Any chance of a photo from the back view?

Paul B (Scotland)- Member
Re: Kaytunwill Pine
![]() johnsmith Sun May 01, 2011 7:32 am
johnsmith Sun May 01, 2011 7:32 am
I would not normally work on a pine that had only been potted the year
Fron wooden box to bonsai pot and then fully styled in a few months?
Surely this goes against all the teaching I've ever read or heard of regarding bonsai?
especially pines, this must be a risk to the health of the tree?
johnsmith- Member
Re: Kaytunwill Pine
![]() Guest Sun May 01, 2011 10:49 am
Guest Sun May 01, 2011 10:49 am
johnsmith wrote:I would not normally work on a pine that had only been potted the year
Fron wooden box to bonsai pot and then fully styled in a few months?
Surely this goes against all the teaching I've ever read or heard of regarding bonsai?
especially pines, this must be a risk to the health of the tree?
Hi John, I understand your concerns however I would not risk loosing a tree of such high quality by being impatient, the tree is very strong and responded well to re-potting. No roots were cut nor any major work done on them. 'Re-potting' was more of a re-positioning from horizontal to upright.
Guest- Guest
Re: Kaytunwill Pine
![]() joven Mon May 02, 2011 2:59 pm
joven Mon May 02, 2011 2:59 pm
Fantastic pine, and very good work. Congratulations.
Greetings
Greetings
joven- Member
» UK Pine styled as...er... UK Pine.
» RESTYLING MY SMALL "P. PINE".
» Pine flower = pine cones?
» Trees downunder in training.
» pine seeded under my pine!
» RESTYLING MY SMALL "P. PINE".
» Pine flower = pine cones?
» Trees downunder in training.
» pine seeded under my pine!
Page 1 of 1
Permissions in this forum:
You cannot reply to topics in this forum|
|
|