


Hawthorn progression
Page 2 of 2 •  1, 2
1, 2

 Re: Hawthorn progression
![]() my nellie Wed Nov 21, 2012 11:44 am
my nellie Wed Nov 21, 2012 11:44 am
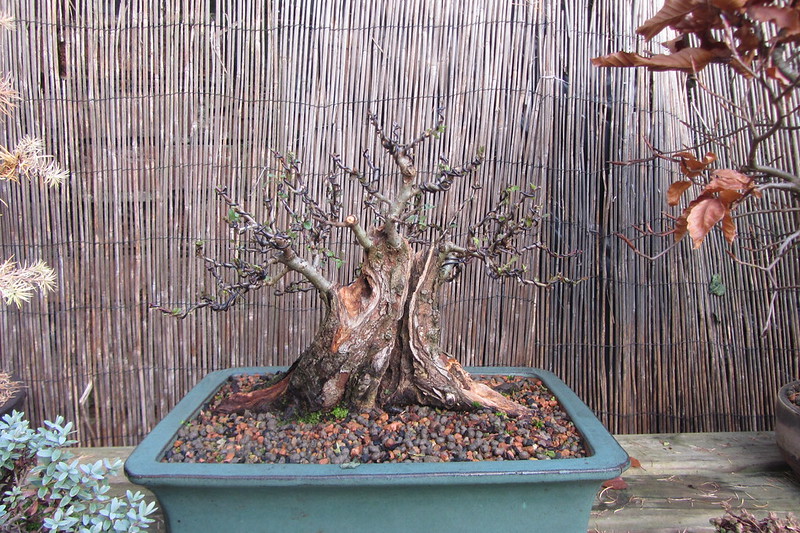
I have one question concerning the carved fat root on right side of the tree : Since the live bark is disrupted, how is the branch above that root being fed and kept alive?
Sorry for my poor English.... I hope you can understand what I mean.

my nellie- Member

Re: Hawthorn progression
![]() Smithy Wed Nov 21, 2012 5:03 pm
Smithy Wed Nov 21, 2012 5:03 pm
Cheers Dad ,oops sorry i meant Paul.
Nellie , there is a root at the bottom of the front bark and some roots around the back . The bit i carved away was only the top really of the big root which had no roots on any way. I checked when i repotted this one to see where all the roots were so i was confident i could carve out the middle and side root and it would still be happy. I haven't used any lime sulphur , just carved it and then left it rot a bit on its own . Then i go over with a wire brush and put some natural preserver on .
Thanks

Smithy- Member
Hawthorn Progression
![]() paul.spearman Thu Nov 22, 2012 12:36 pm
paul.spearman Thu Nov 22, 2012 12:36 pm
paul.spearman- Member
Re: Hawthorn progression
![]() Guest Thu Nov 22, 2012 5:06 pm
Guest Thu Nov 22, 2012 5:06 pm
paul.spearman wrote:Look Son your doing a good job, so proud of your work will double your pocket money next week
Smithy... Paul... Play nicely

Guest- Guest
Re: Hawthorn progression
![]() Andrew Campbell Thu Nov 22, 2012 9:26 pm
Andrew Campbell Thu Nov 22, 2012 9:26 pm

Andrew Campbell- Member
Re: Hawthorn progression
![]() Smithy Thu Nov 22, 2012 9:56 pm
Smithy Thu Nov 22, 2012 9:56 pm
Andrew Campbell wrote:Looking very nice smithy, I always enjoyed your progressions. Very nice
Thanks Andrew.
Smithy- Member
Re: Hawthorn progression
![]() JudyB Fri Nov 23, 2012 12:39 pm
JudyB Fri Nov 23, 2012 12:39 pm
JudyB- Member
Re: Hawthorn progression
![]() Smithy Fri Nov 23, 2012 3:40 pm
Smithy Fri Nov 23, 2012 3:40 pm
Smithy- Member
Re: Hawthorn progression
![]() Guest Fri Nov 23, 2012 4:41 pm
Guest Fri Nov 23, 2012 4:41 pm
Guest- Guest
Re: Hawthorn progression
![]() Smithy Fri Nov 23, 2012 5:18 pm
Smithy Fri Nov 23, 2012 5:18 pm
Scion wrote:I have a hawthorn project myself and I've been satisfied with its progress so far.( That's it I'm wiring in the photo to the right). But suddenly mine seems too tall!
looks a nice hawthorn you've got, you will just have to get another to make smaller. That one looks too nice to chop down.
Smithy- Member
Re: Hawthorn progression
![]() -Daniel- Sun Nov 25, 2012 7:15 pm
-Daniel- Sun Nov 25, 2012 7:15 pm
Regards , Daniel

-Daniel-- Member
Re: Hawthorn progression
![]() Billy M. Rhodes Sun Nov 25, 2012 8:20 pm
Billy M. Rhodes Sun Nov 25, 2012 8:20 pm

Billy M. Rhodes- Member
Re: Hawthorn progression
![]() Cockroach Mon Nov 26, 2012 2:44 am
Cockroach Mon Nov 26, 2012 2:44 am

Cockroach- Member
Re: Hawthorn progression
![]() tiennavi Mon Nov 26, 2012 7:02 am
tiennavi Mon Nov 26, 2012 7:02 am
i also hope having one kind of this tree!
thanks for your sharing!best regards!

tiennavi- Member
Re: Hawthorn progression
![]() Smithy Sun Nov 24, 2013 8:22 am
Smithy Sun Nov 24, 2013 8:22 am
I had a pot commissioned for it and hope to get it for the spring.
015 by smithyla67, on Flickr

018 by smithyla67, on Flickr

021 by smithyla67, on Flickr
Smithy- Member
Re: Hawthorn progression
![]() yamasuri Sun Nov 24, 2013 11:20 am
yamasuri Sun Nov 24, 2013 11:20 am

yamasuri- Member
Re: Hawthorn progression
![]() Smithy Sun Nov 24, 2013 11:22 am
Smithy Sun Nov 24, 2013 11:22 am
Smithy- Member
Re: Hawthorn progression
![]() yamasuri Sun Nov 24, 2013 11:28 am
yamasuri Sun Nov 24, 2013 11:28 am
yamasuri- Member
Re: Hawthorn progression
![]() my nellie Tue Nov 26, 2013 1:02 pm
my nellie Tue Nov 26, 2013 1:02 pm
I like the all natural color of the shari and uro. No lime sulphur is my choice, too.
Bravo!
my nellie- Member
Re: Hawthorn progression
![]() Richard S Tue Nov 26, 2013 7:21 pm
Richard S Tue Nov 26, 2013 7:21 pm
Fantastic tree. The branch development is coming on really well and the carving in particular has added enormously to the character of what started off as a rather average piece of material. A great job, very inspiring.
However, if I had one other comment to make it would be that in the photos at least, the tree looks a bit two dimensional (wide but rather flat). I realise that it may just be the camera angle but I am left wondering whether it would have been better to have left at least part of one of those forward facing surface roots that you removed?
I feel that might have retained a bit of visual depth at the base which has now been lost. Although admittedly there's not much you can do about that now.
Anyway, sorry for being (slightly) negative about your otherwise excellent tree. It's not really a criticism as much as an observation and it's only a very small point but that's what strikes me when I look at the pictures.
Regards
Richard

Richard S- Member
Re: Hawthorn progression
![]() Smithy Tue Nov 26, 2013 7:35 pm
Smithy Tue Nov 26, 2013 7:35 pm
Hi Richard,your observations are right. It is a wide and flat image . I had to go back and look again and really i could have left the bottom root sticking out. I've come a long way since starting this project and probably would do things a bit different this time, like most of my projects really. I am going to shorten the sides on the next repot to reduce the width and the pot John pit is making has a small front side with curved scallops leading out to the sides to hopefully make the front not look so wide.
I had thought of grafting some roots on the tree like i'm doing with another hawthorn but in the end i'll live with the tree how it is.
Smithy- Member
Page 2 of 2 • 1, 2
» ever bite off more than you can chew?
» Holiday Greetings!
» Literati Juniper
» Windswept -Before and after 1st styling
|
|
|