VALAVANIS OPEN HOUSE DEMO- VALAVANIS
+16
Budi Sulistyo
AdamG
rolandp
Robert Steven
JJR
Eastern Bonsai
Andrei Darusenkov
SOUMYA MITRA
Russell Coker
Rob Kempinski
Todd Ellis
peter krebs
Pavel Slovák
coh
drgonzo
William N. Valavanis
20 posters
Page 1 of 2
Page 1 of 2 • 1, 2 
 VALAVANIS OPEN HOUSE DEMO- VALAVANIS
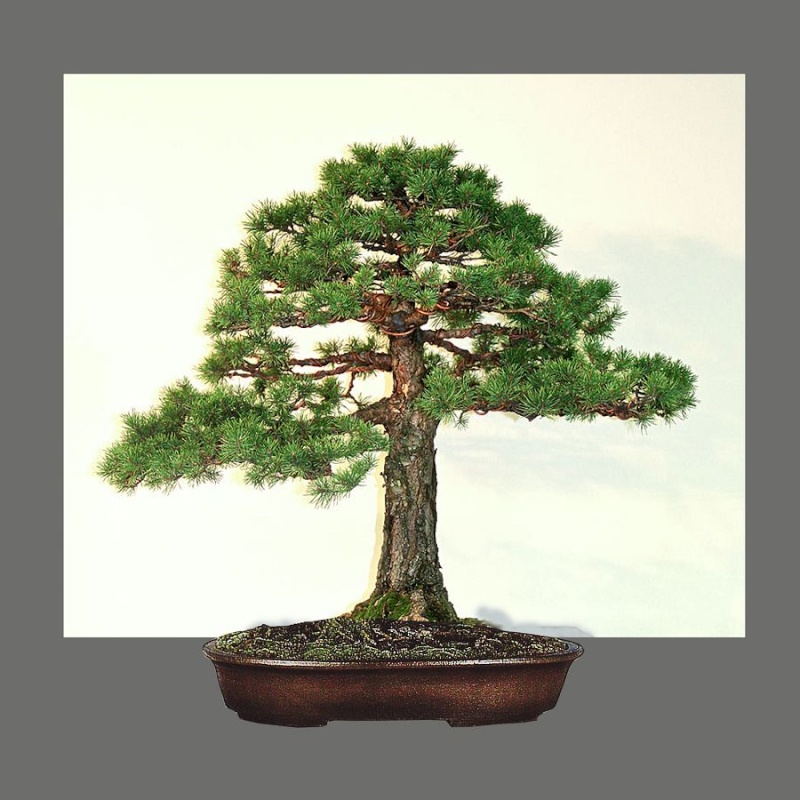
Bill Valavanis worked on an old RAF Dwarf Scots pine for Sunday's demonstration. It was trained by Steve Kozlowski from a young seedling he purchased from me in the early 1970s. He did a great job growing and training it. Now, in my collection it was my turn to refine the design.
The first two branches are very heavy and needed to be lowered. Before lowering they were wired so they would not be disturbed after lowering. There are several different methods for lowering the heavy branches. I used a sharp Masakuni bonsai chisel and made a cut on the upper part of the branch. After pulling the branch down, several small stones were inserted into the cut to keep it in the desired position. This was instead of using guy wires. Then Japanese Cut Paste was put in the crack filling in the hold and small rocks. Then, small pieces of bark were pressed into the Cut Paste.
After lowering the first two branches the remaining tree was wired. Doug McDade and Marc Arpag assisted with the wiring. Then the tree was adjusted for form. The small twigs were not wired because of time. The entire demonstration only took 1 1/2 hours.
Then the top was removed. A pointed top suggests a young tree, while a rounded crown presents the feeling of an old mature tree.
Finally, we wrestled to remove the tree from the container. Then we cut the roots on the side only so I could show the audience how a different shaped container makes a difference in the feeling of the bonsai. The deeper container was finally selected because of the age and history of the container.
Later on this week the tree will be transplanted into the new old container.
Bill
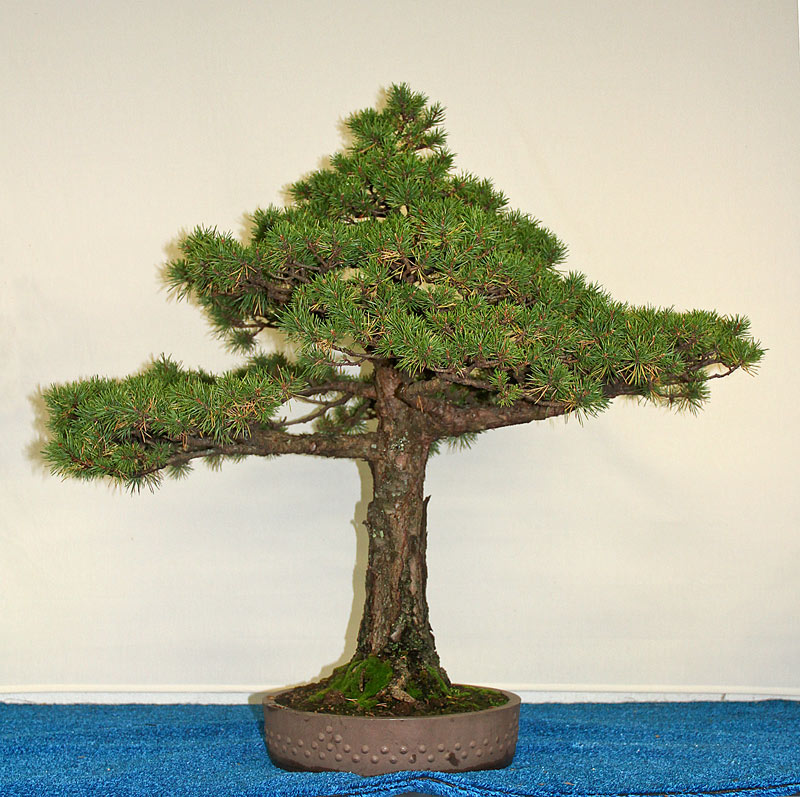
RAF Dwarf Scots Pine grown from a seedling purchased by Steve Kozlowski from Valavanis in the early 1970's
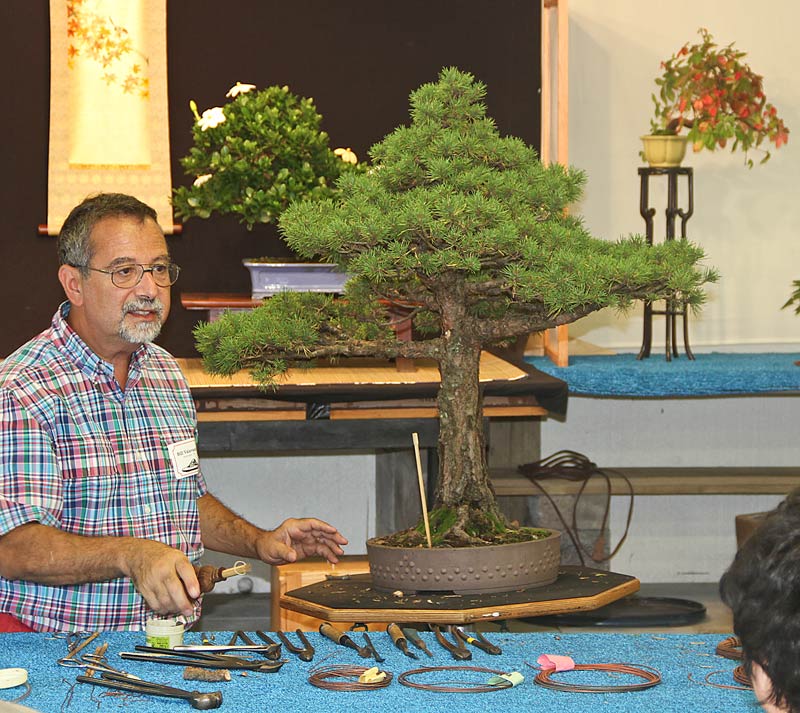
Bill explaining the design of the bonsai
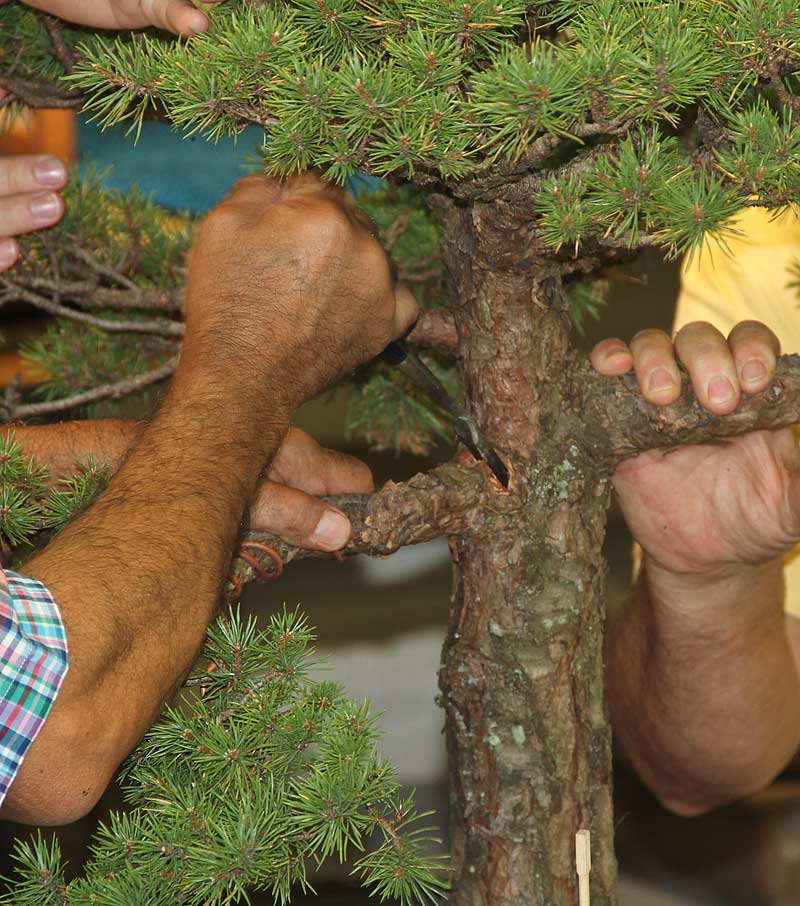
A sharp Japanese Masakuni Bonsai Chisel was used to make a cut on the top of the heavy branch to lower it
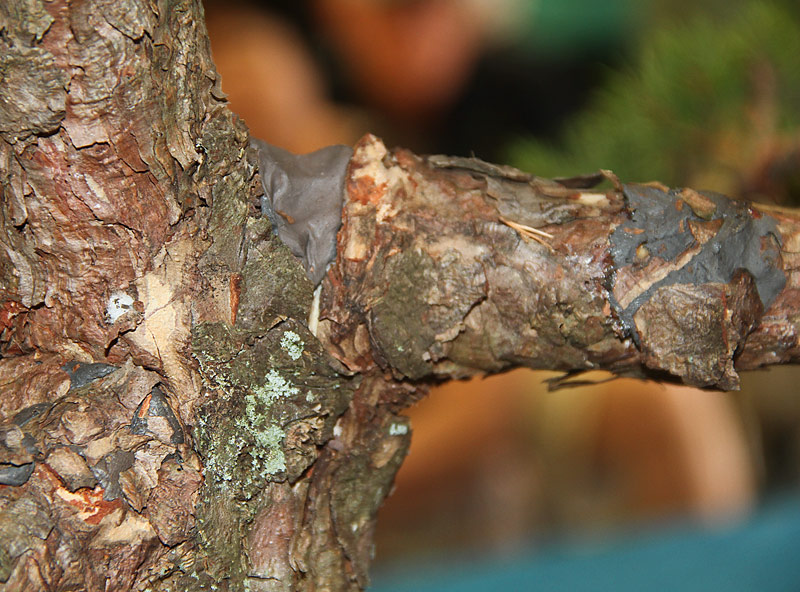
Cut Paste was inserted into the cut
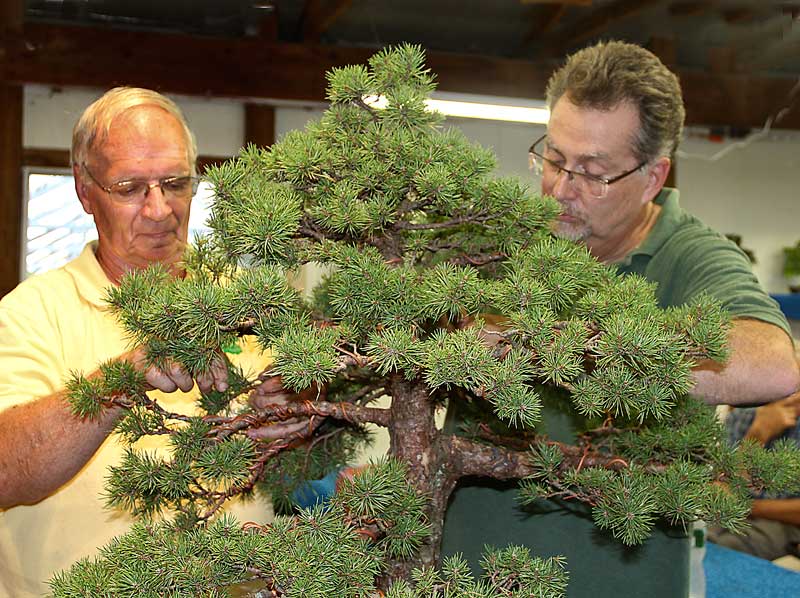
After lowering the two heavy branches the remaining tree was wired with the assistance of Doug McDade and Marc Arpag
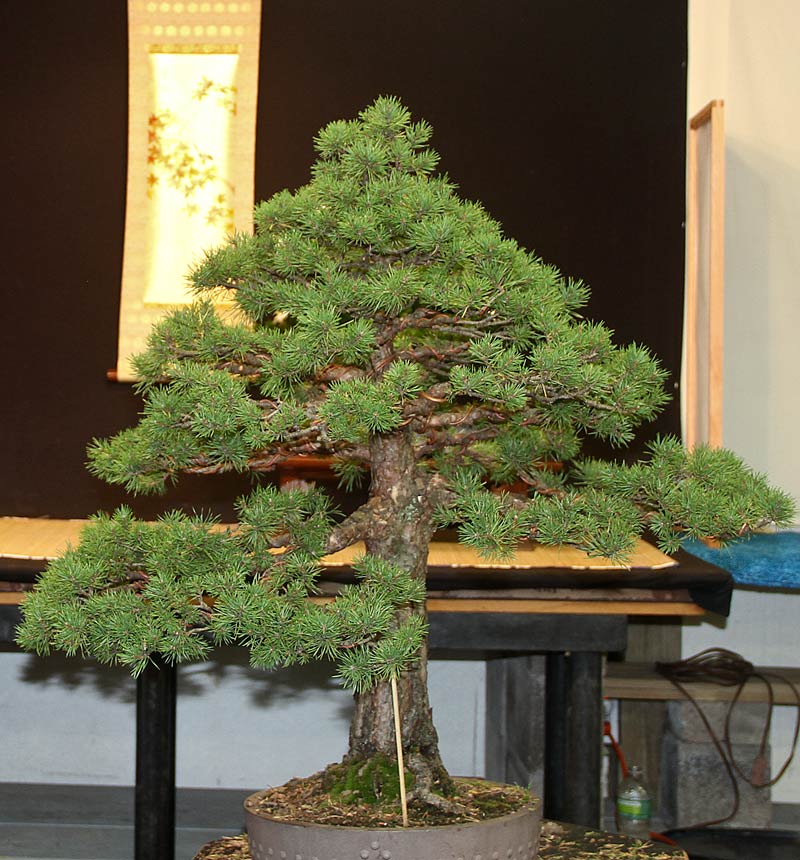
Wired bonsai showing pointed crown
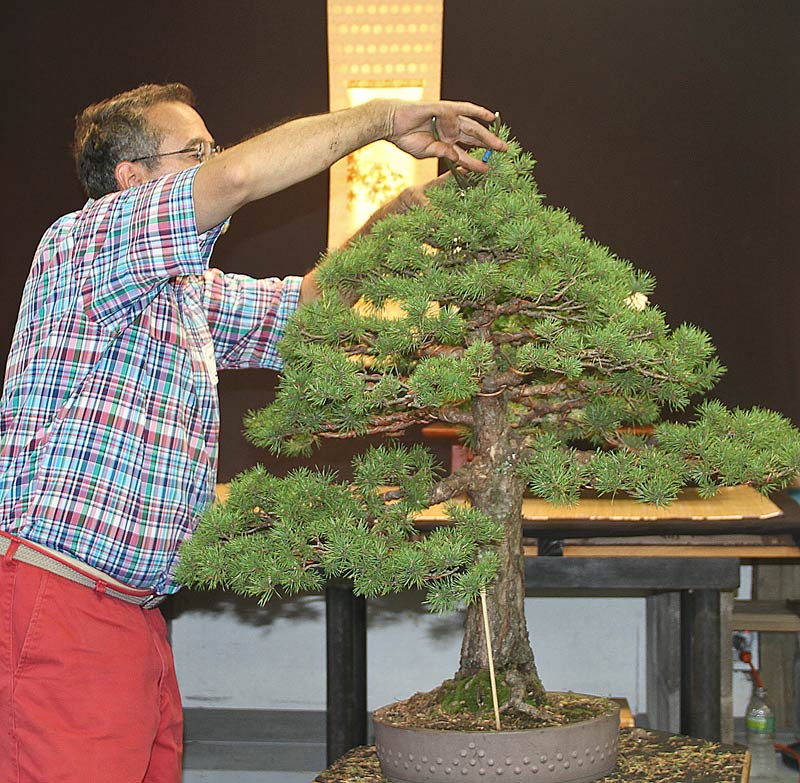
Pruning the pointed crown
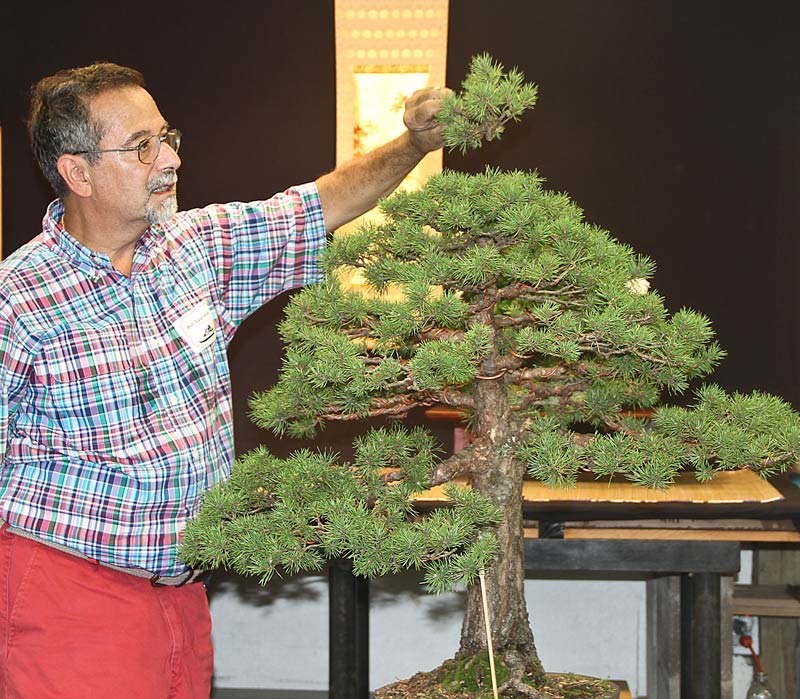
The pruned pointed crown
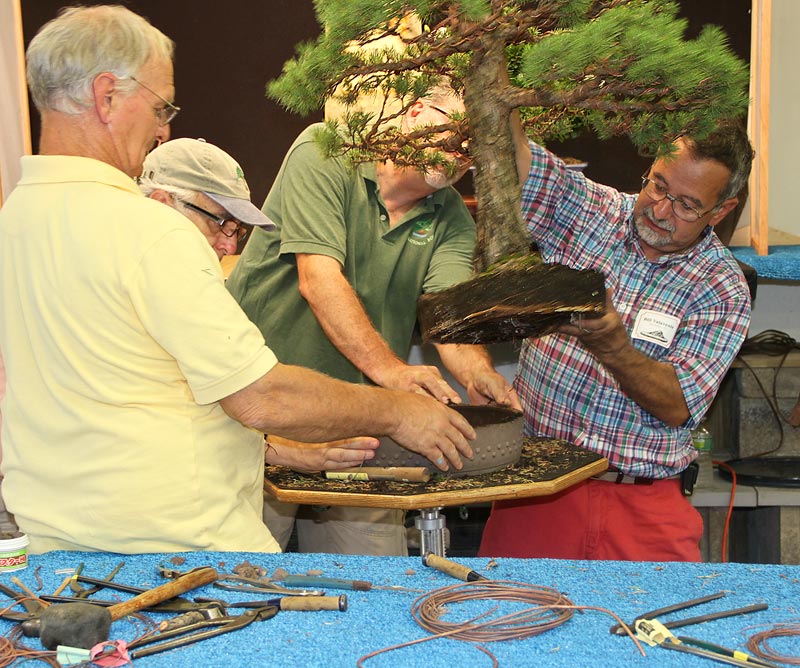
Unpotting the bonsai

Removing two sides (back and front) of the rootball with a Sawzall
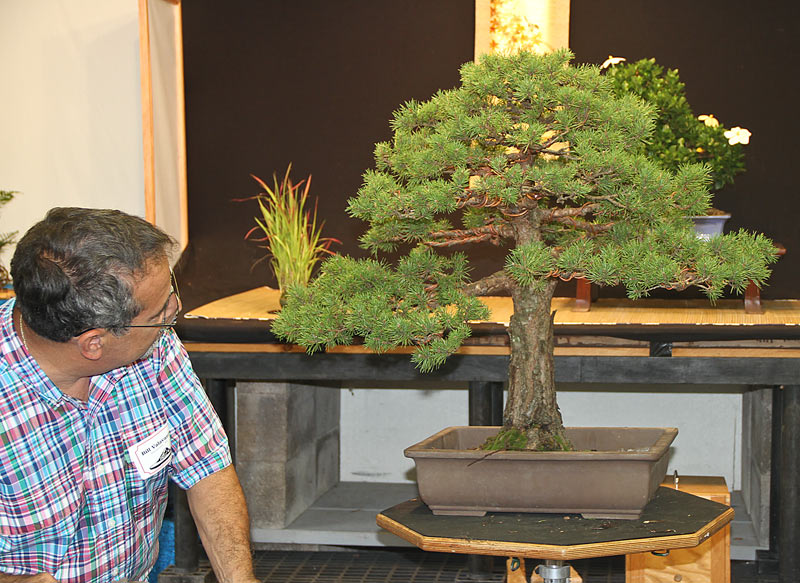
A possible future container
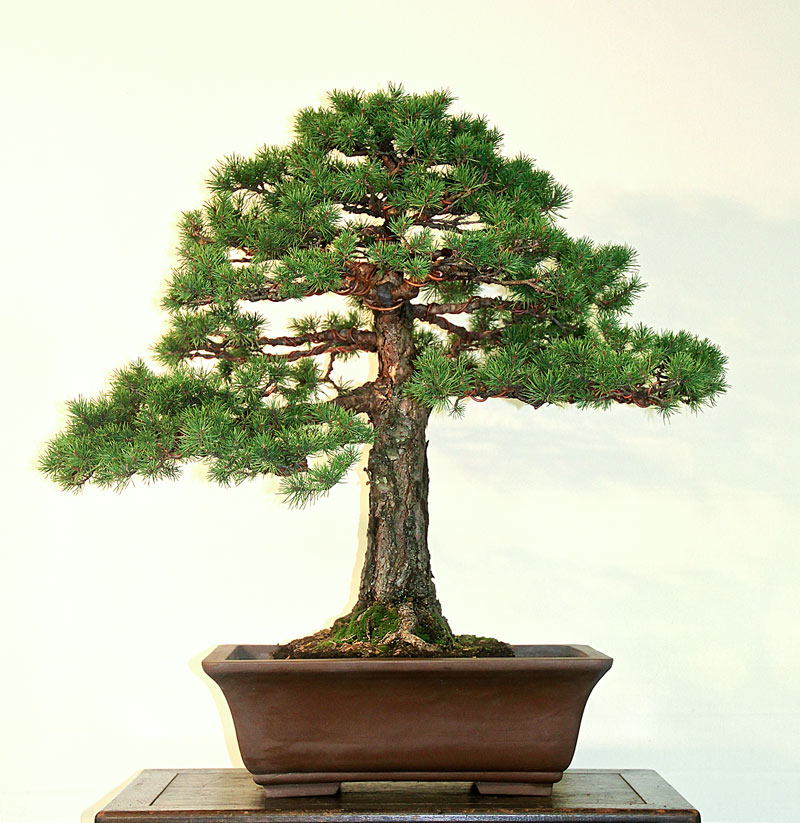
The final container selection
The first two branches are very heavy and needed to be lowered. Before lowering they were wired so they would not be disturbed after lowering. There are several different methods for lowering the heavy branches. I used a sharp Masakuni bonsai chisel and made a cut on the upper part of the branch. After pulling the branch down, several small stones were inserted into the cut to keep it in the desired position. This was instead of using guy wires. Then Japanese Cut Paste was put in the crack filling in the hold and small rocks. Then, small pieces of bark were pressed into the Cut Paste.
After lowering the first two branches the remaining tree was wired. Doug McDade and Marc Arpag assisted with the wiring. Then the tree was adjusted for form. The small twigs were not wired because of time. The entire demonstration only took 1 1/2 hours.
Then the top was removed. A pointed top suggests a young tree, while a rounded crown presents the feeling of an old mature tree.
Finally, we wrestled to remove the tree from the container. Then we cut the roots on the side only so I could show the audience how a different shaped container makes a difference in the feeling of the bonsai. The deeper container was finally selected because of the age and history of the container.
Later on this week the tree will be transplanted into the new old container.
Bill

RAF Dwarf Scots Pine grown from a seedling purchased by Steve Kozlowski from Valavanis in the early 1970's

Bill explaining the design of the bonsai

A sharp Japanese Masakuni Bonsai Chisel was used to make a cut on the top of the heavy branch to lower it

Cut Paste was inserted into the cut

After lowering the two heavy branches the remaining tree was wired with the assistance of Doug McDade and Marc Arpag

Wired bonsai showing pointed crown

Pruning the pointed crown

The pruned pointed crown

Unpotting the bonsai

Removing two sides (back and front) of the rootball with a Sawzall

A possible future container

The final container selection
William N. Valavanis- Member
 Re: VALAVANIS OPEN HOUSE DEMO- VALAVANIS
Thank you for posting these Bill! Interesting that you decided to notch from the top and not below the branch. The removal of the pointed apex really did a lot, much more than you might think when contemplating the idea, I will consider (or reconsider) a particular pointed top on one of my trees in light of this.
-Jay
-Jay

drgonzo- Member
 Re: VALAVANIS OPEN HOUSE DEMO- VALAVANIS
Great demos by both of you! Very informative. Thanks so much for the nice "bonsai weekend".
Chris
Chris

coh- Member
 Re: VALAVANIS OPEN HOUSE DEMO- VALAVANIS
Hi Wliam
Very nice tree and great job. I think that the new pot will be very good.
Congratulations.
Gretings Pavel
Very nice tree and great job. I think that the new pot will be very good.
Congratulations.
Gretings Pavel

Pavel Slovák- Member
 Re: VALAVANIS OPEN HOUSE DEMO- VALAVANIS
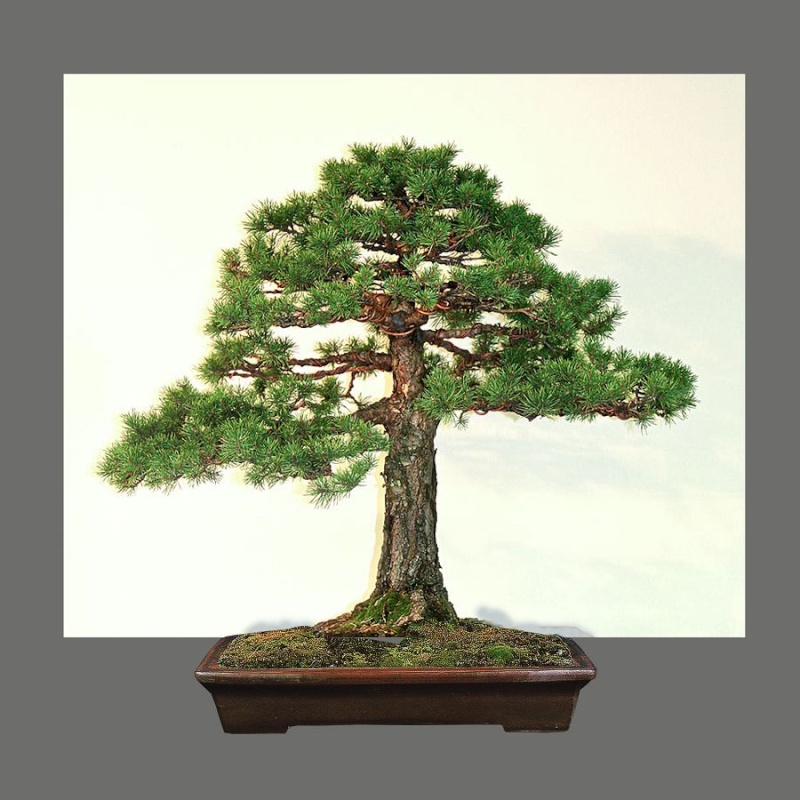
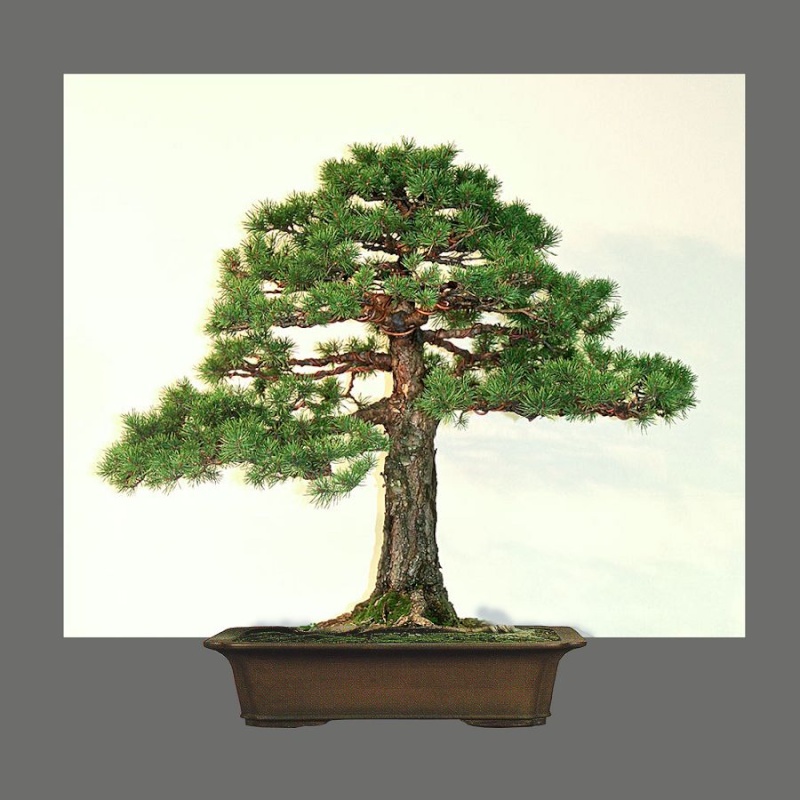
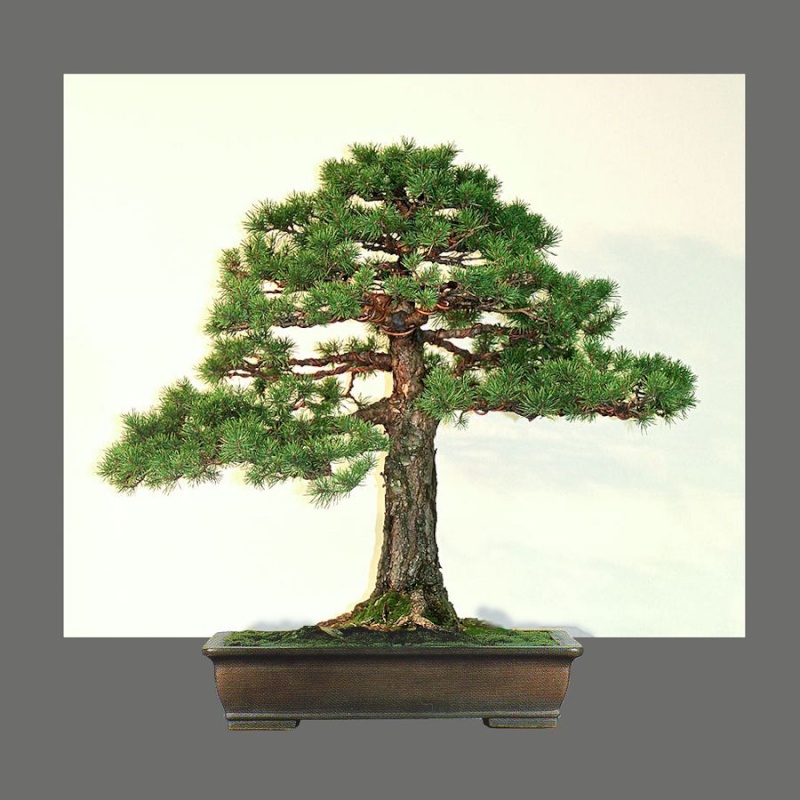
Best wishes
Peter
_____________________________________________
THE WORLD OF THE POT: http://www.peter-krebs.de/

peter krebs- Member
 Pot history?
Hi Bill,
Beautiful tree and great transformation. I learned much from this post!
Would you mind sharing the history of the pot you selected?
Best,
Todd
Beautiful tree and great transformation. I learned much from this post!
Would you mind sharing the history of the pot you selected?
Best,
Todd
Todd Ellis- Member
 Re: VALAVANIS OPEN HOUSE DEMO- VALAVANIS
Bill, the tree looks nice and shows one doesn't need to start with yamadori to have a great tree.
I agree guy wires are ugly on bonsai. Sticking the rock in the crack to wedge it open is an interesting idea. Here's something else that may work a bit better. Try the same technique but insert two part plumber's epoxy in the crack. It dries in about 5 mintues and becomes rock hard. While it is drying it can be carved into various shapes or surface texture. It will hold the branch and will get covered over nicely with time - its grey color looks like cut paste.
This is a link from Ace hardware for the product to which I am referring. It's the kind that comes in a tube that requires one to rub together to mix the epoxy components. I keep a tube in my bonsai tool bag as it has several uses. Just an idea for next time.
http://www.google.com/products/catalog?q=plumbers+epoxy&hl=en&cid=7324262025251581341&ei=XXNlTvrJK6e0wAWYsLGVDw&ved=0CAcQ8wIwAA#p

Rob Kempinski- Member
 Re: VALAVANIS OPEN HOUSE DEMO- VALAVANIS
Why did you choose such a clunky pot? ANY of Peter's suggestions seem so much more appropriate.
After your wonderful maple tutorial, this selection surprises me.
After your wonderful maple tutorial, this selection surprises me.

Russell Coker- Member
 Re: VALAVANIS OPEN HOUSE DEMO- VALAVANIS
The number 4 pot suggestion from Peter Krebs is very nice and elegant...
Kind regards Yvonne
Kind regards Yvonne
Guest- Guest
 The master's mind .
Just now seen a great demo-and transformation of a tree cared for last 40+ years .
The tree's journey from seedling to maturity speaks of how lovingly it was cared for health and growth.
There after it run the full circle and came back to original 'Master'- Bill and we witnessed some novel techniques and intricate pot selection.
It would be highly interesting and learning to know the Master's mind as to criteria behind the uppercut of the trunk and the pot selection.
SOUMYA MITRA- Member
 Re: VALAVANIS OPEN HOUSE DEMO- VALAVANIS
Bill, excellent transformation! Many thanks for some very usefull tips!
Andrei Darusenkov- Member
 Re: VALAVANIS OPEN HOUSE DEMO- VALAVANIS
William N. Valavanis wrote: Then Japanese Cut Paste was put in the crack filling in the hold and small rocks. Then, small pieces of bark were pressed into the Cut Paste.
Bill,
I was wondering what purpose the small pieces of bark pressed into the cut paste serves. Is this to retain moisture in the area of the cut? Also, would this be a pine bark or bark removed from the Bonsai in question?
Thanks,
Abe

Eastern Bonsai- Member
 Re: VALAVANIS OPEN HOUSE DEMO- VALAVANIS
Hi Abe,
The bark is used to disguise the cut paste. It is a simple technique which can hide small and large wounds; deciduous, tropicals and conifers alike.
Best,
Todd
The bark is used to disguise the cut paste. It is a simple technique which can hide small and large wounds; deciduous, tropicals and conifers alike.
Best,
Todd

Todd Ellis- Member
 Re: VALAVANIS OPEN HOUSE DEMO- VALAVANIS
drgonzo wrote:Thank you for posting these Bill! Interesting that you decided to notch from the top and not below the branch. The removal of the pointed apex really did a lot, much more than you might think when contemplating the idea, I will consider (or reconsider) a particular pointed top on one of my trees in light of this.
-Jay
The branches are not actually notched on the top, no wood is removed. The chisel is used to seperate the branch. Small wedge shaped stones are then placed in the hole and very carefully pounded in until the branch is at the desired angle. The hole is covered with cut paste to help promote healing and prevent drying out. As the wound heals over the stones are pushed out or the tree grows around them.
JJR- Member
 Re: VALAVANIS OPEN HOUSE DEMO- VALAVANIS
Ahh I see
so a notch would have been necessary if it were to have been cut from under the branch yet this way no wood is removed. I had to leave before I got to actually see this done..fascinating. I wonder if this sort of top cut and split technique could be used with large roots that need to be bent downwards to fit in a pot yet are too large to wire. The re-bound pressure of the root or branch would make wiring unnecessary and would hold pressure on the stones..
thats bloody brilliant. thank you for explaining this technique for me.

drgonzo- Member
 Re: VALAVANIS OPEN HOUSE DEMO- VALAVANIS
Nice work Bill...see you soon in Africa...

Robert Steven- Member
 Re: VALAVANIS OPEN HOUSE DEMO- VALAVANIS
Thanks for posting this nice story.
The result is very good, a major improvement of the design.
Regards,
Roland
The result is very good, a major improvement of the design.
Regards,
Roland

rolandp- Member
 Re: VALAVANIS OPEN HOUSE DEMO- VALAVANIS
Thanks to everyone for all your kind comments, I'm glad the demo helped and gave some good information for some.
Peter, you did a great job with your virtual container selections! Too bad your pots were not at hand during the demo. Although they are all good, I'd like to comment according to MY taste:
NO. 1 Round
The round shape puts emphasis on the height of the tree, I want to put emphasis on the width. There is nothing wrong with the height being dominant, I just want to show the width.
NO. 2- Oval
Generally too informal for pines, especially when in the formal upright style.
NO. 3- Rectangle, shallow
Too shallow for my taste.
NO. 4- Rectangle, straight sides
Nice fit, but a bit still a bit too shallow. Many people try to get trees in containers as shallow as possible, yes, they make the trees look taller and a bit more elegant. But not my taste, today...
NO. 5- Rectangle, deep
Great container and selection, but not the position of the trunk, but we are not discussing that aspect. That's another entire lesson. This would be my first choice, if I had the container.
NO. 6- Rectangle, mid-deep
I like this container the second best, but not the position, too centered. If I had this container and NO. 5 it would be difficult to chose.
Russell asked about the "clunky" pot. Last December I was fortunate to purchase over 1,000 old Tokoname-ware Japanese containers from an old nursery which went out of business about 25 to 30 years ago. This container was on the cover of the book the owner authored with an ancient California juniper bonsai. Of course the tree is dead now, but I got the trunk to breath new life into the dead wood. In my search for suitable Shimpaku junipers to create the new bonsai I remembered that I was going to carve the old trunk into a better design and was not certain of the shape necessary for the Shimpaku junipers. Julian Adams had a few dozen, so I did the best thing, and purchased all of them. But that's another project when I have "free" time. Back to the container, it's old, has history and fine quality clay. So, I thought I'd use this container for the demonstration.
But, the tree is not potted yet....
Rob, That's a great idea about the plumbers epoxy putty! I've used that material for over 20 years to attach tie down wires on to stones for rock plantings, and I'll try it next time, or actually for this bonsai as well. In studying the photographs the lowest right branch should be lowered slightly. Also the entire tree needs to be thinned out and fine wired. I'll try to get to it very soon before I leave the country.
The small pieces of bark are used to hide the cut paste and to make the tree look better. This was a very quick job. Remember this ENTIRE demonstration was ONLY 1 1/2 hours. Fine work requires time, this was a demonstration on advanced techniques I presented to celebrate my birthday.
Robert, I will be leaving very soon for my "Around The World in 19 Days" lecture tour to South Africa (3rd African Bonsai Convention) then continuing on to Perth and throughout Australia returning home at 10am on Monday, because I have a class the same day at 7pm. Yes, this schedule is crazy, but that's what is sometimes necessary for a professional bonsai artist, educator and scholar to make a living in the bonsai community. I look forward to joining you on the stage in Durban, South Africa soon, and also to see many friends in Africa and throughout Australia. Travel safely!
Bill

William N. Valavanis- Member
 Re: VALAVANIS OPEN HOUSE DEMO- VALAVANIS
So sound you won't join us for our Namibia safari trip..heh ? Too bad... However, what an exactly round the world trip.. Have a safe trip as well.

Robert Steven- Member
 Re: VALAVANIS OPEN HOUSE DEMO- VALAVANIS
Hello William,
it is extremely difficult if the tree is not in the original looks to create a virtual pot exactly right. If you want to choose a well fitting pot, one must necessarily see the tree three dimensional.
The Virtuals are really only dreams, and point to a few possibilities.
Your jaw is beautiful, and you will choose with certainty exactly one matching pot.
Best wishing
Peter

peter krebs- Member
 Re: VALAVANIS OPEN HOUSE DEMO- VALAVANIS
peter krebs wrote:Hello William,
it is extremely difficult if the tree is not in the original looks to create a virtual pot exactly right. If you want to choose a well fitting pot, one must necessarily see the tree three dimensional.
The Virtuals are really only dreams, and point to a few possibilities.
Your jaw is beautiful, and you will choose with certainty exactly one matching pot.
Best wishing
Peter
...Pot number 3 or 4 for me Peter, I personally find it more suiting. but maybe a bit wider and the tree placed off center.
The rustic brown color is good too.
regards,
jun
Guest- Guest
 Re: VALAVANIS OPEN HOUSE DEMO- VALAVANIS
William N. Valavanis wrote: Russell asked about the "clunky" pot. Last December I was fortunate to purchase over 1,000 old Tokoname-ware Japanese containers from an old nursery which went out of business about 25 to 30 years ago. This container was on the cover of the book the owner authored with an ancient California juniper bonsai. Of course the tree is dead now, but I got the trunk to breath new life into the dead wood. In my search for suitable Shimpaku junipers to create the new bonsai I remembered that I was going to carve the old trunk into a better design and was not certain of the shape necessary for the Shimpaku junipers. Julian Adams had a few dozen, so I did the best thing, and purchased all of them. But that's another project when I have "free" time. Back to the container, it's old, has history and fine quality clay. So, I thought I'd use this container for the demonstration.
Hey Bill.
First, I didn't mean to disparage this pot when I said "clunky". Actually I LOVE this pot, both in its antique Chinese form and its Tokoname knock-off. As you know, it's a difficult pot to find the right tree for. And I have pots that I love and really want a tree for, even if it's sometimes not the right fit - which is what I think you have here. For me, in my mind's eye, tall, formal trees don't go well with deep formal pots. I prefer something wide and shallow to really show it off. And that's what I meant about Peter's suggestions - any of which I still think is a better choice than the "clunky" pot. Since you just bought over 1,000 pots, surely you can find a better match. I have faith in you!
Btw, you refer to this pine as an "RAF Dwarf Scots pine ". What does "RAF" mean?

Russell Coker- Member
 Re: VALAVANIS OPEN HOUSE DEMO- VALAVANIS
Nice job Bill. Hope to see you again some day.
Are you going to Takamatsu?
Budi
Are you going to Takamatsu?
Budi
Budi Sulistyo- Member
Page 1 of 2 • 1, 2 
 Similar topics
» VALAVANIS OPEN HOUSE DEMO- CARAPELLA
» VALAVANIS SPRING OPEN HOUSE DISPLAY
» Bill Valavanis house fire
» Open house days Hoka En Holland
» Bonllwyn Open Day
» VALAVANIS SPRING OPEN HOUSE DISPLAY
» Bill Valavanis house fire
» Open house days Hoka En Holland
» Bonllwyn Open Day
Page 1 of 2
Permissions in this forum:
You cannot reply to topics in this forum


