


Scots pine
+4
Peter E.
gman
Victrinia Ridgeway
Hans Vleugels
8 posters
Page 1 of 1

 Scots pine
![]() Hans Vleugels Mon May 17, 2010 4:51 pm
Hans Vleugels Mon May 17, 2010 4:51 pm
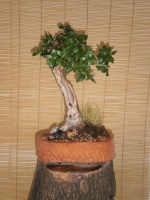
This is a yamadori Scots pine I have in my collection since the summer of 2007.
This tree has nice movement in the trunk, and some beautiful deadwood features.
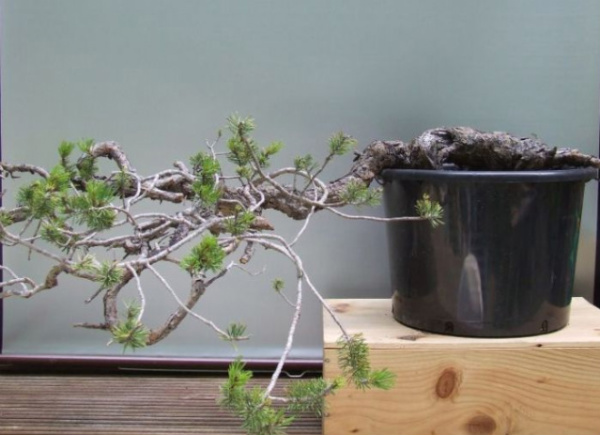
But it also has a major problem in the roots that became visible when I repotted it for the first time in march of 2009...
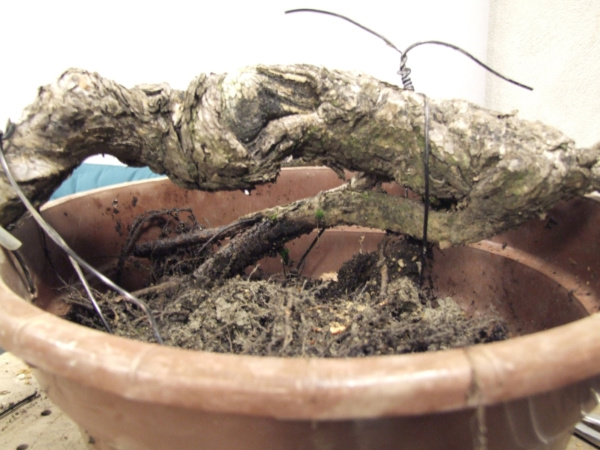
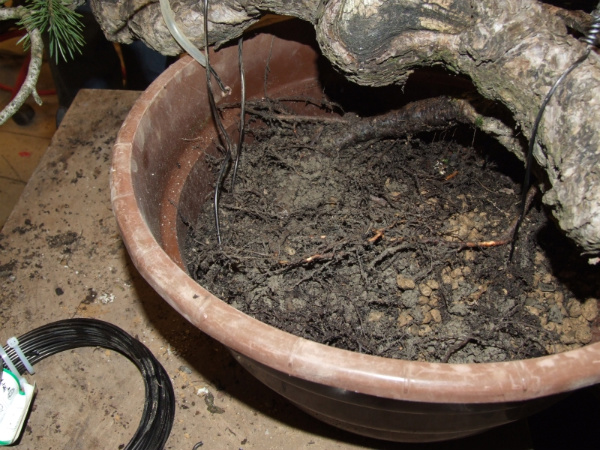
As you can see, there are only two main roots on this tree.
This means I am very limited in changing the inclination of the tree.
My first thought was a cascade or kengai…
I tried to shape this tree as a cascade, but the result was a bit disappointing...
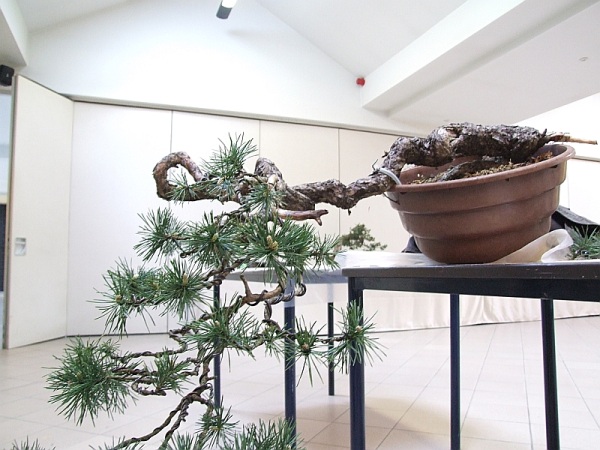
A friend suggested me to change the inclination to a more upright position...
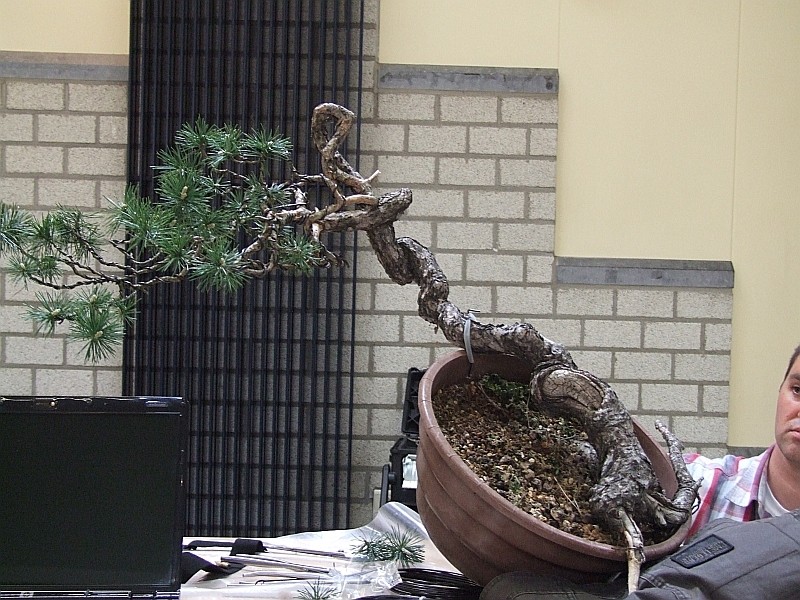
Nevertheless the main root is going a bit in the air now, I like this position.
You can see much more depth and movement in the trunkline now.
So I restyled the foliage a bit to match better with the tree in this position...

I still have some possibilities changing the inclination a little bit, but I have to figure out a way how I will get the root on the backside in a pot. This main root is about three fingers thick, so changing its position will be hard. Maybe by splitting this root, but I consider that a very risky option. Or I have to order a custom made pot in the shape of a shell or something like that. Maybe I can make one myself...
Anyway, I am not finished with this tree yet…
This tree has nice movement in the trunk, and some beautiful deadwood features.
But it also has a major problem in the roots that became visible when I repotted it for the first time in march of 2009...
As you can see, there are only two main roots on this tree.
This means I am very limited in changing the inclination of the tree.
My first thought was a cascade or kengai…
I tried to shape this tree as a cascade, but the result was a bit disappointing...
A friend suggested me to change the inclination to a more upright position...
Nevertheless the main root is going a bit in the air now, I like this position.
You can see much more depth and movement in the trunkline now.
So I restyled the foliage a bit to match better with the tree in this position...
I still have some possibilities changing the inclination a little bit, but I have to figure out a way how I will get the root on the backside in a pot. This main root is about three fingers thick, so changing its position will be hard. Maybe by splitting this root, but I consider that a very risky option. Or I have to order a custom made pot in the shape of a shell or something like that. Maybe I can make one myself...
Anyway, I am not finished with this tree yet…

Hans Vleugels- Member

Re: Scots pine
![]() Victrinia Ridgeway Tue May 18, 2010 3:44 am
Victrinia Ridgeway Tue May 18, 2010 3:44 am
I am suprised no one has commented as yet on the remarkable work you are doing with this tree... so well done! 
Working with collected material always has it's challenges, so when one can take a venerable - but messy looking tree, and make it lovely while still honoring it's age... that's worth a
Thanks so much for sharing your work.
Kindest regards,
Victrinia
Working with collected material always has it's challenges, so when one can take a venerable - but messy looking tree, and make it lovely while still honoring it's age... that's worth a
Thanks so much for sharing your work.
Kindest regards,
Victrinia

Victrinia Ridgeway- Member
Re: Scots pine
![]() gman Tue May 18, 2010 5:51 pm
gman Tue May 18, 2010 5:51 pm
Hans,
Like Miss Vic, I really like the new position of this tree and agree that it has more depth and the movement is more evident and appealing.
Great job.
Cheers Graham
Like Miss Vic, I really like the new position of this tree and agree that it has more depth and the movement is more evident and appealing.
Great job.
Cheers Graham
gman- Member
Re: Scots pine
![]() Peter E. Tue May 18, 2010 6:54 pm
Peter E. Tue May 18, 2010 6:54 pm
Hans,
I also think the upright move was for the good. It shows the tree to be very elegant. I hope you keep the foliage light on this one and not develope a heavy mass on top of the trunk. I am sure you will be able to slowly sort the roots to get this beauty into a pot.
I also think the upright move was for the good. It shows the tree to be very elegant. I hope you keep the foliage light on this one and not develope a heavy mass on top of the trunk. I am sure you will be able to slowly sort the roots to get this beauty into a pot.
Peter E.- Member
Re: Scots pine
![]() Pavel Slovák Tue May 18, 2010 7:11 pm
Pavel Slovák Tue May 18, 2010 7:11 pm
Hi Hans.
Congratulation. Very beautiful Pines. I think the problem you will not think of a way of establishment of a new shape bowls. Creativity you have shown. 
Pavel
Congratulation.
Very beautiful Pines. I think the problem you will not think of a way of establishment of a new shape bowls. Creativity you have shown. Pavel

Pavel Slovák- Member
Re: Scots pine
![]() Victrinia Ridgeway Wed May 19, 2010 2:44 am
Victrinia Ridgeway Wed May 19, 2010 2:44 am
I am a student of Daniel Robinson, who specializes in working with yamadori.
One thing we have done with large branches... not base roots though... is to carve out a channel in the area that needs the extreme bend, and use that channel to excavate the the bulk of the heartwood as much as possible (using a die grinder with a 3/8 core box router bit). Then we fill the channel with long pieces of aluminum wire and wrap it tightly - not with raffia, but with hay bail twine. The advantage of using hay bail twine in this application would be extreme, because it would not rot in the soil. Then we wrap the outside of the area to be bent with additional heavy aluminum wire and bend it. Generally we will use a guy wire to help keep the bend as well.
By removing the heartwood, you allow the movement to be introduced to the area, but leave the bark mainly in tact. It would be important not to do such a bend that it would crimp the cambuim and phloem tissue, but you'd be amazed at how many degrees you can change the direction of wood in this way. The wire in the channel provides the support and flexibility, while the wrap and the exterior wire prevents tears and delamination in the sapwood and vascular tissue.
If the tree were in vigorous health, I think it could tolerate this treatment. It is healthy now... but to do it I would let it have some unrestricted growth and an excellent feeding regimen the year before, doing it during the normal repot time for pines in your area. And being careful to protect it afterwards.
The tree would require some extra support for a while... but it's not impossible by any stretch. Depending on the pot you would ultimately put it in, you may need to let the aluminum stay in the channel permanently (which is not something we would normally do)... but as it is a supporting root, the structural integrity may require it, and in time the opening of the channel should fill over with scar tissue.
It's something to contemplate anyway... The difference between being great and being nice is as simple as a the change you effected in the positioning angle. So it's a matter of whether or not you believe it's worth the risk. If it were mine... I'd do it... but I've done this sort of thing before... so I have some confidence in the process. If nothing else, this may inspire some other thought in you... and that's still a good thing. Though for all of that... there's nothing wrong with being satisfied with a very nice tree at any angle.
Kindest regards,
Victrinia
One thing we have done with large branches... not base roots though... is to carve out a channel in the area that needs the extreme bend, and use that channel to excavate the the bulk of the heartwood as much as possible (using a die grinder with a 3/8 core box router bit). Then we fill the channel with long pieces of aluminum wire and wrap it tightly - not with raffia, but with hay bail twine. The advantage of using hay bail twine in this application would be extreme, because it would not rot in the soil. Then we wrap the outside of the area to be bent with additional heavy aluminum wire and bend it. Generally we will use a guy wire to help keep the bend as well.
By removing the heartwood, you allow the movement to be introduced to the area, but leave the bark mainly in tact. It would be important not to do such a bend that it would crimp the cambuim and phloem tissue, but you'd be amazed at how many degrees you can change the direction of wood in this way. The wire in the channel provides the support and flexibility, while the wrap and the exterior wire prevents tears and delamination in the sapwood and vascular tissue.
If the tree were in vigorous health, I think it could tolerate this treatment. It is healthy now... but to do it I would let it have some unrestricted growth and an excellent feeding regimen the year before, doing it during the normal repot time for pines in your area. And being careful to protect it afterwards.
The tree would require some extra support for a while... but it's not impossible by any stretch. Depending on the pot you would ultimately put it in, you may need to let the aluminum stay in the channel permanently (which is not something we would normally do)... but as it is a supporting root, the structural integrity may require it, and in time the opening of the channel should fill over with scar tissue.
It's something to contemplate anyway... The difference between being great and being nice is as simple as a the change you effected in the positioning angle. So it's a matter of whether or not you believe it's worth the risk. If it were mine... I'd do it... but I've done this sort of thing before... so I have some confidence in the process. If nothing else, this may inspire some other thought in you... and that's still a good thing.
Kindest regards,
Victrinia
Victrinia Ridgeway- Member
Re: Scots pine
![]() Hans Vleugels Thu Feb 17, 2011 6:36 pm
Hans Vleugels Thu Feb 17, 2011 6:36 pm
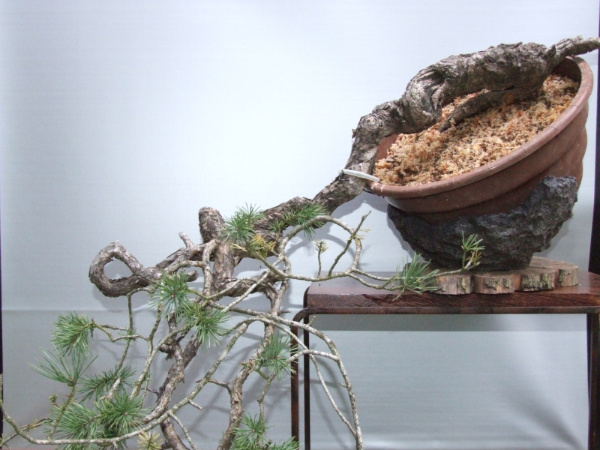
Yesterday I did my first repotting of the year. It was time to place this yamadori Scots pine in a crescent pot I had lying here for some time now. This crescent was made many years ago by Andreas van Kerckhove, a Belgian potter, and I thought it could fit with this tree...


I’d rather have seen it slightly more tilted up, but this was the utmost upwards position I could get this tree in this crescent. More inclination upwards would place the large root on the back (along with the smaller roots hanging on it) higher into the air, and that’s obviously not the intention. The foliage mass is not really 100% in proportion with the rest of the tree now. I think the lower branch is too heavy now, and more than likely I am going to remove it in the future. (See the virtual without the branch) But for now I will leave this branch where it is, until I am sure the roots are well strengthened again. I think this branch still can be useful to activate some extra rootgrowth. The looping on the top of the tree – which is holding all the foliage mass of this tree – is still flexible enough to bend, and thus the position of the foliage mass still can be changed easily in the future.

On these pictures the crescent pot is maybe looking slightly too heavy for this tree, but in real life – where you have a bit more depth perception – it is certainly okay. I myself am quite satisfied with it, and I am very pleased this tree fitted in this pot like it is now. One small downside is that I had to use a small piece of wood to support the tree. Hopefully the tree will get firmly anchored in this pot after some growing seaons, so the piece of wood can be removed later on. This tree was not blessed with many roots, and they were quite far away from the base, so I had to use a solution like this. Now it will get some time to recover again from this repotting, but I’m pretty confident about this because there was virtually no root pruning performed. The piece of dead root on the right side of the trunk – which is extending upwards – will be shortened in the future. The other piece of dead wood root on the front will remain the same as it is now. In the future, I hope to intensify the landscape feeling by adding some moss and a small plant like a fern or a dwarf-cotoneaster. But that’s for later on. To conclude this story for now, here is a more detailed picture of the dead wood on the root base…

To be continued!
Kind regards,
Hans
I’d rather have seen it slightly more tilted up, but this was the utmost upwards position I could get this tree in this crescent. More inclination upwards would place the large root on the back (along with the smaller roots hanging on it) higher into the air, and that’s obviously not the intention. The foliage mass is not really 100% in proportion with the rest of the tree now. I think the lower branch is too heavy now, and more than likely I am going to remove it in the future. (See the virtual without the branch) But for now I will leave this branch where it is, until I am sure the roots are well strengthened again. I think this branch still can be useful to activate some extra rootgrowth. The looping on the top of the tree – which is holding all the foliage mass of this tree – is still flexible enough to bend, and thus the position of the foliage mass still can be changed easily in the future.
On these pictures the crescent pot is maybe looking slightly too heavy for this tree, but in real life – where you have a bit more depth perception – it is certainly okay. I myself am quite satisfied with it, and I am very pleased this tree fitted in this pot like it is now. One small downside is that I had to use a small piece of wood to support the tree. Hopefully the tree will get firmly anchored in this pot after some growing seaons, so the piece of wood can be removed later on. This tree was not blessed with many roots, and they were quite far away from the base, so I had to use a solution like this. Now it will get some time to recover again from this repotting, but I’m pretty confident about this because there was virtually no root pruning performed. The piece of dead root on the right side of the trunk – which is extending upwards – will be shortened in the future. The other piece of dead wood root on the front will remain the same as it is now. In the future, I hope to intensify the landscape feeling by adding some moss and a small plant like a fern or a dwarf-cotoneaster. But that’s for later on. To conclude this story for now, here is a more detailed picture of the dead wood on the root base…
To be continued!
Kind regards,
Hans
Hans Vleugels- Member
Re: Scots pine
![]() Guest Thu Feb 17, 2011 6:44 pm
Guest Thu Feb 17, 2011 6:44 pm
Hi Hans
That is great work. I really like the solution chosen. The root problem can be solved with root grafting, but I know not many have worked with this in the west yet I believe. I have a pine I have to root graft, and expect to take the step this spring. It is a pine from a mountain and the roots are, like yours, not growing like we want them as bonsai.
Regards
Morten
Guest- Guest
Re: Scots pine
![]() Peter E. Thu Feb 17, 2011 7:14 pm
Peter E. Thu Feb 17, 2011 7:14 pm
I like it with the lower branch removed.
A very elegant planting. It will be a cracker.
A very elegant planting. It will be a cracker.
Peter E.- Member
Re: Scots pine
![]() Guest Thu Feb 17, 2011 7:24 pm
Guest Thu Feb 17, 2011 7:24 pm
Hello Hans. I like this composition and great work on this dynamic Pine.
Hello Morton. Could you go through the proceedure for grafting Pine roots please. I have a Scots with severe inverse taper and want to graft roots higher up the trunk.
Hello Morton. Could you go through the proceedure for grafting Pine roots please. I have a Scots with severe inverse taper and want to graft roots higher up the trunk.
Guest- Guest
Re: Scots pine
![]() Guest Fri Feb 18, 2011 9:09 am
Guest Fri Feb 18, 2011 9:09 am
Hi Will
I have grafted roots on maples at the base with good results earlier. This year it is my Pine who will take grafts.
The technique is almost the same as if you graft on a specific part of the trunk or at the base to correct missing roots i.e.
Grafting higher on the trunk needs the added plants to be in growing containers, were grafted plants at the base can be put directly in the soil at the base.
Grafting higher at the trunk needs a little more care especially keeping the added plants growing well with water and nutrients.
I have tried to illustrate the two methods below.
Root grafting is good technique to add roots to a tree at a place missing proper roots. Especially collected trees from the wild may have areas were roots are not present, because they are not trained from start with the aim of producing roots well placed as wished in bonsai, illustrating a small illusion of a larger tree.
Grafting roots on the spots necessary will help improving this design issue. Use a young plant to graft on the same specimen. Remove bark at equal size of both the tree who is added the graft and the young plant applied to the tree. Be sure the cambium (fresh layers underneath the bark), is connected closely with no gaps. The debarked areas must be of equal size precisely to ensure a good connection between the two items, so the union will take and be as less visible as possible later on.
When connected bind the two items together firmly and seal it with grafting wax, and grafting tape for a period. Feed well until the graft has taken. Depending on growth speed the graft should have healed the wounds and be united with the tree after one to three years (depending on the specimen).
Then the top of the grafted young plant can be cut close above the base were the union of the two items were connected. The roots from the young plant will now feed and take up water for the tree.
Be sure to remove the stump of the cutting and make it as close as possible to the trunk of the tree, to make it appear natural. After a few years the wound will grow over and be more or less invisible.
Example 1
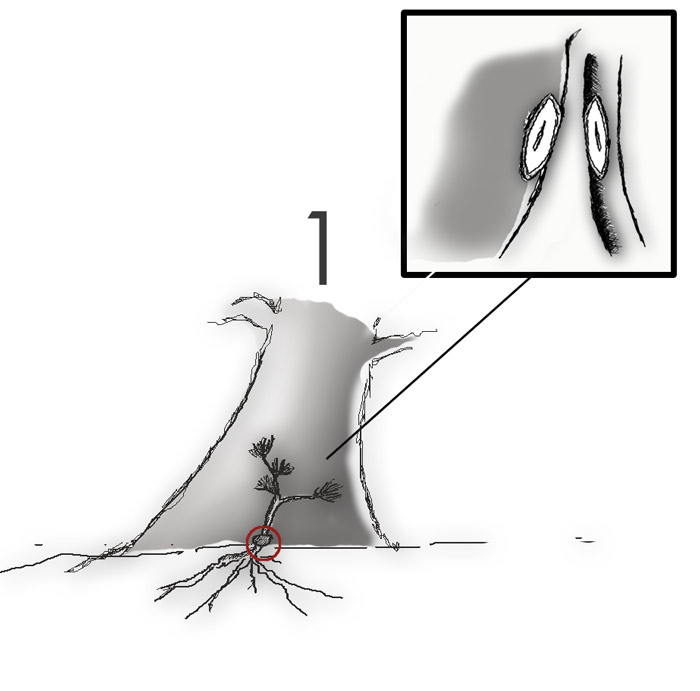
The young tree is attached by approach grafting at the spot were new roots are needed.
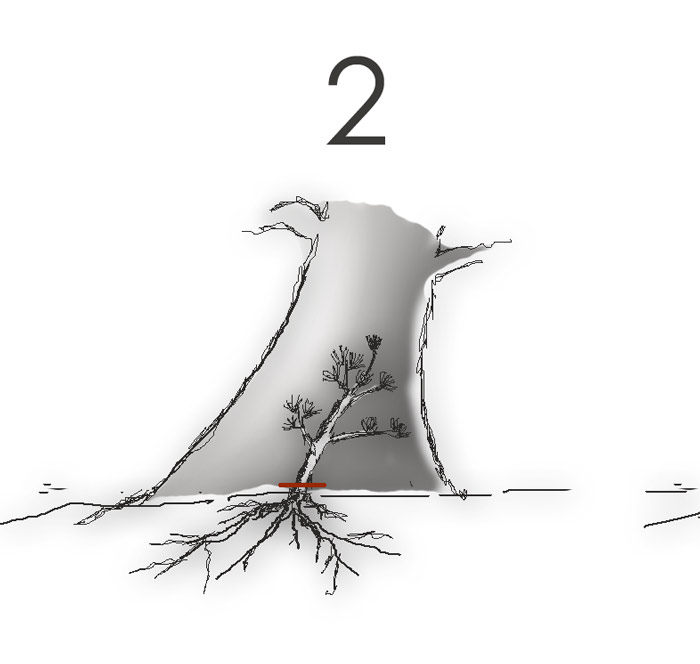
After a few growing seasons (depending on how fast the added young plant grows) the graft should have taken,
and the part above the graft can be removed by cutting.
The top of the added plant has been removed and the new roots have taken over and is united with the tree.
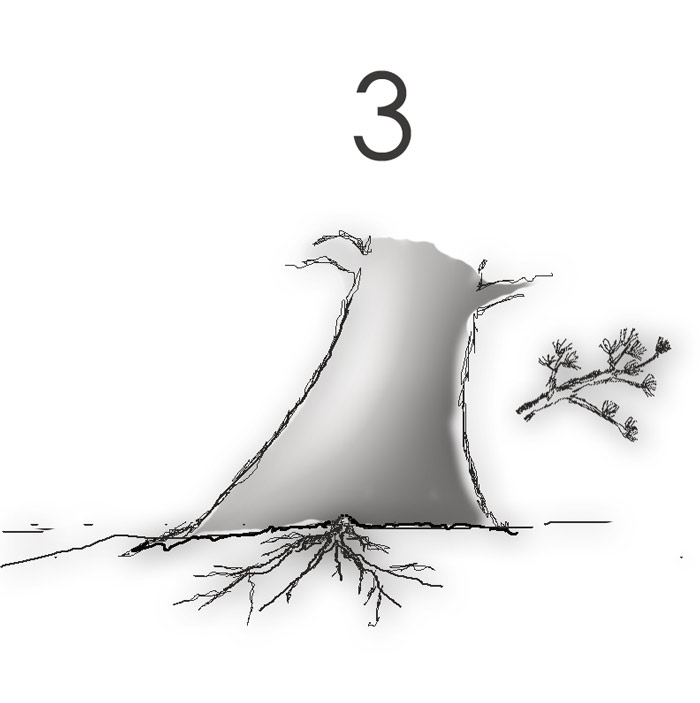
Example 2
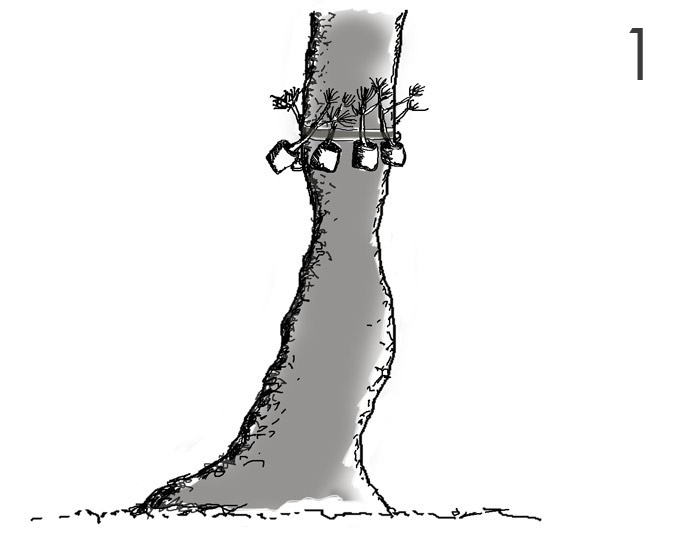
Same method of grafting. This time used high up on the trunk to make a new root base.
This serves both to shorten the trunk and in this case to deselect and remove an unwanted area of the trunk with inverse tapering.

After the younger plants has united with the trunk, the lower part is cut off.

Later the upper part of the grafted plants can be removed like in the first example, and
a tree with new roots is made. It will take time though before the new roots are grown thicker and
looks natural with the older trunk.
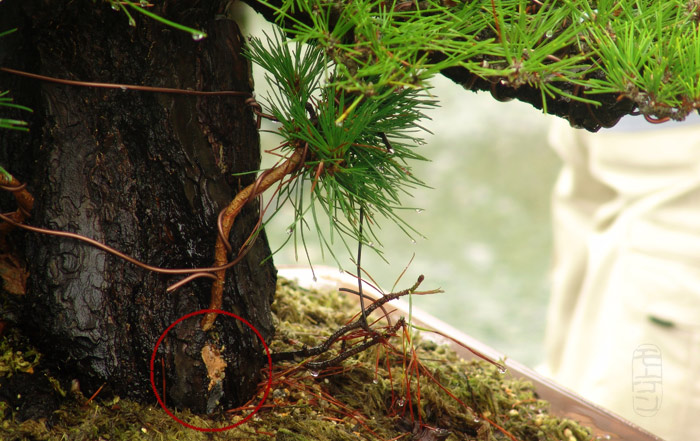
Finally a look close to a graft of Japanese black pine after one year.

Hope this helps some.
Regards
Morten
I have grafted roots on maples at the base with good results earlier. This year it is my Pine who will take grafts.
The technique is almost the same as if you graft on a specific part of the trunk or at the base to correct missing roots i.e.
Grafting higher on the trunk needs the added plants to be in growing containers, were grafted plants at the base can be put directly in the soil at the base.
Grafting higher at the trunk needs a little more care especially keeping the added plants growing well with water and nutrients.
I have tried to illustrate the two methods below.
Root grafting is good technique to add roots to a tree at a place missing proper roots. Especially collected trees from the wild may have areas were roots are not present, because they are not trained from start with the aim of producing roots well placed as wished in bonsai, illustrating a small illusion of a larger tree.
Grafting roots on the spots necessary will help improving this design issue. Use a young plant to graft on the same specimen. Remove bark at equal size of both the tree who is added the graft and the young plant applied to the tree. Be sure the cambium (fresh layers underneath the bark), is connected closely with no gaps. The debarked areas must be of equal size precisely to ensure a good connection between the two items, so the union will take and be as less visible as possible later on.
When connected bind the two items together firmly and seal it with grafting wax, and grafting tape for a period. Feed well until the graft has taken. Depending on growth speed the graft should have healed the wounds and be united with the tree after one to three years (depending on the specimen).
Then the top of the grafted young plant can be cut close above the base were the union of the two items were connected. The roots from the young plant will now feed and take up water for the tree.
Be sure to remove the stump of the cutting and make it as close as possible to the trunk of the tree, to make it appear natural. After a few years the wound will grow over and be more or less invisible.
Example 1
The young tree is attached by approach grafting at the spot were new roots are needed.
After a few growing seasons (depending on how fast the added young plant grows) the graft should have taken,
and the part above the graft can be removed by cutting.
The top of the added plant has been removed and the new roots have taken over and is united with the tree.
Example 2
Same method of grafting. This time used high up on the trunk to make a new root base.
This serves both to shorten the trunk and in this case to deselect and remove an unwanted area of the trunk with inverse tapering.
After the younger plants has united with the trunk, the lower part is cut off.
Later the upper part of the grafted plants can be removed like in the first example, and
a tree with new roots is made. It will take time though before the new roots are grown thicker and
looks natural with the older trunk.
Finally a look close to a graft of Japanese black pine after one year.
Hope this helps some.
Regards
Morten
Guest- Guest
Re: Scots pine
![]() Guest Fri Feb 18, 2011 10:13 am
Guest Fri Feb 18, 2011 10:13 am
Thankyou Morton for your very detailed explanation. I have approach grafted Pine branches before, with great success and this is almost the same.
Guest- Guest
Re: Scots pine
![]() Hombre Fri Feb 18, 2011 12:03 pm
Hombre Fri Feb 18, 2011 12:03 pm
Despite very enlightening Morten, thanks for the valuable information.
I would make another question to Morten and to Will, when is the right time of year to make these work;
thanks in advance.
Best regards Lazaros
I would make another question to Morten and to Will, when is the right time of year to make these work;
thanks in advance.
Best regards Lazaros
Hombre- Member
Re: Scots pine
![]() Guest Fri Feb 18, 2011 8:28 pm
Guest Fri Feb 18, 2011 8:28 pm
Hello Lazaros. I have performed the majority of my approach grafting, mid Summer. Although Pines start to grow in the Spring, they tend to put weight on trunk and branches in July/ August (Western Europe). I will attempt the root grafting at this time.
Guest- Guest
Re: Scots pine
![]() Hombre Fri Feb 18, 2011 9:33 pm
Hombre Fri Feb 18, 2011 9:33 pm
Thank you Will .
I have a black pine with very nice and mature trunk but there is a big problem with big gaps between the top and the bottom branches, I hope to thereby fix the problem.
Best regards Lazaros
I have a black pine with very nice and mature trunk but there is a big problem with big gaps between the top and the bottom branches, I hope to thereby fix the problem.
Best regards Lazaros
Hombre- Member
Re: Scots pine
![]() Guest Fri Feb 18, 2011 10:08 pm
Guest Fri Feb 18, 2011 10:08 pm
will baddeley wrote:Hello Lazaros. I have performed the majority of my approach grafting, mid Summer. Although Pines start to grow in the Spring, they tend to put weight on trunk and branches in July/ August (Western Europe). I will attempt the root grafting at this time.
I agree with that and a bit earlier too.
Regards
Morten
Guest- Guest
peter keane- Member
Re: Scots pine
![]() Guest Sat Feb 19, 2011 3:33 am
Guest Sat Feb 19, 2011 3:33 am
Hello Peter. I would have thought the problem with thread grafting is getting the needles through the hole. Something thats not a problem with deciduous trees.
Guest- Guest
Re: Scots pine
![]() Tom Benda Sat Feb 19, 2011 11:27 am
Tom Benda Sat Feb 19, 2011 11:27 am
Beautiful and rare trunkline!
I´d like to try pine grafting too.
I´d like to try pine grafting too.
Tom Benda- Member
» "That" pine-question... Candle pruning scots pine
» Pinus sylvestris - yamadori
» Scotch Pine
» scots pine
» Scots Pine
» Pinus sylvestris - yamadori
» Scotch Pine
» scots pine
» Scots Pine
Page 1 of 1
Permissions in this forum:
You cannot reply to topics in this forum|
|
|