


Hop Hornbeam Beginning
5 posters
Page 1 of 1

 Hop Hornbeam Beginning
![]() AdamDunham Sun Jan 27, 2013 12:52 am
AdamDunham Sun Jan 27, 2013 12:52 am
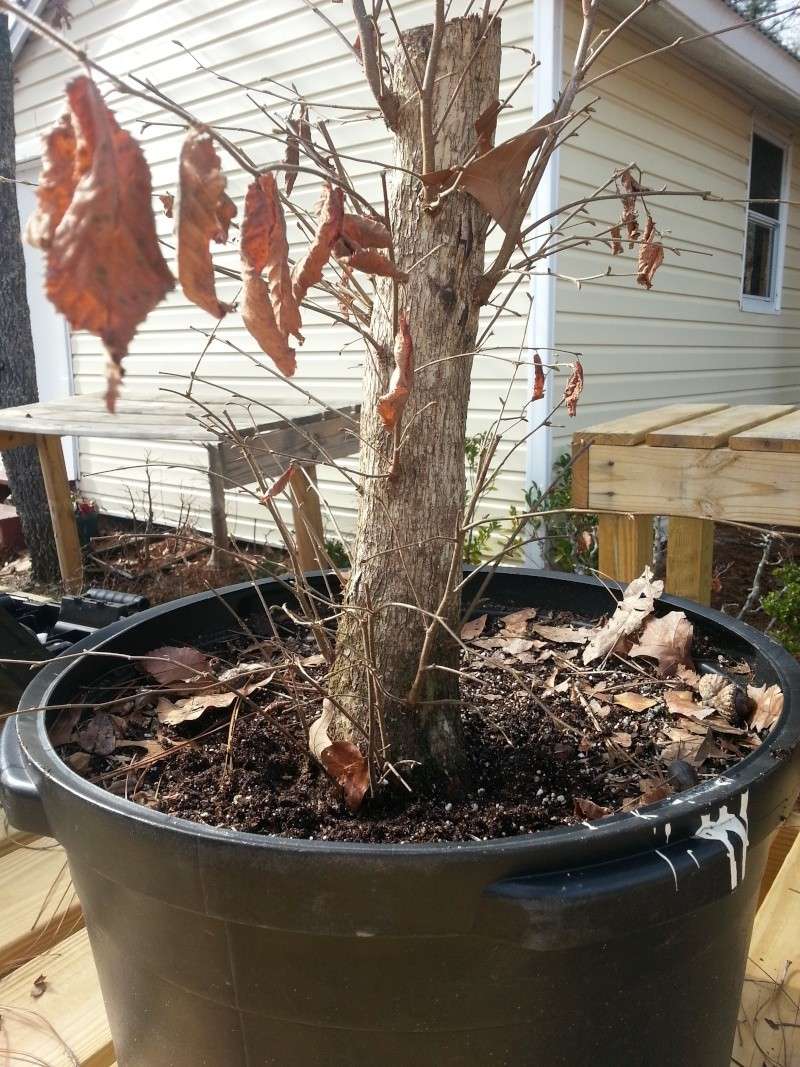
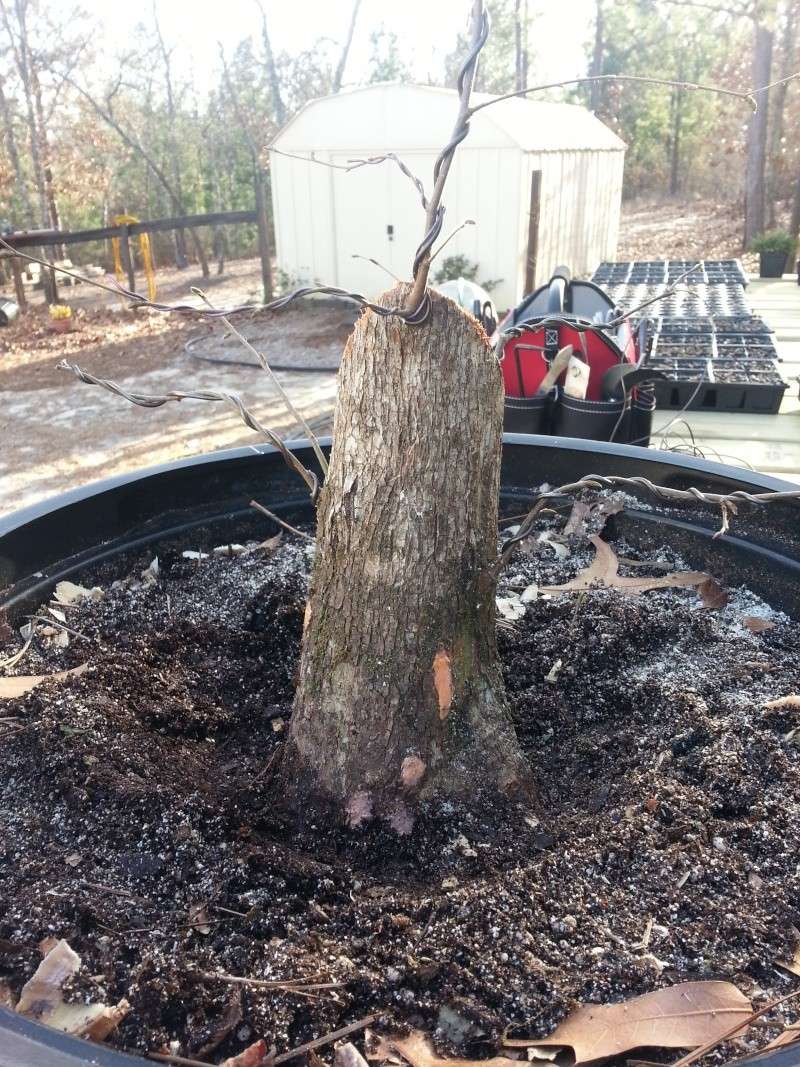
Thought I would share a few pics of a hop hornbeam I started developing today. The tree was collected Feburary of last year at a trail I have visited the last few years. Nothing super special about the tree got my attention. It's something I probably would have passed on a collecting trip nowadays, but at the time I thought it would be a good cutback canidate. Cut the roots back hard with a sawzall and knob cutters. I normally don't plant trees in containers that deep, but my inventory of nursery pots was running low at the time. The tree was allowed to grow freely for a good bit of the year, and was trimmed back around August to get some back budding.
Pulling the tree from under benches

Trying to dig around on the soil, and seeing where the best angle is on the base/roots. The tree was planted deeper than usual to increase the survival rate since it was recently collected. On this side, the base has more interest. I believe the root placement will also confirm this side as the best front.
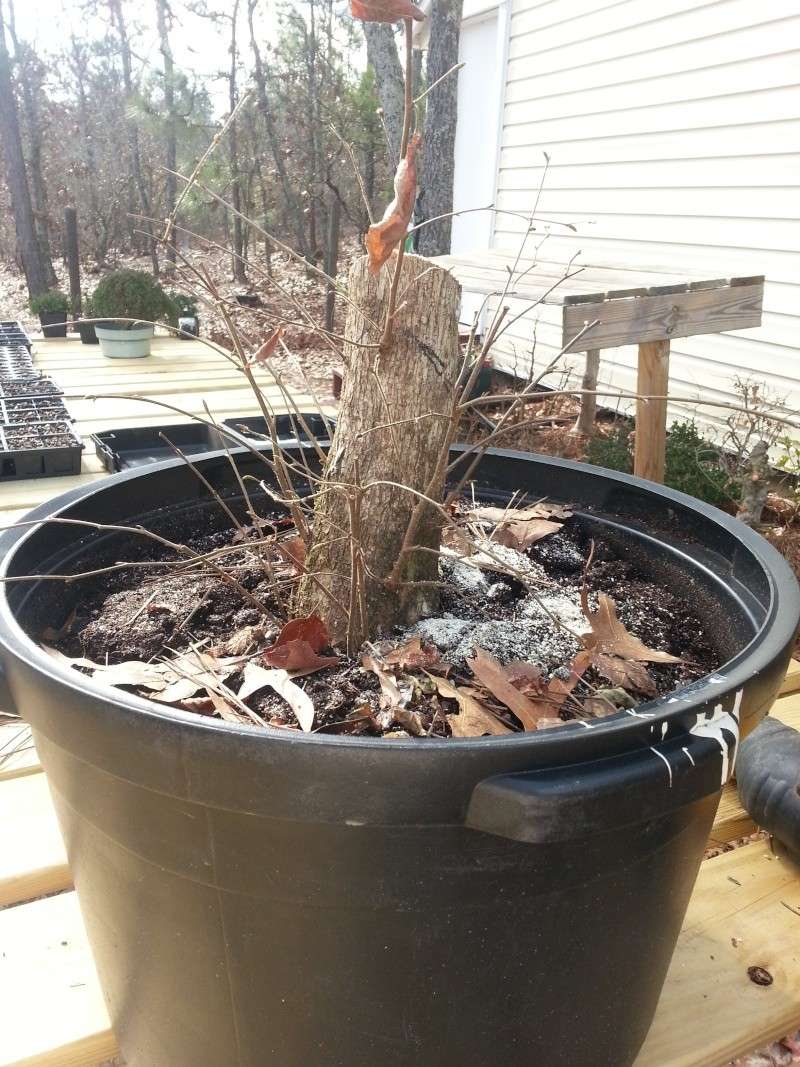
Initial cutback, deciding how to get closer on the cutback and deciding which branches to keep. I was very happy with the lower budding activity.
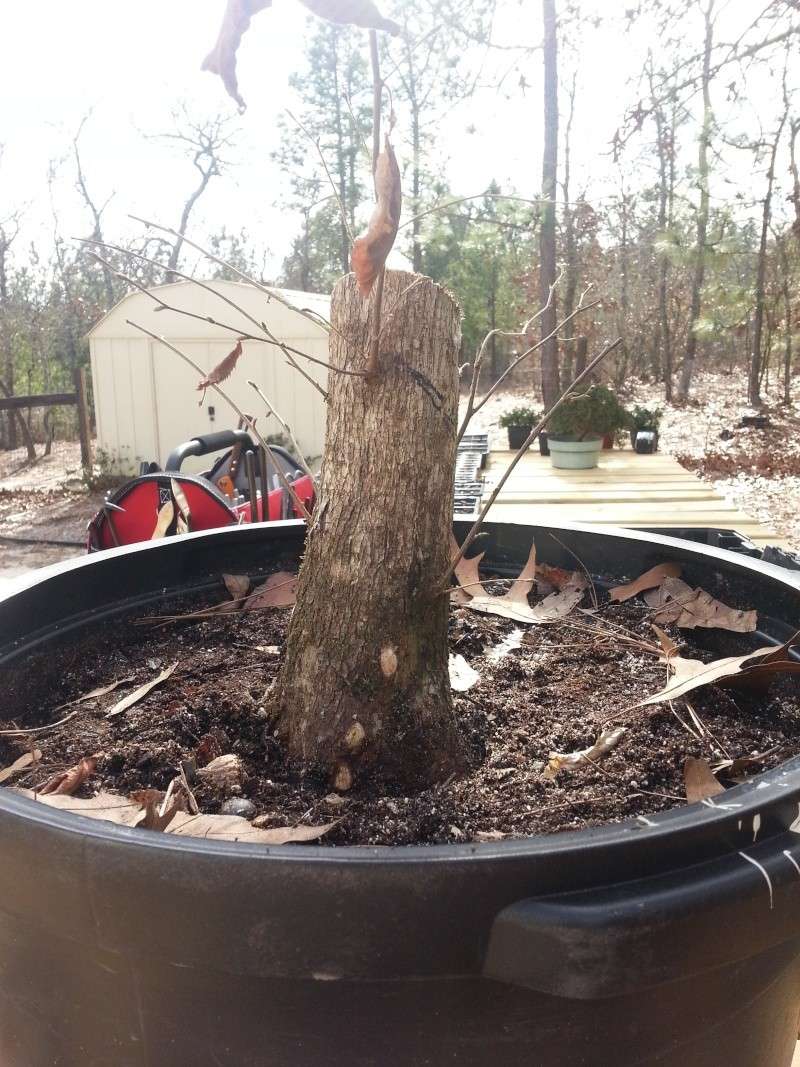
Branches left to wire. Some additional branches were left in the back to ensure the health of the tree
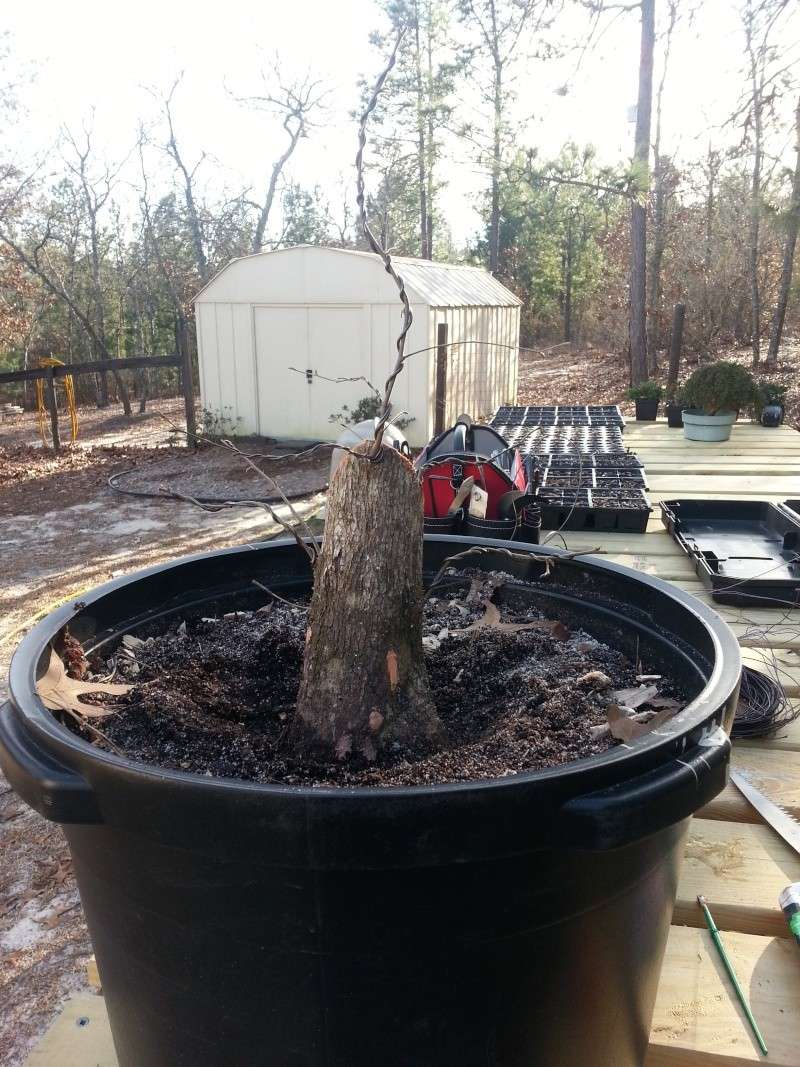
Wire branches, top jin applied to cuts.
Closer pic of the trunk/branches. You can see the base starts to flare at the soil level after digging a bit. The tree has decent flare, but nothing Japanese spectacular.
The final product. The proposed front, maybe turning the tree just a hair clockwise.
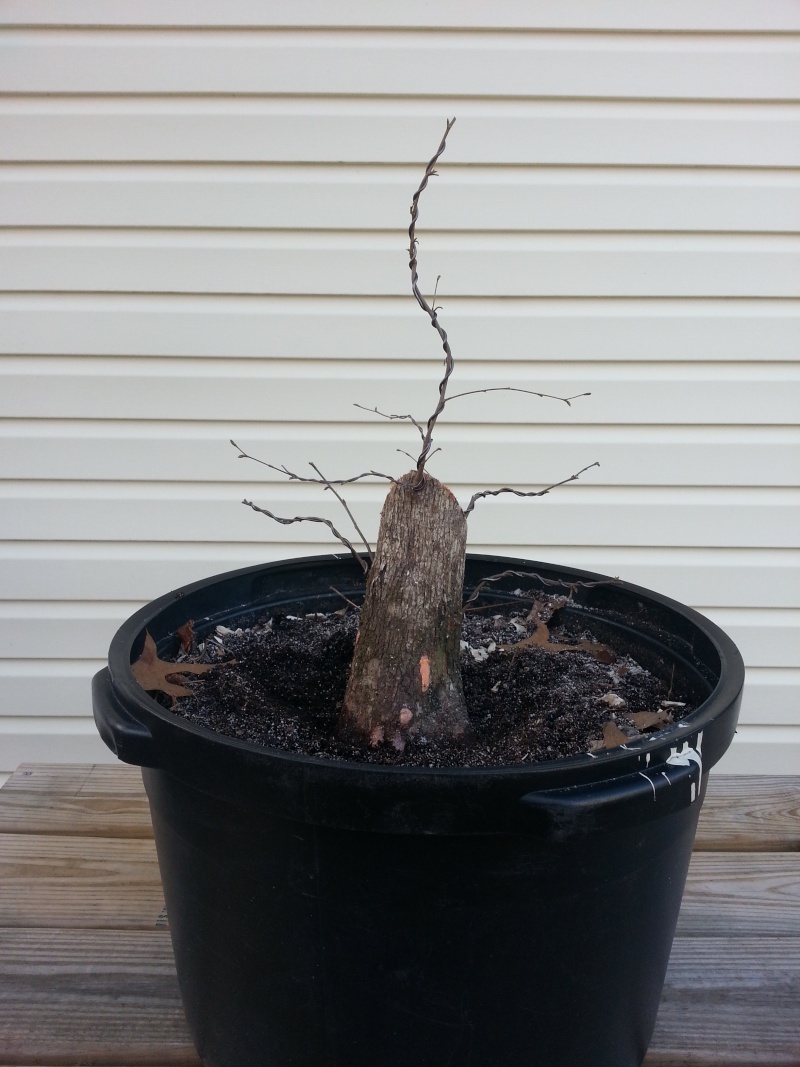
I'll get the leaves to reduce in the future as development continues, but I know this species will never have the size leaves I truly want. This is simply a creation for me to have as a winter silhouette on the benches. I'll continue to grow it in this container for another year. Once it comes out of the container, I will then focus on exposing much more of the basal flare. Anyways, just a small beginning i thought i would share
Pulling the tree from under benches
Trying to dig around on the soil, and seeing where the best angle is on the base/roots. The tree was planted deeper than usual to increase the survival rate since it was recently collected. On this side, the base has more interest. I believe the root placement will also confirm this side as the best front.
Initial cutback, deciding how to get closer on the cutback and deciding which branches to keep. I was very happy with the lower budding activity.
Branches left to wire. Some additional branches were left in the back to ensure the health of the tree
Wire branches, top jin applied to cuts.
Closer pic of the trunk/branches. You can see the base starts to flare at the soil level after digging a bit. The tree has decent flare, but nothing Japanese spectacular.
The final product. The proposed front, maybe turning the tree just a hair clockwise.
I'll get the leaves to reduce in the future as development continues, but I know this species will never have the size leaves I truly want. This is simply a creation for me to have as a winter silhouette on the benches. I'll continue to grow it in this container for another year. Once it comes out of the container, I will then focus on exposing much more of the basal flare. Anyways, just a small beginning i thought i would share

AdamDunham- Member

Re: Hop Hornbeam Beginning
![]() PeacefulAres Sun Jan 27, 2013 5:55 am
PeacefulAres Sun Jan 27, 2013 5:55 am
You should put that in the ground for 2-3 years. That new leader needs to thicken up a lot to be proportional and it will take forever to do it in that pot.
PeacefulAres- Member
Re: Hop Hornbeam Beginning
![]() AdamDunham Sun Jan 27, 2013 6:48 pm
AdamDunham Sun Jan 27, 2013 6:48 pm
PeacefulAres wrote:You should put that in the ground for 2-3 years. That new leader needs to thicken up a lot to be proportional and it will take forever to do it in that pot.
Thanks for your feedback Peaceful,
You know, I don't think that is such a great idea. If grown unchecked, hop hornbeam develop huge internode distance. If the tree were to be put into the ground that long, the lower branches that are wired would have to be removed due to their size, creating more scars on the trunk. Also, hop hornbeam is an understory tree. Can't comment on how well it would do growing in the field with my trident and Japanese maples. The pot it is currently growing in is WAY too big. As a result, it is already similar to growing it in the ground as is. I'm not worried about the leader thickening up. I'll be growing sacrificial branches on it to promote that. Also, before the cutback in August, the tree had 3+ feet of grown branches. That is great growth considering it had virtually almost no roots before going in, and was a big stump with no branches. Also, I'm not really focusing on growing the trunk as it is already pretty chunky as is. I'll probably move it into a grow bag after this to work on developing the feeder roots (possibly root grafting), probably on a piece of wood/tile.
AdamDunham- Member
Re: Hop Hornbeam Beginning
![]() drgonzo Sun Jan 27, 2013 8:18 pm
drgonzo Sun Jan 27, 2013 8:18 pm
I have some experience working with this species and can share a bit of what I have learned.
O. virginiana responds poorly to being transplanted (thats not the same as re-potting in the bonsai sense once a good network of feeder roots is developed...it will deal with that treatment reasonably well) If the tree is so recently out of the forrest and is doing well in that pot...leave it. It will grow that leader quickly. They are fairly fast growers once established for a few years after the initial transplant from the wild.
Caterpillars love those leaves so give it a spray with a bacillus spray such as Spinosad after the leaves have hardened off in spring and re-apply every two weeks and you'll save yourself a lot of trouble. The leaves are so very tasty that this species will attract nibblers in from far and wide that may also transmigrate to other tasty trees you may have...well worth the ounce of prevention to stop this before it starts!
When you do the 45 (or so) degree trunk reduction, back to a single leader, allow several years worth of growth on that leader BEFORE you do the cut back. This will allow sufficient strength and sap draw for the leader so you don't risk it dying back when you eventually make that cut to remove the upper part of the original trunk. I fear for that small branch on the right hand side (top) so near to the large reduction cut as it may not make it..
I've learned this the hard way with a few good trunks (not just Ostrya) that I rushed to reduce to size and wound up having the leader or side branch I cut them back too die back on me...ugh!
-Jay

drgonzo- Member
Re: Hop Hornbeam Beginning
![]() AdamDunham Sun Jan 27, 2013 9:07 pm
AdamDunham Sun Jan 27, 2013 9:07 pm
drgonzo wrote:I have some experience working with this species and can share a bit of what I have learned.
O. virginiana responds poorly to being transplanted (thats not the same as re-potting in the bonsai sense once a good network of feeder roots is developed...it will deal with that treatment reasonably well) If the tree is so recently out of the forrest and is doing well in that pot...leave it. It will grow that leader quickly. They are fairly fast growers once established for a few years after the initial transplant from the wild.
Caterpillars love those leaves so give it a spray with a bacillus spray such as Spinosad after the leaves have hardened off in spring and re-apply every two weeks and you'll save yourself a lot of trouble. The leaves are so very tasty that this species will attract nibblers in from far and wide that may also transmigrate to other tasty trees you may have...well worth the ounce of prevention to stop this before it starts!
When you do the 45 (or so) degree trunk reduction, back to a single leader, allow several years worth of growth on that leader BEFORE you do the cut back. This will allow sufficient strength and sap draw for the leader so you don't risk it dying back when you eventually make that cut to remove the upper part of the original trunk. I fear for that small branch on the right hand side (top) so near to the large reduction cut as it may not make it..
I've learned this the hard way with a few good trunks (not just Ostrya) that I rushed to reduce to size and wound up having the leader or side branch I cut them back too die back on me...ugh!
-Jay
Awesome. Thanks for the tips, Jay! I think the small branch on the right hand side next to the cut you are looking at is actually a back branch that has been wired toward the right hand side. To help keep the backside from dying, I left a few smaller branches at the bottom. I will keep an eye on those caterpillars.
FYI, I have a new respect for people who do trunk chops with a hand saw
AdamDunham- Member
Re: Hop Hornbeam Beginning
![]() Todd Ellis Sun Jan 27, 2013 10:43 pm
Todd Ellis Sun Jan 27, 2013 10:43 pm
I learned much from this thread; thanks!. Regarding the sawing ... if your saw is sharp and the right size "for the job" then cutting should be pretty easy. There's nothing like a sharp saw! 
Last edited by Todd Ellis on Sun Jan 27, 2013 10:46 pm; edited 1 time in total (Reason for editing : typo)

Todd Ellis- Member
Re: Hop Hornbeam Beginning
![]() drgonzo Mon Jan 28, 2013 12:33 am
drgonzo Mon Jan 28, 2013 12:33 am
what I do now rather then using a hand saw is use a jig saw with extra long (say 3.5 inches) blades I found at Lowes. I slip the blade in behind the leader and cut downwards. It gives a smooth cut and the speed of the tool's back and forth motion leads to less root disturbance, I also use it on big roots after collection. Works very well.
-Jay
-Jay
drgonzo- Member
Re: Hop Hornbeam Beginning
![]() Seth Ellwood Mon Feb 11, 2013 1:28 am
Seth Ellwood Mon Feb 11, 2013 1:28 am
I am in Columbia,SC ,and if you are wanting to transplant in to a shallower container go to lowes or hd and get a cement mixing tub.It serves 2 purposes. 1 no need for tile or slab of wood the bottom is flat . 2 It is alot shallower than the current container and it is wide so you get an awesome flare with the roots.I have been using them for the past 7 years and will never look back. I would not do anything more to this tree for the next 2-3 years to let it recover.If you do transplant do it asap it is starting to warm up already.I have a vid on you tube that I took a trident maple and did this to it it might be of intrest to you. ellwoodbonsai is my handle.
Seth Ellwood- Member
Re: Hop Hornbeam Beginning
![]() AdamDunham Fri Feb 15, 2013 3:17 am
AdamDunham Fri Feb 15, 2013 3:17 am
Seth Ellwood wrote:I am in Columbia,SC ,and if you are wanting to transplant in to a shallower container go to lowes or hd and get a cement mixing tub.It serves 2 purposes. 1 no need for tile or slab of wood the bottom is flat . 2 It is alot shallower than the current container and it is wide so you get an awesome flare with the roots.I have been using them for the past 7 years and will never look back. I would not do anything more to this tree for the next 2-3 years to let it recover.If you do transplant do it asap it is starting to warm up already.I have a vid on you tube that I took a trident maple and did this to it it might be of intrest to you. ellwoodbonsai is my handle.
Hey, Seth. I appreciate your words on the tree. I do indeed use the cement mixing tubes, but only on collected material. I find they are too big to move something into as a next phase. I found through a friend that Grow Bags have produced great results for moving trees a next container (these containers seem to produce excellent feeder root growth and health). Not in all cases would i move it to a Grow Bag, but with this particular tree, I think that is okay. I will then grow it on a piece of wood/tile for a few years in that (probably root grafts as well). The tree will be left in the current nursery container for at least a year to recover and further the establishment. Hopefully it turns into something decent in the next few years. Hope things in Cola are well for you!
AdamDunham- Member
» just what I really needed
» The beginning of a mume
» Beginnings of Chinese Elm
» Beginning of March...
» Beginning bonsai tips wanted
» The beginning of a mume
» Beginnings of Chinese Elm
» Beginning of March...
» Beginning bonsai tips wanted
Page 1 of 1
Permissions in this forum:
You cannot reply to topics in this forum|
|
|