


Juniper progression & options on the final design.
+2
Russell Coker
Justin Hervey
6 posters
Page 1 of 1

 Juniper progression & options on the final design.
![]() Justin Hervey Tue Jun 05, 2012 10:31 am
Justin Hervey Tue Jun 05, 2012 10:31 am
Here is the initial image of the tree as I acquired it in 2008, full of borer beetle and wood rot.

After potting, cleaning and stripping affected areas.

The deadwood was further reduced and the initial styling done in 2010.

A year later - 2011.

I then decided to change the front in order to create a more compact image.

Beginning of 2012 after further refinement.

The tree as it is now.

And finally a virtual showing the possible finished design.
I would be very interested to hear your opinions.

After potting, cleaning and stripping affected areas.
The deadwood was further reduced and the initial styling done in 2010.
A year later - 2011.
I then decided to change the front in order to create a more compact image.
Beginning of 2012 after further refinement.
The tree as it is now.
And finally a virtual showing the possible finished design.
I would be very interested to hear your opinions.

Justin Hervey- Member

Re: Juniper progression & options on the final design.
![]() Russell Coker Tue Jun 05, 2012 1:17 pm
Russell Coker Tue Jun 05, 2012 1:17 pm
Nice job!
It's really hard to pass judgement from 2-D pictures because I can't "see" exactly what you "see". For ME, the first front was much more interesting. I assume you're planning on doing something with the live wood/dead wood on your new front?
R

Russell Coker- Member
Re: Juniper progression & options on the final design.
![]() handy mick Tue Jun 05, 2012 1:28 pm
handy mick Tue Jun 05, 2012 1:28 pm
Nice tree,
I feel it needs more folage to counter the large base.
regards
Mick
I feel it needs more folage to counter the large base.
regards
Mick
handy mick- Member
Re: Juniper progression & options on the final design.
![]() davtree Tue Jun 05, 2012 2:59 pm
davtree Tue Jun 05, 2012 2:59 pm
Is it possible to reduce the base by carving so there is not such a gross difference in size between the tree and the base ?
davtree- Member
Re: Juniper progression & options on the final design.
![]() marcus watts Tue Jun 05, 2012 10:23 pm
marcus watts Tue Jun 05, 2012 10:23 pm
just like Russel for me the 2011 front is the best by absolute miles - its alway funny how sometimes people seee a tree for the first time in a different way to the owner who sees it every day.
Nice progress but for me 2011 front and more greenery will make this a great little juniper.
cheers Marcus
Nice progress but for me 2011 front and more greenery will make this a great little juniper.
cheers Marcus

marcus watts- Member
VIRTUAL
![]() abcd Wed Jun 06, 2012 6:06 am
abcd Wed Jun 06, 2012 6:06 am
I think that an empty space with the dead wood in the center will be better ( an empty space full of .... informations !!) , the left branch longer.
 [/img]
[/img]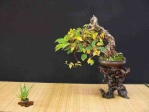
abcd- Member
Re: Juniper progression & options on the final design.
![]() marcus watts Wed Jun 06, 2012 6:43 am
marcus watts Wed Jun 06, 2012 6:43 am
an alternative design could be this -as much of the trunk moves to the right i moved some foliage to go with the trunk, and softened the huge drop from trunk to branch with one section of foliage in front.

cheers Marcus
cheers Marcus
marcus watts- Member
Re: Juniper progression & options on the final design.
![]() Justin Hervey Wed Jun 06, 2012 11:01 am
Justin Hervey Wed Jun 06, 2012 11:01 am
Thanks for your input Mick, Dav & Abcd, certainly possibilities.
Russell & Marcus, this is an option I will now revisit. My decision on switching the fronts was due to the angle of the top section of trunk which runs away (toward the back) from the 'deadwood front'. Viewed from slightly above, as bonsai generally are, the image was not compact enough for my eye.
Maybe with the foliage filled out it may be the better way to go, I'll post another image of this front for your comments.
Marcus, you say "People see a tree for the first time in a different way to the owner who sees it every day." So true. It is natural to desensitize and stop 'seeing', precisely why this forum is such a great tool.
Cheers - Justin
Justin Hervey- Member
» Future Juniper Design
» Big juniper design help please
» progression of an old juniper
» juniper design help tree #2
» Kishu Juniper progression
» Big juniper design help please
» progression of an old juniper
» juniper design help tree #2
» Kishu Juniper progression
Page 1 of 1
Permissions in this forum:
You cannot reply to topics in this forum|
|
|