


RESTYLING "WOLFIE" MY MUGO PINE.
+19
tmmason10
Carolee
yamasuri
quatrefi
Ume
bonsapien
Tom Benda
Nik Rozman
my nellie
rolandp
ybonsai
chris
landerloos
Lone
stavros
Bob Pressler
Pavel Slovák
Milan Karpíšek
Hans van Meer.
23 posters
Page 2 of 2
Page 2 of 2 •  1, 2
1, 2

 Re: RESTYLING "WOLFIE" MY MUGO PINE.
![]() yamasuri Mon Sep 17, 2012 11:49 am
yamasuri Mon Sep 17, 2012 11:49 am
Hans,
Clear answer and I belive Wolfgang did good work on roots before he let the pine go. I don't know him personaly [which I would if I live in EU ] but his web shows very enhusiastic and experience person. More likely I'm used to see "trees in progress/work" in larger/training pots so that's why yours hit my "scale" sensor even pot itself is very beautiful piece. Regarding to your experience I'm sure you will pick the best pot to fill the composition with "wolfie". Look forward to see more progress on tree.
Clear answer and I belive Wolfgang did good work on roots before he let the pine go. I don't know him personaly [which I would if I live in EU
Last edited by yamasuri on Tue Sep 18, 2012 11:14 pm; edited 1 time in total

yamasuri- Member

Re: RESTYLING "WOLFIE" MY MUGO PINE.
![]() Carolee Tue Sep 18, 2012 9:57 pm
Carolee Tue Sep 18, 2012 9:57 pm
Please elaborate on this statement:
Was it just a piece in the center or the pot/tree trunk and smaller than the pot itself, or something else. How does styrofoam effect water drainage? Thanks, Carolee
Because Wolfgang had planted this tree on a piece of Styrofoam, it had a wonderful flat root base! So I was able to plant it in to a shallow round pot.
Was it just a piece in the center or the pot/tree trunk and smaller than the pot itself, or something else. How does styrofoam effect water drainage? Thanks, Carolee

Carolee- Member
Re: RESTYLING "WOLFIE" MY MUGO PINE.
![]() Hans van Meer. Sun Sep 23, 2012 12:40 pm
Hans van Meer. Sun Sep 23, 2012 12:40 pm
Carolee wrote:Please elaborate on this statement:Because Wolfgang had planted this tree on a piece of Styrofoam, it had a wonderful flat root base! So I was able to plant it in to a shallow round pot.
Was it just a piece in the center or the pot/tree trunk and smaller than the pot itself, or something else. How does Styrofoam effect water drainage? Thanks, Carolee
Hi Carolee,
I could not find the pictures that show the piece of Styrofoam in the old trainings pot so I made a quick drawing to show how Wolfgang used a piece of Styrofoam to train/guide the roots.

The Styrofoam those not effect water drainage much and it dos not hold any water itself. So this is a good and simple technique to use if you want to train your rootsbase to be flat or to preserve a already flat rootbase.
Hope this helps to answer your question?
Cheers,
Hans van Meer.
Last edited by Hans van Meer. on Sun Sep 23, 2012 5:21 pm; edited 1 time in total

Hans van Meer.- Member
Re: RESTYLING "WOLFIE" MY MUGO PINE.
![]() Hans van Meer. Sun Sep 23, 2012 1:04 pm
Hans van Meer. Sun Sep 23, 2012 1:04 pm
Hi everybody,
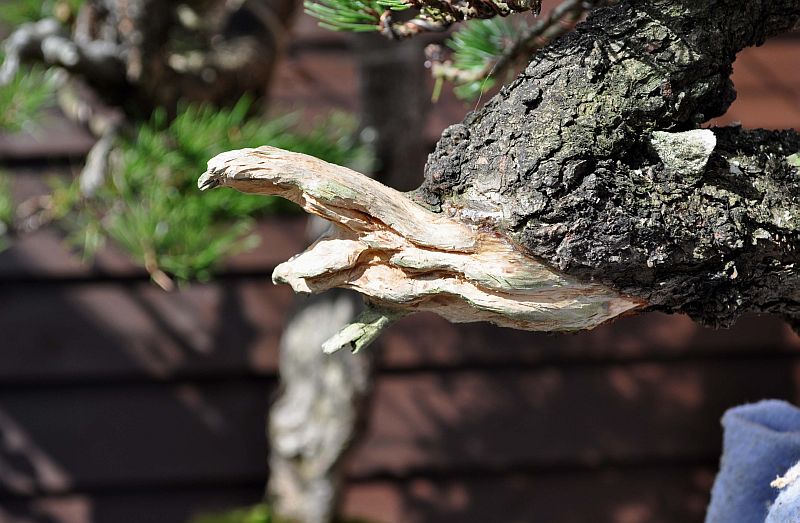
as promised here are a few pictures from the deadwood work that I did a few day's ago. All the deadwood was cleaned and treated with Lime Sulfur to bleach it. The large Jin on the left was refined some more with power and hand tools. I did not want to creat to much fine detail work in that Jin, because it would drown to much attention to it self and that would distract from the overall view that I am after! As "Wolfie" develops more in the future that Jin can always be refined some more when necessary! Than the freshly created work was worked over with a blowtorch than brushed with a copper brush and treated with two coatings of Lime Sulfur. It all looks very bright at this moment but that will tone down in the next months, but "Wolfie" is not going anywhere soon, so that is no problem at all. When the dead root on the right side is dry enough it will be treated with wood hardener to preserve it for the future!
Below: Before work started.

Below: Halve way trough.
Below: Torching the deadwood.
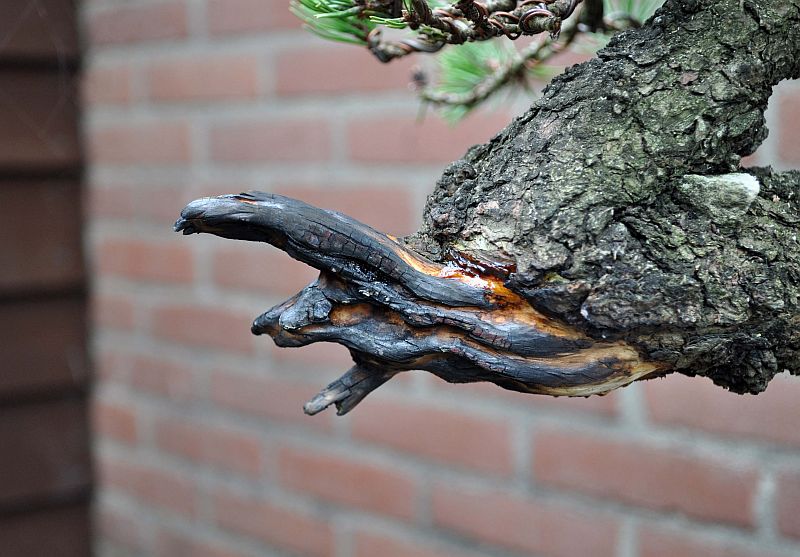
Below: And the finished work (for now).

I realy like how "Wolfie" is progressing. I hope you enjoyed this little story?!
Until the next time!
Cheers,
Hans van Meer.
as promised here are a few pictures from the deadwood work that I did a few day's ago. All the deadwood was cleaned and treated with Lime Sulfur to bleach it. The large Jin on the left was refined some more with power and hand tools. I did not want to creat to much fine detail work in that Jin, because it would drown to much attention to it self and that would distract from the overall view that I am after! As "Wolfie" develops more in the future that Jin can always be refined some more when necessary! Than the freshly created work was worked over with a blowtorch than brushed with a copper brush and treated with two coatings of Lime Sulfur. It all looks very bright at this moment but that will tone down in the next months, but "Wolfie" is not going anywhere soon, so that is no problem at all. When the dead root on the right side is dry enough it will be treated with wood hardener to preserve it for the future!
Below: Before work started.
Below: Halve way trough.
Below: Torching the deadwood.
Below: And the finished work (for now).
I realy like how "Wolfie" is progressing. I hope you enjoyed this little story?!
Until the next time!
Cheers,
Hans van Meer.
Hans van Meer.- Member
Re: RESTYLING "WOLFIE" MY MUGO PINE.
![]() Carolee Sun Sep 23, 2012 8:50 pm
Carolee Sun Sep 23, 2012 8:50 pm
Your drawing and explanation helps very much. Thank you! I like your "Wolfie" and the progression is helpful for learning. Carolee
Carolee- Member
Re: RESTYLING "WOLFIE" MY MUGO PINE.
![]() yamasuri Sun Sep 23, 2012 10:23 pm
yamasuri Sun Sep 23, 2012 10:23 pm
Nice carving. I go with simple shape...fits good to composition. I like the colour of jin. What did you use to tint?
yamasuri- Member
Re: RESTYLING "WOLFIE" MY MUGO PINE.
![]() tmmason10 Mon Sep 24, 2012 12:35 am
tmmason10 Mon Sep 24, 2012 12:35 am
Tree is looking great Hans. Nice job with the deadwood on both.
tmmason10- Member
Re: RESTYLING "WOLFIE" MY MUGO PINE.
![]() Hans van Meer. Tue Sep 25, 2012 10:47 pm
Hans van Meer. Tue Sep 25, 2012 10:47 pm
yamasuri wrote:Nice carving. I go with simple shape...fits good to composition. I like the colour of jin. What did you use to tint?
Hi Yamasuri,
it is good to hear you like the resuld of the carving. After the large Jin was torched I brushed it with a wire brush, but it still was black when I was finished. Than the deadwood was carfully sprayed with water, this will open the pores of the deadwood, so that the coatings of pure Lime sulfur that I apply (with a old brush)when the excess water has run off, will penetrate the wood more easily! If you dont apply some water first, the Lime sulfur will be hard to bring on and it will mostly run right off the deadwood surface on to your bark and roots! Just a tip!
Cheers,
Hans van Meer.
Hans van Meer.- Member
Re: RESTYLING "WOLFIE" MY MUGO PINE.
![]() Hans van Meer. Tue Sep 25, 2012 10:48 pm
Hans van Meer. Tue Sep 25, 2012 10:48 pm
tmmason10 wrote:Tree is looking great Hans. Nice job with the deadwood on both.
Thanks tmmason!
Cheers,
Hans van Meer.
Hans van Meer.- Member
Re: RESTYLING "WOLFIE" MY MUGO PINE.
![]() JudyB Tue Sep 25, 2012 10:57 pm
JudyB Tue Sep 25, 2012 10:57 pm
I hope you don't get tired of hearing this, but Wolfie is awesome....
JudyB- Member
Re: RESTYLING "WOLFIE" MY MUGO PINE.
![]() Hans van Meer. Wed Sep 26, 2012 9:44 pm
Hans van Meer. Wed Sep 26, 2012 9:44 pm
JudyB wrote:I hope you don't get tired of hearing this, but Wolfie is awesome....
Ha! No Judy, bring it on!
I am glad you like him!
Cheers,
Hans van Meer.
Hans van Meer.- Member
Re: RESTYLING "WOLFIE" MY MUGO PINE.
![]() yamasuri Thu Sep 27, 2012 12:53 am
yamasuri Thu Sep 27, 2012 12:53 am
Hans, I don't have good experience moisten dry wood before applying lime sulphur.The bark around jin was wet and LS marked it. True I had lousy brush too.
yamasuri- Member
Re: RESTYLING "WOLFIE" MY MUGO PINE.
![]() JMcCoy Thu Sep 27, 2012 5:43 am
JMcCoy Thu Sep 27, 2012 5:43 am
Love this Pine, Hans.. just beautiful! I've been watching this post for a while and just had to say something. Fantastic work!
JMcCoy- Member
Re: RESTYLING "WOLFIE" MY MUGO PINE.
![]() kauaibonsai Thu Sep 27, 2012 6:42 am
kauaibonsai Thu Sep 27, 2012 6:42 am
your bonsai is beautiful hans-and so radiantly green and healthy
best wishes, sam
best wishes, sam
kauaibonsai- Member
Re: RESTYLING "WOLFIE" MY MUGO PINE.
![]() tiennavi Thu Sep 27, 2012 9:42 am
tiennavi Thu Sep 27, 2012 9:42 am
nice work and tree!
thanks for sharing !
thanks for sharing !

tiennavi- Member
Re: RESTYLING "WOLFIE" MY MUGO PINE.
![]() Hans van Meer. Thu Sep 27, 2012 7:03 pm
Hans van Meer. Thu Sep 27, 2012 7:03 pm
yamasuri wrote:Hans, I don't have good experience moisten dry wood before applying lime sulphur.The bark around jin was wet and LS marked it. True I had lousy brush too.
Hi Yamasuri,
I know it can be a precise work to bring it on with out it getting it all over the live bark. That why it is a good idea to carfully applying the water on places close to the bark and to let it dry some what before applying the Lime sulfur, the pores of the deadwood will stay open long enough! And as you say, it comes off pretty good with a brush, I use a old toothbrush!
Cheers,
Hans van Meer.
Hans van Meer.- Member
Re: RESTYLING "WOLFIE" MY MUGO PINE.
![]() Hans van Meer. Thu Sep 27, 2012 7:06 pm
Hans van Meer. Thu Sep 27, 2012 7:06 pm
JMcCoy wrote:Love this Pine, Hans.. just beautiful! I've been watching this post for a while and just had to say something. Fantastic work!
Hi Joey,
thanks man! Nice to hear from you!
Cheers,
Hans van Meer.
Hans van Meer.- Member
Re: RESTYLING "WOLFIE" MY MUGO PINE.
![]() Hans van Meer. Thu Sep 27, 2012 7:07 pm
Hans van Meer. Thu Sep 27, 2012 7:07 pm
tiennavi wrote:nice work and tree!
thanks for sharing !
Thanks Tiennavi,
I am glad you like it!
Cheers,
Hans van Meer.
Hans van Meer.- Member
Page 2 of 2 • 1, 2
» RESTYLING MY MUGO PINE NAMED "LITTLE CHAPEL".
» RESTYLING MY MUGO NAMED "Z".
» Pinus mugo (han-kengai) - restyling
» Scots Pine Restyling
» RESTYLING MY SMALL "P. PINE".
» RESTYLING MY MUGO NAMED "Z".
» Pinus mugo (han-kengai) - restyling
» Scots Pine Restyling
» RESTYLING MY SMALL "P. PINE".
Page 2 of 2
Permissions in this forum:
You cannot reply to topics in this forum|
|
|