


my new acacia
+3
Khaimraj Seepersad
BrendanR
mano javier
7 posters
Page 2 of 2
Page 2 of 2 •  1, 2
1, 2

 Re: my new acacia
![]() Leo Schordje Tue Jan 10, 2017 5:59 pm
Leo Schordje Tue Jan 10, 2017 5:59 pm
That is a great trunk. It won't take long, less than 5 years it could be very nice.
What I offer below is just a thumbnail of general design suggestions. They are usually called rules, but this is art, and rule one is there are no absolute rules. However, these are proven principles that will be at least pleasing in results, and these principles are most useful when you are not certain what you should do. If you have a plan, ignore my comments, I only offer them in the spirit of help.
If you are heading toward a natural savanna style tree, You need to identify which of the new buds will be the continuation(s) of the trunk. This one shoot you will need to let grow until it is at least 50% or more the diameter of the trunk it emerges from. This may mean letting it run a couple meters. You may want to identify several sub-trunks, rather than continue a single trunk. Sketch out your savanna style tree. The tree in your initial drawing follow the pattern more for an informal upright, than a savanna style tree. If you like that look, you can go that way. Trees are like botanical modeling clay, you can shape them as you like.
The rest of the new shoots, that will either become branches, or are just there to build energy, need to be wired, positioned, and then pruned before they are more than 25% or so of the diameter of the trunk.
To build taper, with smooth transition from one trunk segment to the next, each new segment of trunk needs to be allowed to grow wild until it is about or a little more than 50% the diameter of the previous segment. This way, the cut scars will be able to heal and the trunk line will be relatively smooth transition from segment to segment. If it were not allowed to grow out and build caliper, the transition would look abrupt, and unnatural.
Conversely, Trunks and Sub Turinks are visually distinguished from branches by their diameter. If branches are visually too close in diameter to the trunk, the composition begins to look like shrub in a pot, rather than a tree in a pot.
Branches should be less than 50% the diameter of the trunk they emerge from. Once they are larger than 50% they begin to ruin the image of a tree. At that point a new shoot needs to be identified to become a replacement branch, and the overly thick branch will need to be removed. I suggest using 25% of the diameter of the trunk to prune the branches and stop their building of bulk, as this will allow for a number of years where the branch will remain visually acceptable.
Branches are built in segments the same way the trunk is, and each segment of branch follows the general guideline for building tunk. You want the branches to smoothly taper to the final twigs. So let each branch segment grow out until it is 50% the diameter of the segment of branch preceding. To get the smooth taper, branches may have to be allowed to extend a meter or more, then cut back to just a few centimeters. Then allow to bud out and extend, then cut back. Cycle repeats. By the time you have gone through 10 cycles, you should see amazing development of branch structure.
Thickest branches should be the lowest branches, the diameter of the branches decreases as you rise up the tree.
One more thing to keep in mind. Each segment of trunk, should be shorter than the preceding, extend for less distance than preceding. Same for branches. How do you pick the defining measurement for setting the pattern? A general suggestion is that the first segment of branch retained for the finished branch be shorter than the distance along the trunk, from the roots to the first branch. So if it is 10 cm from roots to the first branch, let the first branch grow out until is has sufficient diameter to be visually a branch - say maybe 26% the diameter of the trunk, less may be okay, then cut it back to less than 10 cm, I would go maybe 7 cm in length, then grow out the next segment, it should be cut back to maybe 5 cm, and the cycle keeps repeating.
Now for a savanna style, it consists of trunk and sub trunks, rising to maybe 2/3rds the height of the tree. then the branch work begins. A little different in lay out than the classic formula informal upright, but the principals for proportions is the same.
If you are styling a tree to a naturalistic style for either that species, or a different species, look at iconic photos and note how they differ from the plan I offered. For examples, maples in my area tend to have a relatively short first segment of trunk, then they either branch into 2 or 3 sub trunks, or stay single, but the second trunk segment tends to be quite a bit longer than the first segment, then from the third segment on, they follow the pattern above.
Clearly identifying, or drawing out, the plan for the tree helps, because it is difficult to remember after a year or two what you were planning on doing. It is okay to change plans to adjust to the way the tree actually grow, or if you change your mind, but it helps to have a plan. I know you did a drawing, that is exactly what is needed. It is not for others, it just has to be enough to keep you on track with what you want to achieve. Given the above, you might want to revisit, or annotate your drawing, you don't need to share it, just refine your plan for yourself.
Final thought, you should be able to get several cycles of grow out and cut back every year, probably 2, or 3, maybe more if the tree is very fast growing. It is better for the health of the tree to let it grow out, then prune everything, then let grow out, in cycles. I don't recommend pruning just a branch here, and a branch there in a continuous fashion. The tree needs to grow to maintain vigor, constant pruning may weaken the tree. Buds that won't be needed for branches, can be removed at pruning time. Later, once you are settled that every branch is where you want it, you can rub off buds on the trunk you don't need as soon as they are visible, but for the first couple years, I'd let them grow out, then remove at pruning time, by cutting back flush. You want to be able to evaluate each to see if they are a ''better'' position for a branch. At least until your style is firmly set.
Hope this all helps.

Leo Schordje- Member

My New Acacia
![]() mano javier Wed Jan 11, 2017 10:34 am
mano javier Wed Jan 11, 2017 10:34 am
Many thanks guys for your great comments and insightful opinions. I will be taking note of that much needed advice Leo. Mano
mano javier- Member
Re: my new acacia
![]() my nellie Wed Jan 11, 2017 10:46 pm
my nellie Wed Jan 11, 2017 10:46 pm
Sound advice, comprehensive and clearly understood.
Many thanks to Leo!
Many thanks to Leo!

my nellie- Member
My new acacia
![]() mano javier Tue Feb 14, 2017 7:02 am
mano javier Tue Feb 14, 2017 7:02 am
reposting
Last edited by mano javier on Tue Feb 14, 2017 9:41 am; edited 1 time in total
mano javier- Member
My new acacia
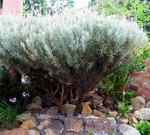
![]() mano javier Tue Feb 14, 2017 9:37 am
mano javier Tue Feb 14, 2017 9:37 am
Here it is now with new robust growth due to good rainfall. It is sporting now 2 bottom layers, just waiting for the branches to thicken then proceed on clipping. Had it re-potted also and positioned in its permanent place.
mano javier- Member
Page 2 of 2 • 1, 2
» just tried the acacia landscape
» What to do with this acacia
» Acacia cyanophylla
» Acacia Trees
» My Acacia Collection
» What to do with this acacia
» Acacia cyanophylla
» Acacia Trees
» My Acacia Collection
Page 2 of 2
Permissions in this forum:
You cannot reply to topics in this forum|
|
|