


my first phoenix graft assembly (shimpaku)

 my first phoenix graft assembly (shimpaku)
![]() Kevin S - Wisco Bonsai Wed Dec 31, 2014 2:53 pm
Kevin S - Wisco Bonsai Wed Dec 31, 2014 2:53 pm
i documented all steps and am including some of the pictures and steps below in case anyone else wants to try this technique...
started out with this for $15 from the chicago show in 2013

after several mistakes... er... um... i mean "learning experiences", i ended up with this and was ready to "set it free" as i was most unhappy with some of the ill-informed decisions i made

but then december 26th 2014 dawned in milwaukee as a beautiful sunny day with highs in the low 50s (f) which is quite unusual round these parts in winter... so i went beachcombing and found a piece of driftwood that i was not looking for but was happy to find as it looked like a match for this shimpaku sitting on the island of misfit trees (aka the back shelf)

a quick test fit confirmed it

as far as attaching it goes, i saw this technique on colin lewis' on-line class, and though he uses it to attach long-term guy wires rather than a phoenix graft, i thought it might be a good way to attach the living to the dead...
so first i clamped it into place (i love these one-handed quick clamps with cushioned holders)

then drill a couple holes and pull some wire through leaving a loop exposed on one side


then pull the wire tight and secure the looped end with what colin calls a "toggle"
(the loose ends on the opposite side of the graft get similarly secured by twisting around another toggle)

then to secure the base (into which i hope the trunk will expand)


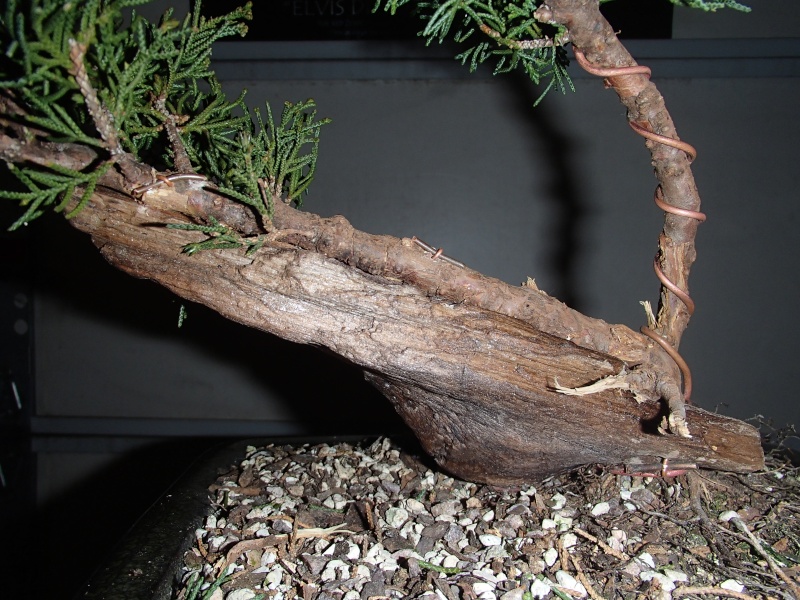
and after all of that, this is what i am left with...
the prow of a ship !!!


a better shot of the finished attachments of the main branch...
i just think it looks cleaner than some phoenix attachements i have seen...
i do see some potential issues i will have to deal with as it progresses (both style-wise and physical attachment)...
along with what to do with the upper branch as it sustained some damage in earlier "styling lessons",
and is not very manipulable until it regains some strength where it attaches to the trunk...
possible jin ? (depending on what the lower trunk does... maybe even an elevated raft ?)
but whatever i decide... those are issues for another day.

Kevin S - Wisco Bonsai- Member

Re: my first phoenix graft assembly (shimpaku)
![]() DougB Wed Dec 31, 2014 3:43 pm
DougB Wed Dec 31, 2014 3:43 pm

DougB- Member
Re: my first phoenix graft assembly (shimpaku)
![]() Vance Wood Wed Dec 31, 2014 3:52 pm
Vance Wood Wed Dec 31, 2014 3:52 pm
Vance Wood- Member
Re: my first phoenix graft assembly (shimpaku)
![]() Richard S Wed Dec 31, 2014 5:39 pm
Richard S Wed Dec 31, 2014 5:39 pm
The attachment technique is particularly ingenious (and something I hadn't seen before).
Regarding the future, if the "prow of a ship" look doesn't work out you can always change the planting angle to make it more upright. That might present more options?
Anyhow, as long as you have learnt something worthwhile by doing it (and I'm sure you will have) then the time spent will not have been wasted whatever the ultimate outcome. Thanks for sharing.
Detailed technique and progression threads like this are one of the best features of this forum. As Vance said, please do keep us updated.
Regards
Richard

Richard S- Member
Re: my first phoenix graft assembly (shimpaku)
![]() Kevin S - Wisco Bonsai Wed Dec 31, 2014 6:03 pm
Kevin S - Wisco Bonsai Wed Dec 31, 2014 6:03 pm
re: sitting on top rather than in the groove, the pictures are a bit deceptive, but not much...
it does sit a bit deeper than it appears, but only a little...
again though, time will tell how this works out
thanks for the comments so far
Kevin S - Wisco Bonsai- Member
Re: my first phoenix graft assembly (shimpaku)
![]() Richard S Wed Dec 31, 2014 6:21 pm
Richard S Wed Dec 31, 2014 6:21 pm
I know this would be a radical bend but I notice that there is already some dead wood/scaring at the base of that second trunk. Could this be carved away to leave a thin, flexible strip of live wood?
Combined with a more upright position at the next re-pot this could perhaps leave you with two distinct areas of foliage at different heights and on slightly different planes. This might add both interest and depth to the image and if the two trunks could be brought close enough in time they might swell enough to bulk up the base a little which couldn't hurt.
Of course I've no idea if this would actually work because I haven't tried anything like that on a Juniper myself (just thinking out loud) but you see plenty of radical bending techniques in books/demos/posts on forums. Presumably some of them actually work.
Regards
Richard
Richard S- Member
Re: my first phoenix graft assembly (shimpaku)
![]() Kevin S - Wisco Bonsai Wed Dec 31, 2014 6:49 pm
Kevin S - Wisco Bonsai Wed Dec 31, 2014 6:49 pm
though i will most readily concede that something needs to be done with the upper branch, but as you noticed and as i mentioned, it is damaged and at this point, if i want to keep it, i think it needs to get stronger before i monkey around with it too much...
worst case scenario ?
gin & jin
i think at this point though i will just let it grow some before i subject it to any more of me
Kevin S - Wisco Bonsai- Member
Re: my first phoenix graft assembly (shimpaku)
![]() Richard S Wed Dec 31, 2014 7:24 pm
Richard S Wed Dec 31, 2014 7:24 pm

Obviously I've shown the foliage at the wrong angle if you re-potted at a 45 degrees but hopefully you see what I mean.
Cheers
Richard
Richard S- Member
Re: my first phoenix graft assembly (shimpaku)
![]() Kevin S - Wisco Bonsai Wed Dec 31, 2014 10:17 pm
Kevin S - Wisco Bonsai Wed Dec 31, 2014 10:17 pm
i think that would be too extreme of a bend for me to attempt...
at least for now
thanks !
Kevin S - Wisco Bonsai- Member
Re: my first phoenix graft assembly (shimpaku)
![]() Khaimraj Seepersad Wed Dec 31, 2014 10:24 pm
Khaimraj Seepersad Wed Dec 31, 2014 10:24 pm
to preserve the wood, through all that growing and training ?
Will be watching, thanks for taking the time to post.
Laters.
Khai......

Khaimraj Seepersad- Member
Re: my first phoenix graft assembly (shimpaku)
![]() Richard S Wed Dec 31, 2014 11:28 pm
Richard S Wed Dec 31, 2014 11:28 pm
If your interested this might help,
http://www.bonsai4me.com/AdvTech/ATBendingThickBranchesThree.htm
http://www.bonsai4me.com/AdvTech/ATBendingThickBranchesTwo.htm
Still, like I say, I'm just thinking out loud really. There are doubtless lots of other possibilities and certainly no need to rush into any of them.
Cheers
Richard
Richard S- Member
Re: my first phoenix graft assembly (shimpaku)
![]() giga Thu Jan 01, 2015 4:42 am
giga Thu Jan 01, 2015 4:42 am

giga- Member
Exemplary...
![]() Guest Thu Jan 01, 2015 11:56 am
Guest Thu Jan 01, 2015 11:56 am
beer city snake wrote:hey richard... i cant quite picture how what you are suggesting would look...
though i will most readily concede that something needs to be done with the upper branch, but as you noticed and as i mentioned, it is damaged and at this point, if i want to keep it, i think it needs to get stronger before i monkey around with it too much...
worst case scenario ?
gin & jin
i think at this point though i will just let it grow some before i subject it to any more of me
I think you have done a wonderful job on this Shimpaku Juniper...although I am not a fan of Driftwood or Jin I think you have used your Driftwood on this example in a very Harmonius manner...
This is IMO a Great example of taking a smallish, inexpensive, PreBonsai Juniper and turning it into a great example of Bonsai Gardening, Job Well Done BeerCity ...and Yes Lower that Top branch just a touch.
Guest- Guest
Re: my first phoenix graft assembly (shimpaku)
![]() Leo Schordje Thu Jan 01, 2015 6:05 pm
Leo Schordje Thu Jan 01, 2015 6:05 pm

Leo Schordje- Member
Re: my first phoenix graft assembly (shimpaku)
![]() Kevin S - Wisco Bonsai Thu Jan 01, 2015 9:39 pm
Kevin S - Wisco Bonsai Thu Jan 01, 2015 9:39 pm
Khaimraj Seepersad wrote:to preserve the wood, through all that growing and training ?
khai - i did treat the driftwood with numerous coats of minwax wood hardener, which it drank up like a sponge.
giga wrote:Good first attemp, but I think the wood you selected needs to be replaced. The groove need to be just slightly larger the the trunk so you can just barely fit it in there, then as it grows out it'll bulge out. The holding technique is pretty ingenious though.
thanks giga, i am aware of how it would typically be done, but as i said, i wasnt even looking for a piece of d-wood for this tree and i was ready to give up on the tree after my learning mistakes, and the d-wood had the natural groove already in it (which i could have altered, but chose not to) so i think i will just leave it as it is and see what serendipity has in store for it.
and to bolero, thank you very much.
richard - thank you again.
leo - thank you too and you are welcome
Kevin S - Wisco Bonsai- Member
Cool Graft-Raft
![]() KyleT Sat Jan 03, 2015 3:04 am
KyleT Sat Jan 03, 2015 3:04 am

KyleT- Member
Re: my first phoenix graft assembly (shimpaku)
![]() Kevin S - Wisco Bonsai Sat Jan 03, 2015 2:56 pm
Kevin S - Wisco Bonsai Sat Jan 03, 2015 2:56 pm
that would just entail encouraging each branch to develop into its own tree down the length of what is now the lower branch...
i'm thinking that if i jin the upper branch (after appropriate manipulation) it would lend to the illusion of the fallen tree...
but again, that is for the future if it back buds down the line back toward the trunk
Kevin S - Wisco Bonsai- Member
Re: my first phoenix graft assembly (shimpaku)
![]() Andre Beaurain Wed Jan 07, 2015 10:09 am
Andre Beaurain Wed Jan 07, 2015 10:09 am
Im still on summer holiday, but somebody phoned me, and told me that my mail was full, so I had to put this dreaded communication device on. hi hihi hi
Must say coming into my office was like a vampire exposed to sudden sunlight.
Kevin did you take the bark off at the bottom of the trunk where it is attached to the driftwood?
Love Light and Awakening
Andre

Andre Beaurain- Member
Re: my first phoenix graft assembly (shimpaku)
![]() Kevin S - Wisco Bonsai Wed Jan 07, 2015 12:58 pm
Kevin S - Wisco Bonsai Wed Jan 07, 2015 12:58 pm
now step away from the computer and get back to your holiday !
Kevin S - Wisco Bonsai- Member
» Phoenix graft
» Phoenix graft with Ficus
» Pyracantha Phoenix Graft
» Phoenix graft to Literati
|
|
|