


RESTYLING "WOLFIE" MY MUGO PINE.
Page 1 of 2 • 1, 2 

 RESTYLING "WOLFIE" MY MUGO PINE.
![]() Hans van Meer. Wed Oct 06, 2010 9:38 pm
Hans van Meer. Wed Oct 06, 2010 9:38 pm
a few days ago we had some surprisingly warm and sunny weather, so I decided it was a brilliant day to do some light bonsai work. The week before I had removed all the wire raffia, tape and plucked all the old needles. So "Wolfie" was all ready to be restyled again!
In 2003 me and Tony Tickle had the privilege to visit the wonderful garden and Bonsai collection of my friend Wolfgang Putz in Austria. Besides sampling from Wolfgang's enormous collection of self made snaps (11 o'clock in the morning), I was also lucky enough to swap with him one of my Yamadori Yews, that I had brought along, for this old Mugo Pine, that Wolfgang had collected himself! Wolfgang was very generous to me that day! He is one of the nicest guy's I had the pleasure to meet and that's why I named this little tree "Wolfie"! The nickname that we used when we spook about Wolfgang!
Below: In my own garden. This is how the present front side of the tree looked in 2003.

Below: Back side.

In 2005 I was invited to do a two day demo at the famous "Joy of bonsai" in Bath (UK). So I brought along "Wolfie" to give it it's first styling. Because, Wolfgang had planted this tree tilted more to the right, that initial styling by me was don in a slightly different way and direction than it's present design is. But the general idea never changed.
Below: During my demo at "Joy of bonsai".
This main branch needed a lot of protection before I would try to bend it closer to the trunk. All along the length of that branch there is a lot of twirling deadwood that made it almost impossible to bend. But it did bend and with out breaking anywhere!
Below: Working on the deadwood.
Below: The final resuld of a day's hard work.
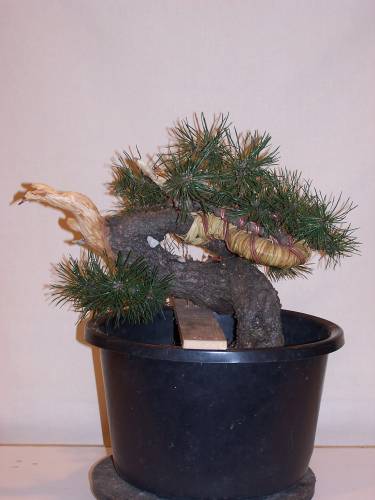
Below: 2006. Here I repotted the tree for the first time. Because Wolfgang had planted this tree on a piece of Styrofoam, it had a wonderful flat root base! So I was able to plant it in to a shallow round pot. I was pleasantly surprised to discover that the root base on the right side, that was hidden before, was wonderful, so I planted the tree tilted more to the left side. Showing the whole width of the root base. And in this way, you can just see peaking over the right rootbase, a piece of the rock that "Wolfie" has his grip on, on it's backside!

Below: This is how it looked in May 2006.
Below: In early 2009 "Wolfie" was repotted again tilted some more to the left side. And later that year I restyled it again to fit this new planting angle.
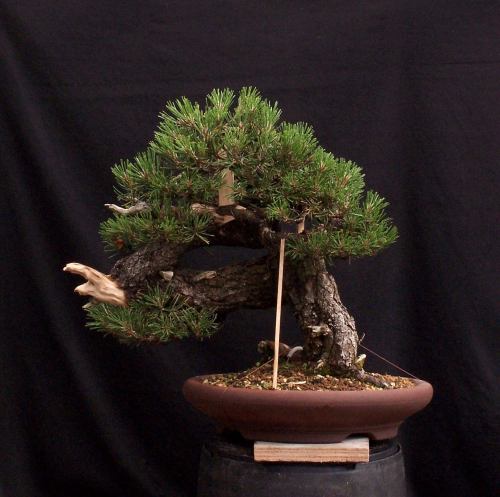
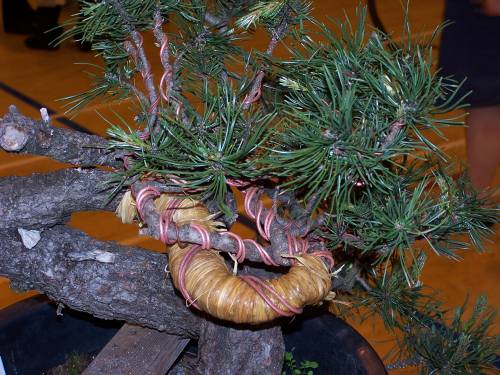
Below: A few days ago. I am finally getting used to working on a tree while sitting down. But I cant wait to be able to do it standing up again! First the large Jin/deadwood section on the left side was extended. Now it is running along the underside of the trunk to the right side. The Jin it self will be restyled, when I am more used to the new image of the tree. Then the tree was wired and the deadwood cleaned and treated with Lime sulfur. I know it look way to bright, but I know out of experience that it will become more natural looking in a few months time.

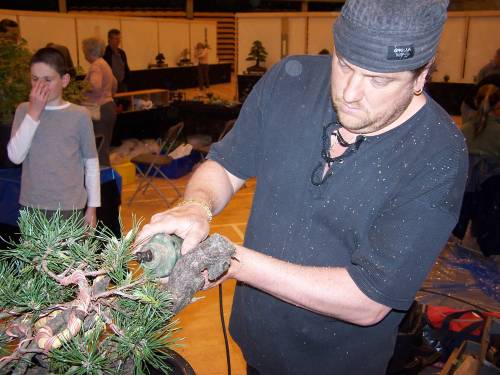
Below: With a soft brush on a slow spinning power tool, the excess lime sulfur is removed from the live bark. Now the deadwood is bleached you can clearly see the Shari that runs across this old curling branch.

Below: Than with the help of my trusty garbage bin with a turning wheel, the tree was elevated to almost eye level height. Working standing up, with the tree at this height is the best way for me to style a tree! I realy need to be able to step backwards and forwards. And to bend side ways and up and downwards. Here I am just about satisfied for now.

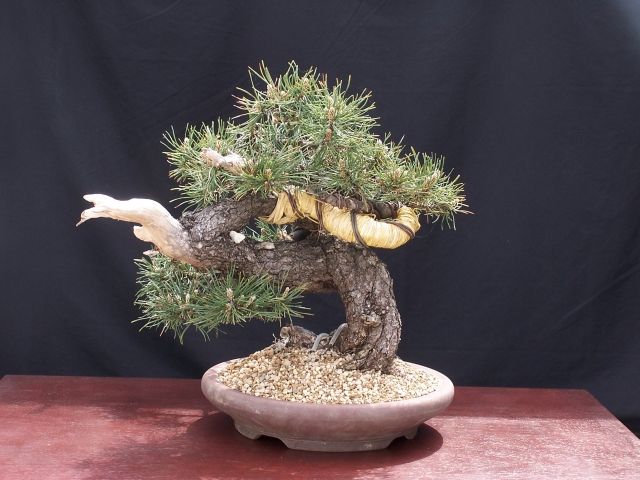
Below: So here is the newly styled image of "Wolfie". The first hanging branch, along with two other major branches, are removed. There is a exciting new empty space just above the first Jin on the left and the old empty space underneed the trunk is now more prominent and hold the tree up. Because of these new empty spaces, more of the amazing trunk movement is shown, with all it's flaws and quirkiness. Now that the left Jin is lengthened into a Shari, even that long straight trunk section don't bothers me any more. It makes this little tree more exciting to look at. There is even a piece of rock living in the middle of that part of the trunk. "Wolfie" must have picked up this pebble ages ago and they have been companions ever since. The grown and branches need to fill out some more and the Jins need more refining, but that's for later!

I am realy pleased with this new and more mature image of "Wolfie". I hope you enjoyed this little story?!
Cheers,
Hans van Meer.
Last edited by Hans van Meer. on Sat Oct 09, 2010 5:57 pm; edited 6 times in total

Hans van Meer.- Member

Re: RESTYLING "WOLFIE" MY MUGO PINE.
![]() Milan Karpíšek Wed Oct 06, 2010 9:47 pm
Milan Karpíšek Wed Oct 06, 2010 9:47 pm
Milan Karpíšek- Member
Re: RESTYLING "WOLFIE" MY MUGO PINE.
![]() Pavel Slovák Wed Oct 06, 2010 9:49 pm
Pavel Slovák Wed Oct 06, 2010 9:49 pm
Beautiful trees and great restyling.

Pavel

Pavel Slovák- Member
Re: RESTYLING "WOLFIE" MY MUGO PINE.
![]() Bob Pressler Wed Oct 06, 2010 10:31 pm
Bob Pressler Wed Oct 06, 2010 10:31 pm

Bob Pressler- Member
Re: RESTYLING "WOLFIE" MY MUGO PINE.
![]() stavros Wed Oct 06, 2010 10:38 pm
stavros Wed Oct 06, 2010 10:38 pm
thanks for sharing
stavros- Member
Re: RESTYLING "WOLFIE" MY MUGO PINE.
![]() Lone Wed Oct 06, 2010 11:01 pm
Lone Wed Oct 06, 2010 11:01 pm
Good to see that you are able to do some work again - hope your back is much better now.
Love Lone

Lone- Member
Re: RESTYLING "WOLFIE" MY MUGO PINE.
![]() landerloos Thu Oct 07, 2010 7:10 am
landerloos Thu Oct 07, 2010 7:10 am
Peter

landerloos- Member
chris- Member
Re: RESTYLING "WOLFIE" MY MUGO PINE.
![]() ybonsai Thu Oct 07, 2010 8:06 am
ybonsai Thu Oct 07, 2010 8:06 am
I like the tree more this way.
Good job.
Best regards,
Yannick
ybonsai- Member
Re: RESTYLING "WOLFIE" MY MUGO PINE.
![]() rolandp Thu Oct 07, 2010 8:24 am
rolandp Thu Oct 07, 2010 8:24 am

rolandp- Member
Re: RESTYLING "WOLFIE" MY MUGO PINE.
![]() my nellie Thu Oct 07, 2010 9:30 am
my nellie Thu Oct 07, 2010 9:30 am
I just want to focus on narrative! Exciting as always and of course absolutely informative!
Thank you once again for sharing, Hans!

my nellie- Member
Re: RESTYLING "WOLFIE" MY MUGO PINE.
![]() Guest Thu Oct 07, 2010 2:14 pm
Guest Thu Oct 07, 2010 2:14 pm
Guest- Guest
Re: RESTYLING "WOLFIE" MY MUGO PINE.
![]() Hans van Meer. Thu Oct 07, 2010 11:49 pm
Hans van Meer. Thu Oct 07, 2010 11:49 pm
I am glad that you like "Wolfie's" new image! It is such a strangely shaped tree, and it has been quit a challenge to find some sort of balance in it's dis balance! I hope that that makes any sense?
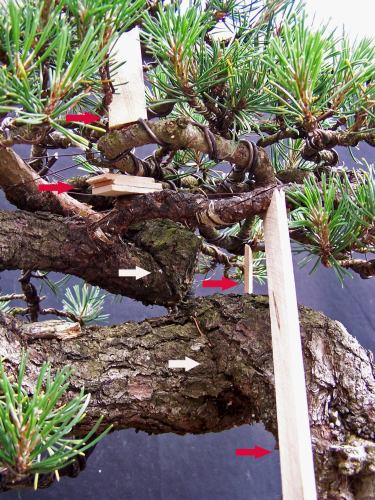
Below: 2009. A close up picture of the right side. The red arrow points at the present front side. I made a yellow dotted line across the length of the trunk, that if you follow it, gives you a good idea about the fact that some were in it's past this tree was forced to grow in to a completely different direction! He almost made a full twist on it's self to the left side, that over time turned in to a knot. From that knot the straight section start, leading into the Jin on left side of the tree. Here you can also see the stone that "Wolfie" is holding on to.
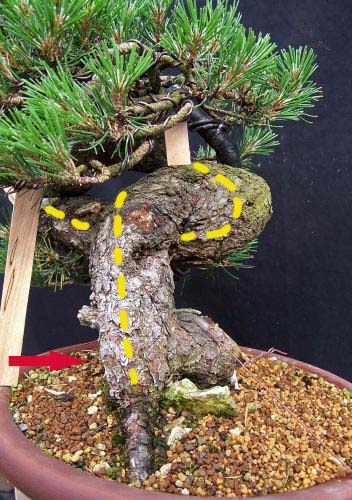
Below: A other picture from 2009. Here you can see the small pieces of wood that I just to hold the very old branches into there new place, after the wire was removed. The first white arrow on the trunk points at this knot in the trunk. And shows how this twisted part looks from the frond side. Than when you follow the trunk line further upward, there is a second white arrow on the trunk pointing at a second full twist in the trunk line! And you have a clear view of how the main branches has grown in circles over decades.
It is such a fun tree to work on. And I cant wait to find a great pot for "Wolfie", but I still have a couple of years time to find that perfect one, so there is no rush!
Cheers,
Hans van Meer.
Hans van Meer.- Member
Re: RESTYLING "WOLFIE" MY MUGO PINE.
![]() Nik Rozman Fri Oct 08, 2010 5:54 pm
Nik Rozman Fri Oct 08, 2010 5:54 pm

Nik Rozman- Member
Re: RESTYLING "WOLFIE" MY MUGO PINE.
![]() Tom Benda Fri Oct 08, 2010 8:41 pm
Tom Benda Fri Oct 08, 2010 8:41 pm
Tom Benda- Member
Re: RESTYLING "WOLFIE" MY MUGO PINE.
![]() bonsapien Sat Oct 09, 2010 3:54 pm
bonsapien Sat Oct 09, 2010 3:54 pm
Tom Kruegl

bonsapien- Member
Re: RESTYLING "WOLFIE" MY MUGO PINE.
![]() Ume Sat Oct 09, 2010 5:16 pm
Ume Sat Oct 09, 2010 5:16 pm
Ume

Ume- Member
Re: RESTYLING "WOLFIE" MY MUGO PINE.
![]() quatrefi Sun Oct 10, 2010 10:58 pm
quatrefi Sun Oct 10, 2010 10:58 pm
Curiously i've got a pinus sylvestris that is quite similar.
https://ibonsaiclub.forumotion.com/bonsai-f1/pinus-sylvestris-t4429.htm
I'm always questionning myself about cuting or not the first branch on the left (in my tree i placed this branch inside the curve of the trunk) i can see that you did finaly cut yours, and that seems good choice !
quatrefi- Member
Restyled "Wolfie" My Mugo Pine Again!
![]() Hans van Meer. Sun Sep 16, 2012 12:32 am
Hans van Meer. Sun Sep 16, 2012 12:32 am
yesterday I felt realy fine and the sun was shinning, so it was the perfect day to rewire and restyle "Wolfie" my old Mugo Pine again. After I applied all the necessary aluminium wire, witch was not that much because most of the main branches stay in place pretty good, I could start to bring all the smaller branches into their desired positions. Two of the main and heavy branches needed some more support, so I placed some small sticks underneed them to help them to stay in place. Than I roughly placed all the branches in the top and the right side of the tree into place. After that was don I could more easily see, how what I had planed to do with the left side of the tree would look! Normally I would do the whole styling of a tree in one go, but I was careful for a good reason! Now that this little tree and it's design has progressed a lot over the last years, I became more and more sure that that straight long Jin that protrudes trough the left side foliage needed to be shortened considerably! I waited this long because, in real live, that Jin gives a lot of visual speed to the already exciting movements of the trunk line! But like I sad, it is to straight and there is not much I can do to change that! So it was time to see just how short it hat to become to fit best in the more refined design?! This is exactly way I dont finish my deadwood sections during the first years of styling! In most cases I like to form the deadwood to compliment the design of the tree, not the other way around! You can always cut it off later, sticking it back on is a lot harder to do!
Below: Before work started.
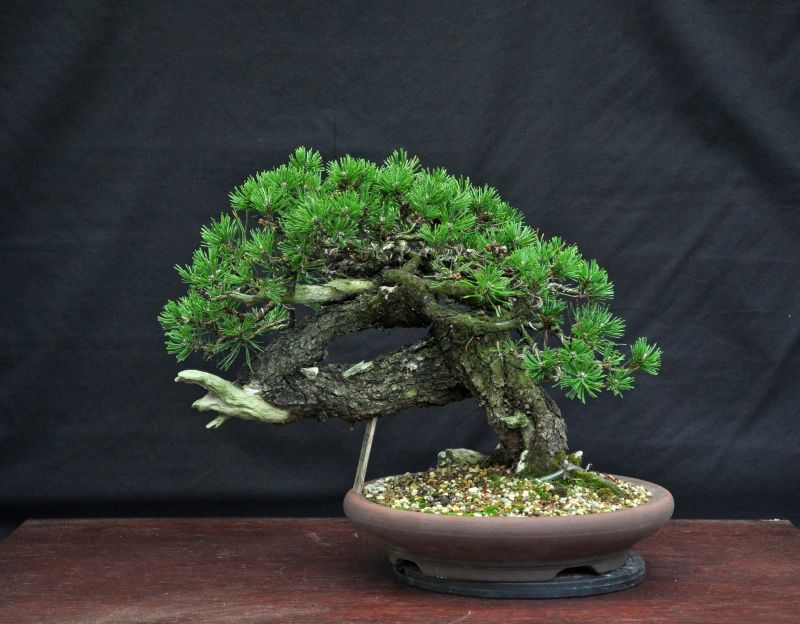
Below: And after.
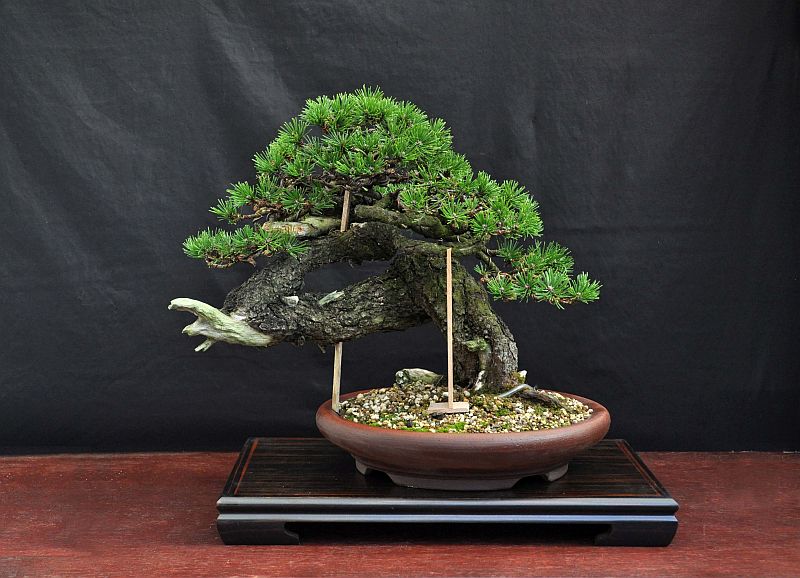
The temporary pot is a Tokaname. Height is 42 cm/ 16,5 inch.
I am realy happy with the way "Wolfie is progressing over the years! I cant wait to see it in a nice pot!
Cheers,
Hans van Meer.
Last edited by Hans van Meer. on Sun Sep 16, 2012 1:20 am; edited 3 times in total (Reason for editing : TYPO!)
Hans van Meer.- Member
Re: RESTYLING "WOLFIE" MY MUGO PINE.
![]() Pavel Slovák Sun Sep 16, 2012 7:26 am
Pavel Slovák Sun Sep 16, 2012 7:26 am
Very beautiful tree and its development. With shorter jin is much better. I love these not simple trees. Super work.
Greetings Pavel
Pavel Slovák- Member
Re: RESTYLING "WOLFIE" MY MUGO PINE.
![]() yamasuri Sun Sep 16, 2012 11:14 am
yamasuri Sun Sep 16, 2012 11:14 am
Very nice progres on branches. I'm so curious to see new repotting. To be honest present pot bothers me a bit [too tiny for such huge trunk

yamasuri- Member
Re: RESTYLING "WOLFIE" MY MUGO PINE.
![]() rolandp Sun Sep 16, 2012 6:18 pm
rolandp Sun Sep 16, 2012 6:18 pm
Your "Wolfie" is progresing realy nice
Cant wait to see the new photos whit the deadwood refinements.
cheers, roland
rolandp- Member
Re: RESTYLING "WOLFIE" MY MUGO PINE.
![]() Hans van Meer. Mon Sep 17, 2012 11:07 am
Hans van Meer. Mon Sep 17, 2012 11:07 am
Pavel Slovák wrote:Hi Hans
Very beautiful tree and its development. With shorter jin is much better. I love these not simple trees. Super work.
Greetings Pavel
Thanks Pavel! I also love the not simple ones! They make you use all your imagination and give you a great sense of joy and fulfilment when it all falls together!
CU soon! Cheers,
Hans van Meer.
Hans van Meer.- Member
Re: RESTYLING "WOLFIE" MY MUGO PINE.
![]() Hans van Meer. Mon Sep 17, 2012 11:25 am
Hans van Meer. Mon Sep 17, 2012 11:25 am
yamasuri wrote:Hans,
Very nice progres on branches. I'm so curious to see new repotting. To be honest present pot bothers me a bit [too tiny for such huge trunk]
Hi Yamasuri,
I am glad you like the progress so far! I know that this pot, even though it is a temporary pot, is not ideal! But I wanted to preserve the excellent root work/preparation that Wolfgang Putz, who collected this tree, had don to get a amazing flat rootbase! I only found out about this when I took the tree out off it's plastic container for the very first time and this pot was at that time the only one I had that was good to safe and further develop the roots! But I am always looking out for that perfect new pot/home were "Wolfie" eventually will be planted and grow old in! But thats for the future!
Cheers,
Hans van Meer.
Hans van Meer.- Member
Re: RESTYLING "WOLFIE" MY MUGO PINE.
![]() Hans van Meer. Mon Sep 17, 2012 11:26 am
Hans van Meer. Mon Sep 17, 2012 11:26 am
rolandp wrote:Hi Hans.
Your "Wolfie" is progresing realy nice
Cant wait to see the new photos whit the deadwood refinements.
cheers, roland
Hi Roland,
how good to hear from you my friend! I am glad you like it so far!
Cheers,
Hans van Meer.
Hans van Meer.- Member
Page 1 of 2 • 1, 2
» RESTYLING MY MUGO NAMED "Z".
» Pinus mugo (han-kengai) - restyling
» Scots Pine Restyling
» RESTYLING MY SMALL "P. PINE".
|
|
|